

A belt sander is one of the most powerful material-removal tools you can add to your workshop. Whether you are flattening rough lumber, stripping old paint from hardwood floors, rounding over sharp edges, or smoothing welds on metal, the right belt sander makes the job faster and cleaner than any other abrasive tool. The problem is that belt sanders range from compact corded handheld models to heavy benchtop combination machines, and picking the wrong one means either underpowered frustration or a machine too aggressive for delicate finishing work.
Our team at HomeThru independently researched, compared, and evaluated dozens of models from brands including Makita, DeWalt, WEN, SKIL, Metabo HPT, and BUCKTOOL to narrow the list down to the 11 best belt sanders available today. We analyzed motor amperage, belt speed ranges, belt dimensions, dust collection efficiency, ergonomics, and real-world user feedback from thousands of verified buyers. Whether you are a weekend DIYer refinishing a deck or a woodworker who runs a sander for hours at a stretch, there is a pick on this list for you. If you rely on other abrasive tools alongside your sander, our coverage of random orbital sanders and oscillating multi tools rounds out a complete finishing toolkit.
Top Belt Sanders We Recommend

Pros
- Powerful motor handles demanding woodworking tasks without bogging down or stalling
- Variable speed control adapts to different materials, allowing finer control on delicate surfaces and aggressive work on rough stock
- Excellent dust collection keeps your shop cleaner and reduces cleanup time after sanding
- Clear visibility window helps you see exactly where you're sanding, preventing accidental over-sanding
- Robust 5-year warranty reflects manufacturer confidence in durability and longevity
Cons
- No customer reviews currently available to assess real-world long-term durability and user experiences
- Belt sanders of this size and power require proper technique and experience to avoid gouging or creating uneven surfaces
The Metabo HPT SB8V2 stands out as a serious workhorse for woodworking enthusiasts and professional craftspeople. With its 1,020-watt motor and variable speed control, this belt sander adapts to different materials and project requirements. Whether you're flattening rough lumber, removing old finishes, or preparing wood for staining, the adjustable speed dial lets you dial in the right performance without sacrificing control or risking damage to your workpiece.
Dust management is a genuine strength of this model. The left-side mounted dust collection bag not only keeps your shop cleaner but also improves visibility and access when sanding corners and edges. The clear front cover adds another layer of visibility, letting you see your work in progress and adjust your technique in real time. The flush surface design means you can sand right up to edges without the sander rocking or creating divots.
Built with a soft-grip handle and backed by a professional 5-year limited warranty, the SB8V2 is engineered for durability and user comfort during extended sessions. This is the kind of tool that rewards proper technique and careful maintenance, making it an excellent investment for anyone serious about woodworking or home improvement projects.
| Specification | Details |
|---|---|
| Model | SB8V2 |
| Motor Power | 9.0 Amp, 1,020 Watts |
| Sanding Belt Size | 3 x 21 Inches |
| Speed Control | Variable Speed Dial |
| Speed Range | 400-1,020 Feet Per Minute |
| Handle Type | Soft Grip |
| Dust Collection | Left-Side Mounted Bag |
| Front Cover | Clear for Improved Visibility |
| Design Feature | Flush Surface for Even Sanding |
| Warranty | 5-Year Limited (Professional Grade) |
| Included Accessories | Sanding Belt, Dust Bag |
Setup and Preparation: Before plugging in, ensure your work surface is secure and stable. Install the sanding belt by opening the belt tension lever, sliding the belt onto the rollers, and locking it back down. Attach the dust collection bag to the left-side port. Always wear safety glasses and a dust mask when operating.
Operating Technique: Start with the variable speed dial set to a moderate setting and increase as needed for your material. Move the sander smoothly along the grain direction, applying light to medium pressure. Never force the sander or hold it in one spot. Let the machine do the work. For best results, overlap each pass slightly and maintain a steady, even pace.
Speed Selection: Use lower speeds (400-600 FPM) for delicate work, final finishing, and softer woods. Use higher speeds (800-1,020 FPM) for aggressive material removal on hardwoods and paint stripping. Always test on scrap wood first to evaluate the results before committing to your project piece.
Personal Protective Equipment: Always wear ANSI-approved safety glasses to protect against dust and debris. Use a properly fitted dust mask or respirator, especially during extended sanding sessions. Wear hearing protection if sanding for extended periods. Avoid loose clothing or jewelry that could get caught in the moving belt.
Machine Safety: Keep both hands on the soft-grip handle at all times during operation. Never reach under or near the sanding belt while the machine is running. Ensure the belt is properly tensioned and centered before starting. Inspect the belt for tears or damage before each use. Keep the work area well-lit so you can see clearly.
Electrical and Maintenance: Always unplug the sander before changing belts, cleaning, or performing maintenance. Use a properly grounded outlet or extension cord rated for the tool's amperage. Empty the dust bag regularly to maintain suction and prevent dust buildup. Store the sander in a dry location and check the power cord for damage before each use.
Material-Specific Techniques: For hardwoods like oak or maple, start with medium speed and gradually increase if the sander isn't removing material efficiently. For softer woods like pine, use lower speeds to avoid creating tearout or surface damage. When removing old paint or finishes, start with a coarse belt and progressively move to finer grits for a smooth final surface. Always sand with the grain to minimize visible scratches.
Achieving Professional Results: Let the sander's weight do most of the work rather than pressing hard. A light touch with steady motion produces better results than aggressive pressure. For large flat surfaces, work in overlapping passes to ensure even coverage. Empty the dust bag frequently to maintain consistent suction, which helps the sander sit flat and stable on your work. Keep the front cover clean so you can see your work clearly throughout the project.
Maintenance and Longevity: Keep spare sanding belts on hand in various grits so you always have the right tool ready. After each use, run the sander briefly over a scrap of wood to help clear dust from the mechanism. Store belts flat in a dry place to prevent warping. Check that the belt tracking is centered occasionally during use. Proper maintenance extends the life of your machine and ensures consistent performance across multiple projects.
Pros
- Extremely lightweight at 6 pounds, making it comfortable for overhead and vertical sanding
- Lock-in trigger feature reduces hand strain during longer projects
- Effective dust collection with included bag keeps work area cleaner
- Compact footprint ideal for smaller workshops and detail work
- Solid warranty coverage with accessible nationwide support
Cons
- Limited power compared to heavier-duty models may require multiple passes on hardwoods
- No user reviews available to validate long-term durability and real-world performance
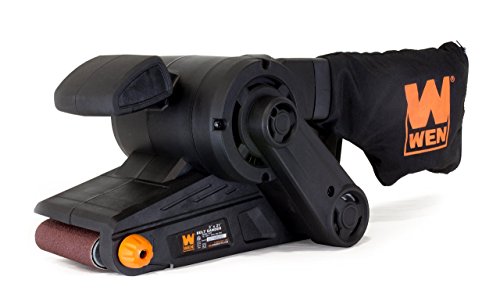
The WEN 6321 belt sander stands out as a practical choice for homeowners and casual DIYers who need reliable sanding power without the bulk of professional-grade equipment. At just 6 pounds, this corded sander is noticeably lighter than comparable models, making it accessible for extended use and reducing the physical strain that often comes with power tool work. The 7-amp motor generates enough speed to handle typical woodworking tasks, from smoothing rough lumber to preparing surfaces for finishing.
The lock-in trigger mechanism is a thoughtful feature that sets this sander apart for user comfort. Rather than gripping the trigger continuously, you can lock it in place once activated, which significantly reduces hand fatigue during longer sanding sessions. Combined with the compact 3-inch by 21-inch sanding surface, this design makes the tool feel more controlled and manageable, especially for detail work or sanding edges and corners where precision matters.
Dust management is handled adequately through the included detachable dust bag, which captures a meaningful amount of sawdust and helps keep your work area cleaner. The two-year warranty and nationwide technician network provide solid backing, though the lack of user feedback means potential buyers should approach this as an entry-level investment rather than a long-term workhorse for heavy professional use.
| Specification | Detail |
|---|---|
| Brand | WEN |
| Model | 6321 |
| Motor | 7 Amp |
| Belt Speed | Over 13 feet per second |
| Sanding Surface | 3 inches x 21 inches |
| Weight | 6 pounds |
| Power Type | Corded Electric |
| Dust Collection | Detachable dust bag included |
| Safety Features | Lock-in trigger for continuous operation |
| Warranty | 2 years |
| Support | Nationwide technician network |
Setup: Connect your WEN 6321 to a grounded outlet using a properly rated extension cord if needed. Attach the dust bag securely to the collection port before operation. Install the appropriate grit sandpaper belt for your project, ensuring it tracks straight and runs smoothly before beginning work.
Operation: Place the sander flat on your workpiece and activate the trigger. Once the belt reaches full speed, you can engage the lock-in feature to maintain continuous operation without constant trigger pressure. Move the sander slowly and evenly across the surface, allowing the belt to do the work rather than forcing it. Avoid pressing down hard, as this can slow the belt and create uneven results.
Best Practices: Work with the grain when possible to minimize splintering. Check your dust bag frequently and empty it to maintain suction and motor efficiency. Always allow the belt to come to a complete stop before setting the sander down or changing sandpaper. Wear safety glasses and a dust mask for protection, and keep the power cord clear of the sanding area.
Before You Start: Inspect the power cord for damage and ensure the outlet is properly grounded. Read the manufacturer's instructions thoroughly. Wear appropriate personal protective equipment including safety glasses, a dust mask or respirator, and hearing protection. Tie back long hair and avoid loose clothing that could catch on the moving belt.
During Operation: Always keep both hands on the sander when actively sanding. Use the lock-in trigger feature responsibly and never leave the running sander unattended. Maintain firm control and steady pressure, allowing the tool to move at its own pace. Be aware of the moving belt and keep fingers and loose materials away from all moving parts.
After Use: Allow the belt to come to a complete stop before setting the tool down or making adjustments. Unplug the sander before changing sandpaper, emptying the dust bag, or performing any maintenance. Store the tool in a clean, dry location away from moisture and extreme temperatures. Check the power cord regularly for wear and replace if damaged.
Belt Selection and Maintenance: Stock several grit options for different phases of your project. Start with coarser grits (60-80) for heavy material removal, transition to medium grits (100-150) for smoothing, and finish with fine grits (180-220) for final prep. Replace belts when they become worn or glazed to maintain consistent performance. Keep spare belts on hand to minimize project interruptions.
Technique and Workflow: Let the sander's weight and motor speed do the work rather than applying excessive downward pressure. Move the sander in overlapping passes to ensure even sanding coverage and avoid creating low spots or uneven surfaces. For best results on hardwoods, make multiple lighter passes rather than trying to remove too much material at once. Always sand with the grain to achieve the smoothest finish.
Dust Management and Workspace: Empty the dust bag frequently to maintain optimal suction and motor performance. Position your sander near a shop vacuum if possible for even better dust capture. Keep your work surface clean and free of debris that could interfere with the sanding process. In a home workshop, consider working in a well-ventilated area or outdoors when possible to reduce dust accumulation.

Pros
- Brushless motor delivers professional-grade power without the cord limitations
- Large 3-inch by 18-inch sanding surface accelerates project completion
- Variable speed control with 25 settings lets you optimize for different materials and finishes
- Excellent dust collection system keeps your workspace cleaner and healthier
- Overmolded auxiliary handle reduces fatigue during extended sanding sessions
Cons
- Battery and charger sold separately, adding to overall project cost
- No customer reviews available yet, so real-world performance feedback is limited
The DEWALT 20V MAX DCW220B cordless belt sander brings serious power to your workshop without being tethered to an outlet. The brushless motor delivers 22% more power than comparable corded alternatives, while the large 3-inch by 18-inch sanding surface covers more ground faster than smaller competitors. Whether you're refinishing a deck, restoring furniture, or prepping floors for new finishes, this sander handles demanding applications with the efficiency and runtime that brushless technology provides.
Control is where this sander really shines. The variable speed trigger features a 25-speed selection dial, giving you precise speed adjustment for everything from delicate veneer work to aggressive stock removal. The quick-release tool-free belt change system keeps you working instead of fumbling with tools, and the dual-handle design with an overmolded auxiliary grip lets you maintain comfortable two-handed control even during long sessions. For those concerned about workspace cleanliness, the airlock-compatible dust collection system achieves up to 95% efficiency when paired with a compatible extractor.
The wireless tool control feature integrates seamlessly with compatible DEWALT vacuums and dust extractors, streamlining your dust management setup. As a 20V MAX XR tool, the DCW220B is part of DEWALT's broader ecosystem, meaning you can share batteries across multiple tools if you already own compatible equipment. Keep in mind that batteries and charger are sold separately, so factor those into your budget when evaluating the total investment.
| Brand | DEWALT |
| Model Number | DCW220B |
| Power System | 20V MAX Lithium-Ion Cordless |
| Motor Type | Brushless |
| Sanding Surface | 3 inches x 18 inches |
| Speed Settings | Variable Speed (25 selections) |
| Belt Change System | Quick-Release Tool-Free |
| Dust Collection Efficiency | Up to 95% |
| Dust Collection Compatible | DEWALT Airlock (sold separately) |
| Handle Type | Dual-Handle with Overmolded Auxiliary |
| Wireless Control | Compatible with DEWALT Vacuums and Dust Extractors |
| Configuration | Tool Only (Battery and Charger Not Included) |
Getting Started: Insert a compatible 20V MAX battery into the tool and ensure it's fully charged. Attach the sanding belt using the quick-release system, making sure it's centered and properly tensioned. Connect a compatible dust collection system to the airlock port for optimal dust capture.
Operating the Sander: Use the variable speed dial to select your desired speed setting based on your material and application. For delicate finishes, start with lower speeds; for aggressive stock removal, use higher settings. Always use both handles for stable, controlled sanding. Keep the sander moving in smooth, even strokes to avoid gouging or uneven surfaces.
Belt Changes: Allow the sander to come to a complete stop before changing belts. The tool-free quick-release system lets you swap belts in seconds without additional tools. Ensure the new belt is properly seated in the guides before resuming work.
Maintenance: Regularly check the sanding belt for wear and replace when necessary. Empty the dust collection bag frequently to maintain suction efficiency. Inspect the motor vents to ensure they remain clear of dust buildup.
Before You Start: Always wear appropriate personal protective equipment, including eye protection and a dust mask or respirator. Tie back long hair and remove loose clothing that could get caught in the moving belt. Read the full instruction manual before your first use.
During Operation: Keep both hands on the auxiliary handles at all times for maximum control and stability. Never reach under or near the sanding belt while the tool is running. Maintain firm footing and a stable stance to prevent loss of control. Keep the power cord (if using an extension cord) away from the sanding area.
Battery Safety: Use only authentic DEWALT 20V MAX batteries and chargers. Never operate the tool if the battery is damaged or leaking. Store batteries in a cool, dry location away from metal objects that could cause a short circuit.
Dust Management: Use the dust collection system whenever possible to minimize airborne dust exposure. Even with dust collection, wear a respirator rated for fine sanding dust. Never blow away dust with compressed air, as this creates a health hazard.
Speed Selection: Match your speed to the material and grit. Softer woods and finer grits typically work better at lower speeds to prevent burning or clogging. Harder woods and aggressive stock removal benefit from higher speeds. Experiment on scrap material first to dial in the perfect setting for your project.
Sanding Technique: Always sand with the grain when possible to minimize visible scratches. Let the weight of the sander do the work; don't press down hard, as this can cause uneven surfaces and premature belt wear. Use overlapping strokes and keep the sander moving to avoid creating low spots.
Belt Longevity: Clogged sanding belts reduce efficiency and heat up the tool. Use a belt cleaning stick periodically during long sessions to extend belt life. Keep spare belts on hand in various grits so you can quickly switch between tasks without waiting for new belts to arrive.
Dust Collection Optimization: Pair this sander with a DEWALT shop vacuum for maximum dust capture. Position the dust collection port to face downward or to the side depending on your vacuum setup. A cleaner workspace means better visibility and a healthier work environment.

Pros
- Exceptional speed and power for aggressive stock removal
- Sealed motor design significantly reduces maintenance and downtime
- Innovative nose and side sanding design for hard-to-reach areas
- Comfortable grip positioning minimizes user fatigue
- Quiet operation at 84dB compared to many competitor models
Cons
- Corded design limits mobility and requires nearby outlet access
- Heavy-duty performance makes it less suitable for delicate detail work or small projects
The Makita 9403 stands out as a workhorse belt sander for homeowners and DIYers who need to tackle large surface areas efficiently. With a belt speed of 1,640 feet per minute and a 4-inch sanding width, this sander removes material quickly, making it particularly valuable for refinishing decks, sanding floors, or preparing rough lumber. The corded electric design delivers consistent, uninterrupted power throughout your project without battery management concerns.
What truly sets this model apart is its thoughtful engineering for real-world use. The labyrinth construction actively seals the motor and bearings from dust and debris, which directly translates to longer tool life and fewer repair visits. Operating at just 84 decibels, it's noticeably quieter than comparable sanders, reducing operator fatigue during extended sessions. The large front grip is positioned specifically for comfort, and the innovative design allows you to sand flush against walls and into corners where traditional sanders fall short.
This is a tool built for serious work. If your projects involve substantial sanding tasks and you value durability and efficiency, the Makita 9403 delivers professional-grade performance. Keep in mind it's a corded model, so you'll need to plan around outlet access, and its power is geared toward aggressive material removal rather than fine detail work.
| Specification | Details |
|---|---|
| Brand | Makita |
| Model | 9403 |
| Belt Width | 4 inches |
| Belt Length | 24 inches |
| Belt Speed | 1,640 feet per minute |
| Motor Type | Corded Electric |
| Noise Level | 84 dB |
| Motor Protection | Labyrinth construction sealing |
| Key Features | Flush-sanding capability, ergonomic front grip, dust-sealed motor |
| Color | Teal |
Setup and Preparation: Before starting, ensure your work surface is secure and stable. Install the appropriate grit belt for your project (coarser grits for material removal, finer grits for finishing). Check that the belt is properly tensioned and tracking straight. Always wear safety glasses and a dust mask, and use hearing protection given the tool's power.
Operating Technique: Start the sander before it contacts the work surface. Apply gentle, even pressure moving the sander in the direction of the wood grain when possible. Avoid staying in one spot too long, as this can create divots. The sander's design allows you to use the nose and sides for flush sanding against walls and into corners. Keep the sander moving smoothly across the surface for even results.
Finishing: Turn off the sander and let it come to a complete stop before setting it down. Empty the dust collection bag regularly to maintain airflow and motor efficiency. After use, inspect the belt for wear and replace if necessary. Store the sander in a dry location away from moisture.
Personal Protective Equipment: Always wear safety glasses to protect from flying debris. Use a dust mask or respirator to prevent inhalation of fine dust particles. Hearing protection is essential, especially during extended use. Wear fitted clothing and tie back long hair to prevent entanglement with the moving belt.
Safe Operation: Never reach under or near the sanding belt while the tool is running. Keep the power cord away from the sanding surface and your work area. Always start the sander before it contacts the work surface, and allow it to reach full speed before beginning. Never force the sander or apply excessive pressure, as this can cause loss of control. Keep both hands on the tool at all times during operation.
Workspace and Maintenance: Ensure your work area is well-lit and free of tripping hazards. Keep bystanders and children away from the work area. Regularly inspect the power cord for damage and replace if necessary. Allow the tool to cool before storage, and keep it away from moisture and extreme temperatures. Never operate the sander on wet or damp materials.
Is This Sander Right for You? The Makita 9403 is ideal if you're planning substantial sanding projects like refinishing decks, sanding floors, or preparing large wood surfaces. It's built for homeowners and DIYers who value speed and durability over portability. If your projects are primarily small-scale or detail-oriented, a smaller orbital or detail sander might be more practical.
Key Considerations: This is a corded model, so plan your workspace around outlet access or use an appropriately rated extension cord. The tool's weight and power make it best suited for horizontal surfaces or walls rather than overhead work. Consider your dust collection setup, as this sander produces significant dust. If you're new to belt sanding, practice on scrap material first to develop a feel for the tool's speed and pressure requirements.
Long-Term Value: Makita's reputation for durability means this sander should serve you reliably for years with proper maintenance. The sealed motor design reduces service needs compared to unsealed competitors. Budget for replacement belts in various grits, as you'll wear through them depending on your project frequency. This is an investment in a tool that will likely outlast cheaper alternatives.
Pros
- Dual functionality saves money and workshop space compared to buying two machines
- Heavy cast iron base minimizes vibration and chatter during operation
- Tilting belt mechanism adds flexibility for edge work and angled surfaces
- Simple tension lever design makes sandpaper changes quick and intuitive
Cons
- Limited online user feedback makes it harder to assess long-term durability and real-world performance
- 6-inch disc size is smaller than industrial models, reducing efficiency on large, flat surfaces
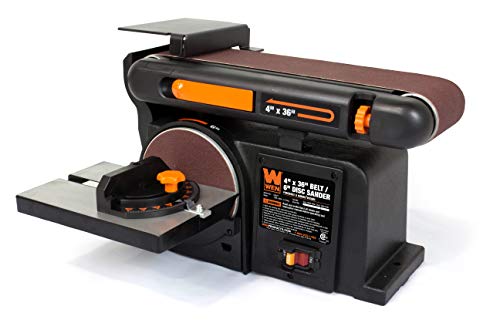
The WEN 6502T addresses a common DIY dilemma: you want both belt and disc sanding capability without dedicating half your workshop to stationary tools. This benchtop model delivers both in a compact footprint, making it a practical choice for homeowners with limited space. The 4x36-inch belt and 6-inch disc give you enough sanding surface for most woodworking tasks, from smoothing edges to flattening panels.
What sets this sander apart is its cast iron base, which is heavier than plastic alternatives and noticeably reduces vibration during operation. This stability matters because less vibration means better control, fewer chatter marks on your workpiece, and less fatigue during extended sanding sessions. The 4.3-amp motor runs at up to 3600 RPM, delivering enough power to handle hardwoods, softwoods, and composite materials without bogging down. The adjustable belt angle, ranging from 0 to 90 degrees, adds versatility for sanding edges, bevels, and contoured surfaces.
The tension release lever is a thoughtful design touch that makes changing sandpaper grits straightforward and quick. For a benchtop machine at this price point, the WEN 6502T represents solid value for DIYers and hobbyists who want reliable dual-purpose sanding without premium pricing. Keep in mind that the 6-inch disc is modest compared to industrial-grade machines, so large, flat surfaces may require more time to complete.
| Specification | Details |
|---|---|
| Model Number | 6502T |
| Brand | WEN |
| Belt Size | 4 x 36 inches |
| Disc Size | 6 inches |
| Motor | 4.3 Amp |
| Maximum Speed | 3600 RPM |
| Belt Angle Range | 0 to 90 degrees |
| Base Material | Cast Iron |
| Type | Benchtop Two-in-One Sander |
| Key Features | Tension Release Lever, Vibration-Reducing Base |
Getting Started: Secure the sander to a sturdy workbench using the pre-drilled mounting holes. Ensure adequate clearance around the machine for safe operation and dust collection.
Belt Sanding: Loosen the tension release lever, slide sandpaper onto the belt, and retighten. Adjust the belt angle using the tilt mechanism based on your workpiece. Start the motor, allow it to reach full speed, and feed your work against the belt with light, even pressure. Move the workpiece side to side to avoid creating grooves.
Disc Sanding: Replace the belt with sandpaper on the 6-inch disc using the quick-change system. Always sand on the lower half of the disc where it moves downward into the workpiece. Feed material slowly and steadily to prevent chattering and ensure even sanding.
Maintenance: Clean out sawdust regularly using a brush or shop vacuum. Check belt tension before each use and replace sandpaper when it becomes worn or clogged.
Before Operation: Always wear safety glasses to protect against flying debris. Use a dust mask or connect a shop vacuum to minimize inhalation of fine sawdust. Tie back long hair and avoid loose clothing that could get caught in moving parts.
During Sanding: Never reach toward the sanding surface while the machine is running. Keep hands and fingers at least 2 inches away from the belt and disc. Feed material slowly and maintain firm control to prevent sudden binding or kickback. Allow the motor to reach full speed before beginning work.
After Use: Turn off the machine and wait for all motion to stop completely before removing your workpiece. Never attempt to stop the belt or disc with your hands. Regularly inspect the machine for loose bolts, worn belts, or damage before each use.
Is This Sander Right for You? The WEN 6502T works best for DIYers, woodworkers, and hobbyists who want versatile sanding capability in a compact machine. If you have limited workshop space, need both belt and disc sanding, and prefer affordability over industrial-grade features, this is a solid choice.
Project Types: This sander excels at smoothing edges, flattening panels, sanding curves, and preparing wood for finishing. It handles hardwoods, softwoods, plywood, and composites well. However, for high-volume production work or extremely large surfaces, a dedicated industrial sander may be more efficient.
What to Expect: Expect smooth, vibration-free operation thanks to the cast iron base. The machine is relatively quiet compared to larger industrial models. Plan for a learning curve if you're new to stationary sanders, but the straightforward design makes it easy to master. Pair it with a dust collection system or shop vacuum to keep your workspace clean and protect your lungs.

Pros
- Pressure control system prevents over-sanding and user damage, making it forgiving for beginners
- Automatic belt tracking saves time and frustration by eliminating manual alignment adjustments
- Dual dust management with micro-filtration and vacuum compatibility keeps your shop cleaner
- Flush edge design maximizes sanding area, reducing passes needed on edges and corners
- 6-amp motor provides enough power for hardwoods and painted surfaces without bogging down
Cons
- No customer reviews available at launch, so real-world durability and long-term reliability remain unproven in user hands
- 3x18-inch belt is smaller than industrial models, making large flat surface work slower and more labor-intensive
The Skil 6 Amp belt sander strikes a practical balance between affordability and capability for homeowners tackling wood refinishing, deck prep, and furniture restoration. The standout feature here is the pressure control technology, which actively monitors how hard you're pushing and warns you before excessive force damages your workpiece or prematurely wears the belt. This is genuinely useful for less experienced users who might otherwise sand through stain or veneer.
Dust management is handled through a combination of micro-filtration built into the sander and a standard vacuum port that accepts most shop vacuums. The auto track belt alignment system keeps the sanding belt centered without manual tweaking, which reduces setup time and frustration between projects. The 3x18-inch belt size is compact enough for detail work and edge sanding, and the flush edge design lets you sand right up to borders and corners where larger sanders can't reach.
The 6-amp motor delivers adequate power for most wood types and painted surfaces, though this sander is best suited for medium-duty work rather than heavy industrial grinding. The vacuum compatibility and dust capture system make it a cleaner option for indoor use or attached garages. For DIYers and homeowners who prioritize ease of use and dust control over raw speed, this is a capable and thoughtfully designed choice.
| Specification | Details |
|---|---|
| Motor Power | 6.0 Amperes |
| Belt Size | 3 inches x 18 inches |
| Sanding Surface | Flush edge design |
| Belt Alignment | Automatic tracking |
| Dust Management | Micro-filtration system |
| Vacuum Compatibility | Standard 1.25-inch hose |
| Pressure Control | Yes, with warning system |
| Model Number | 7510-01 |
Setup: Ensure the belt is properly aligned using the auto track system. Check that your vacuum hose is securely connected to the 1.25-inch port. Plug in the sander and do a brief test run to confirm smooth operation before starting your project.
Sanding Technique: Let the belt do the work. Move the sander in the direction of the wood grain using light to moderate pressure. The pressure control system will alert you if you're pushing too hard. For edge work, use the flush edge design to sand right up to borders and corners. Make multiple light passes rather than one heavy pass for best results.
Dust Control: Keep the vacuum running throughout your work. Check and empty the micro-filtration system regularly to maintain suction and prevent dust buildup. Always wear a dust mask as a secondary precaution, even with vacuum collection running.
Personal Protection: Always wear safety glasses, a dust mask or respirator, and hearing protection when operating this sander. Avoid loose clothing or jewelry that could get caught in the moving belt.
Workspace Safety: Secure your workpiece firmly before sanding. Keep your hands clear of the sanding belt at all times, and never reach underneath or around the sander while it's running. Ensure adequate lighting and ventilation in your work area.
Equipment Care: Allow the sander to come to a complete stop before setting it down or adjusting the belt. Regularly inspect the belt for damage or wear, and replace it if you notice fraying or uneven sanding. Keep the power cord away from the sanding surface and out of high-traffic areas to prevent tripping.
Belt Selection: Keep a variety of grit belts on hand, from 60-grit for heavy material removal to 150-grit for final finishing. Matching the right grit to your task speeds up your work and improves surface quality.
Pressure Control Advantage: Use the pressure warning as a learning tool. Light, consistent pressure produces better results than heavy pressure. Let the motor's power do the work, and you'll achieve smoother finishes and longer belt life.
Edge Mastery: The flush edge design is perfect for sanding right up to trim and molding. Practice on scrap wood first to get a feel for the edge sanding technique, which differs slightly from flat surface work.
Dust Management: Connect to your shop vacuum for better dust capture and cleaner air. Check the micro-filtration system before each project to ensure peak suction and efficiency throughout your work.
Pros
- Angle adjustment up to 55 degrees opens up detail work and contour sanding possibilities
- Auto-tracking belt saves frustration and keeps you sanding instead of troubleshooting
- Variable speed dial gives you control over aggression and finish quality
- Tool-free belt changes keep workflow smooth during longer projects
- Includes everything needed to start sanding right out of the box
Cons
- No user reviews available online, so real-world durability and long-term reliability remain unconfirmed
- Limited to 1/2-by-18-inch belt size, which may feel small for larger flat-surface projects
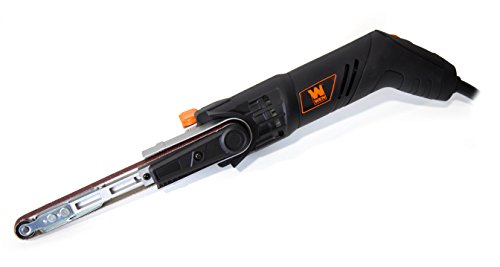
The WEN 6307 is purpose-built for detail and contour work that standard belt sanders struggle with. Its 55-degree pivot range and compact footprint make it valuable for DIYers working on curved furniture edges, moldings, and intricate surfaces where precision matters. The variable speed dial gives you meaningful control, allowing you to dial down to 1080 FPM for delicate finishing work or crank up to 1800 FPM when you need aggressive material removal.
What sets this sander apart is its no-fuss design. The auto-tracking belt system eliminates the frustration of manual tensioning and alignment adjustments that plague many budget sanders. Tool-free belt installation means you can swap grits quickly without hunting for wrenches, keeping your momentum going during longer projects. The included dust port attachment helps manage sawdust, and you get three abrasive belts to start working immediately.
This is a solid choice for homeowners and serious DIYers who need a specialized sander for detail work rather than a general-purpose machine. The two-year warranty backs the build quality, and the thoughtful feature set suggests WEN understands what users actually encounter in the workshop. However, the 1/2-by-18-inch belt size keeps it in the detail category, so it won't replace a larger sander for flat surface work.
| Brand | WEN |
| Model | 6307 |
| Type | Variable Speed Detailing Belt Sander |
| Belt Size | 1/2 inch by 18 inches |
| Speed Range | 1080 to 1800 feet per minute |
| Speed Control | Variable speed dial |
| Pivot Range | Up to 55 degrees |
| Belt Tracking | Automatic (no manual tensioning) |
| Belt Installation | Tool-free design |
| Included Accessories | Three abrasive sanding belts, dust port attachment |
| Warranty | Two years |
Getting Started: Unpack the sander and familiarize yourself with the speed dial and pivot lever. Install one of the three included belts by lifting the belt cover and sliding it onto the rollers. No tools needed. Attach the dust port to keep your workspace cleaner.
Basic Technique: Plug in the unit and set your desired speed using the variable dial. For delicate finishes, start at 1080 FPM; for material removal, move toward 1800 FPM. Let the belt do the work. Hold the sander firmly and move it along the grain or contour. Use the pivot function by adjusting the angle lever to reach curved edges and detailed surfaces up to 55 degrees.
Belt Changes: When a belt wears out, simply lift the belt cover and slide the old belt off. No tensioning adjustments needed thanks to the auto-tracking system. Slide the new belt on and you're ready to sand again. Keep spare belts on hand to maintain workflow.
Speed Selection: Match your speed to your material and goal. Softwoods and paint removal tolerate higher speeds (1600-1800 FPM), while hardwoods and final finishes benefit from lower speeds (1080-1400 FPM) to reduce burn marks and tearout.
Angle Advantage: The 55-degree pivot isn't just a nice-to-have. Use it strategically on chair legs, table edges, and moldings where a flat sander leaves ridges. The angle lets you sand perpendicular to the surface for smoother results.
Dust Management: Connect the dust port to a shop vacuum or dust collector. This keeps your workspace cleaner and helps the sander breathe, extending motor life. A clogged dust system forces the motor to work harder.
Belt Longevity: Avoid sanding metal or other materials that dull belts quickly unless absolutely necessary. Keep belts dry and store them flat. Worn belts reduce speed and increase heat, so rotate them out when performance drops.
Before You Start: Always unplug the sander before installing or changing belts. Wear safety glasses to protect against dust and debris. Use a dust mask or respirator, especially when sanding painted surfaces or exotic woods that produce fine particles.
During Operation: Keep hands clear of the moving belt at all times. Never reach under or over the sander while it's running. Secure your workpiece so it won't shift unexpectedly. Let the belt reach full speed before making contact with the work surface.
Proper Grip: Hold the sander with both hands and maintain firm control. The variable speed dial means the sander can behave differently at different speeds, so stay alert. Never force the sander into the work. Let the belt speed do the job.
Workspace Safety: Keep the work area well-lit and clear of clutter. Ensure the power cord won't snag or get pinched. If you're sanding in an enclosed space, use adequate ventilation. After use, allow the belt to stop completely before setting the sander down.

Pros
- Auto-tracking belt system saves time and frustration by eliminating constant readjustment
- Variable speed control gives you flexibility to sand delicate finishes or aggressive material removal
- Quiet operation at 85dB makes extended use more comfortable in residential settings
- Flush-sanding capability reaches edges and corners other sanders can't access
- Durable build quality reflects Makita's reputation for reliable power tools
Cons
- Heavy-duty performance comes with significant weight, which can cause arm fatigue on overhead or vertical surfaces
- No customer reviews available to provide real-world insight into long-term durability or common issues
The Makita 9903 is a full-size belt sander designed for homeowners and professionals tackling large sanding projects. With an 8.8-amp motor and a 3" x 21" belt, this machine covers ground quickly on decks, hardwood floors, and furniture refinishing work. The variable speed dial lets you dial in anywhere from 690 to 1,440 feet per minute, giving you control over how aggressively the sander removes material. This flexibility is especially valuable when moving between rough wood that needs heavy stock removal and finished surfaces that demand a gentler touch.
One of the standout features is the auto-tracking belt system, which automatically keeps the sanding belt centered during operation. This eliminates the frustration of manual adjustments mid-project and helps ensure even, consistent results across your work surface. The innovative design also allows you to sand flush to walls and into corners using both the nose and side of the sander, a capability that sets it apart from many competitors in this category.
Comfort and practicality matter on longer jobs, and the Makita 9903 delivers on both fronts. The front grip design distributes weight more evenly and reduces hand strain during extended use. Operating at just 85dB also makes it one of the quieter options in its class, which is a genuine advantage if you're working in or near residential areas. This combination of power, control, and thoughtful design makes the Makita 9903 a solid choice for anyone serious about sanding work.
| Specification | Details |
|---|---|
| Motor | 8.8 AMP |
| Sanding Belt Size | 3" x 21" |
| Variable Speed Range | 690 - 1,440 ft./min. |
| Speed Control | Variable speed dial |
| Belt Tracking | Auto-tracking system |
| Noise Level | 85 dB |
| Design Features | Flush-sanding nose and side, ergonomic front grip |
Setup and Safety: Before plugging in, ensure the work surface is secure and stable. Attach the appropriate sanding belt for your material and grit level. Check that the belt tracks properly using the auto-tracking system. Always wear safety glasses, a dust mask, and hearing protection.
Speed Selection: Start with a lower speed (690-800 ft./min.) for fine finishing work and delicate surfaces. Use higher speeds (1,200-1,440 ft./min.) for aggressive stock removal on rough wood. Adjust the speed dial based on the material and desired finish.
Sanding Technique: Move the sander with the grain whenever possible to avoid cross-grain scratches. Keep the sander flat and moving to prevent gouging. Use the flush-sanding nose for edges and the side for flat surfaces. Let the tool do the work without excessive downward pressure.
Personal Protection: Always wear ANSI-approved safety glasses to protect against dust and debris. Use a properly fitted dust mask or respirator, especially when sanding finishes like paint or stain. Hearing protection is essential given the noise level, even at 85dB.
Machine Operation: Keep long hair and loose clothing away from the sanding belt. Never reach under or near the belt while the machine is running. Secure your workpiece firmly to prevent movement or binding. Allow the belt to reach full speed before contacting the work surface.
Dust and Electrical: Connect the sander to a dust collection system or use it in a well-ventilated area to manage fine dust particles. Inspect the power cord regularly for damage. Keep the work area clear of tripping hazards and maintain proper footing while operating.
Material Progression: Start with a coarser grit (60-80) for initial stock removal, then progress to medium (100-120) and fine (150-220) grits for finishing. This approach saves time and produces a smoother final surface than jumping straight to fine grits.
Speed Matching: Softer woods and finishes benefit from lower speeds to prevent burning or tearout. Hardwoods and painted surfaces often require higher speeds for efficient removal. Experiment on scrap material first to dial in the right speed for your specific project.
Edge Work: The flush-sanding design is perfect for refinishing deck edges and hardwood floor perimeters. Work slowly along edges to maintain control and avoid rounding over corners unintentionally. The nose of the sander excels at getting into tight spots that other tools can't reach.
Pros
- Space-efficient two-in-one design saves workshop floor space compared to buying separate sanders
- Direct-drive motor eliminates belt slippage and delivers consistent, powerful performance
- Minimal maintenance with no belt tension adjustments or frequent replacements needed
- Versatile angle adjustment and dual worktables handle curved pieces and various sanding angles
- Sturdy cast aluminum construction with vibration-dampening rubber feet ensures stable operation
Cons
- No customer reviews available yet, so real-world durability and long-term performance data is limited
- 3/4 HP motor is adequate for general woodworking but may feel underpowered for heavy industrial use
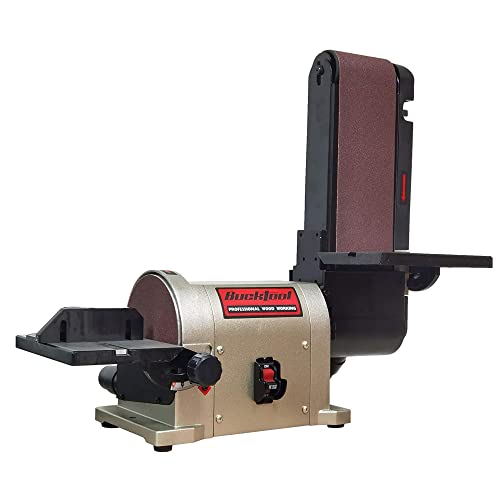
The Bucktool BD4603 is a well-engineered combination sander that brings two essential tools together in a single, compact unit. The direct-drive motor design is a significant advantage over traditional belt-driven sanders, eliminating belt slippage and delivering a claimed 25% efficiency gain. This means the 3/4 HP motor works harder for you, providing smooth, quiet operation while maintaining consistent sanding power across both the belt and disc surfaces.
Versatility is where this machine truly shines. The belt tilts from 0 to 90 degrees, allowing you to sand horizontally for flat stock or vertically for edge work. The dual cast aluminum worktables give you stable, flat surfaces for both the belt and disc, and the quick-change belt system means you spend less time fiddling with setup and more time on your projects. The sturdy aluminum base with rubber feet keeps vibration to a minimum, which translates to better surface finishes and less fatigue during extended work sessions.
From a practical standpoint, the maintenance-free design is a real convenience. You won't need to constantly adjust belt tension or replace worn belts as frequently as with older designs. The combination of a 4x36-inch belt and 6-inch disc covers most woodworking and DIY sanding tasks, making this a solid investment for anyone looking to consolidate their tool collection without sacrificing capability or performance.
| Specification | Details |
|---|---|
| Brand | Bucktool |
| Model | BD4603 |
| Motor Power | 3/4 HP |
| Motor Type | Direct-drive, fully enclosed induction |
| Belt Size | 4 x 36 inches |
| Disc Size | 6 inches |
| Belt Angle Adjustment | 0 to 90 degrees |
| Worktables | Two cast aluminum tables |
| Base Material | Cast aluminum with rubber feet |
| Features | Quick belt replacement, track control, miter gauge, vibration dampening |
| Electrical Rating | 5.0A |
| Certifications | CSA approved |
Getting Started: Ensure the machine is unplugged before making any adjustments. Familiarize yourself with the belt angle adjustment lever and the miter gauge on both the belt and disc tables. Always wear safety glasses and a dust mask when operating.
Belt Sanding: Position your workpiece on the cast aluminum table. Use the angle adjustment to set the belt from 0 degrees (horizontal) to 90 degrees (vertical) based on your sanding direction. Start with the machine off, place your workpiece against the belt, then power on. Move the workpiece smoothly along the belt direction to avoid gouging. The quick-change system allows fast belt replacement when needed.
Disc Sanding: Place your workpiece on the disc table and use the miter gauge for angled cuts if needed. Sand on the downward side of the disc rotation for better control. Light, even pressure produces the best results. The dual worktables mean you can switch between belt and disc work without major repositioning.
Maintenance: Regularly empty the dust collection port and check that rubber feet remain intact. The direct-drive design requires minimal belt tension adjustment, but inspect the belt periodically for wear and replace using the quick-change system as needed.
Personal Protective Equipment: Always wear safety glasses to protect against dust and debris. A dust mask or respirator is essential, especially during extended sanding sessions. Consider hearing protection if the motor noise bothers you, though this model is designed to run quietly.
Before Operating: Inspect the belt and disc for damage or wear. Ensure all guards are in place and the machine is properly grounded. Never operate with long hair, loose clothing, or jewelry that could get caught. Keep hands and fingers clear of moving belts and discs at all times.
During Operation: Never force your workpiece into the sanding surface. Let the machine do the work at its own pace. Keep the work area clear of tripping hazards and ensure adequate ventilation. Never reach under or near moving parts while the machine is running. Always wait for the machine to come to a complete stop before making adjustments.
After Use: Unplug the machine before cleaning or performing maintenance. Allow the belt and disc to stop completely before touching. Empty dust collection regularly to prevent buildup, which can reduce efficiency and create fire hazards.
Maximize Belt Life: The direct-drive design means less belt wear than traditional sanders, but you can extend it further by using the correct grit for your material and avoiding excessive pressure. Let the machine's power do the work rather than forcing the workpiece. Keep the belt tracking straight using the track control function to ensure even wear across the entire belt width.
Achieve Superior Finishes: Start with coarser grits and progressively move to finer grits for smooth results. On the belt sander, always sand with the grain direction when possible to avoid cross-grain scratches. For the disc, sand on the downward-rotating side and keep the workpiece moving to prevent circular scratch marks. The dual worktables let you switch between tools seamlessly for multi-stage sanding projects.
Dust Management: Connect a shop vacuum using a Y-fitting hose (as the manufacturer recommends) to keep your workspace clean and improve visibility. Better dust collection also means cleaner air and more efficient motor cooling. Regularly clean the worktables and inspect dust ports to maintain optimal airflow and machine performance.
Curved and Detail Work: The driven drum on the belt sander is excellent for sanding curved workpieces. The 6-inch disc handles edge work and detail sanding that the belt cannot reach. Use the miter gauge on both surfaces to maintain consistent angles across multiple pieces, which is invaluable for furniture building and trim work.
Pros
- Space-saving two-in-one design gives you belt and disc sanding capabilities without buying two machines
- Powerful 4.5 amp motor maintains consistent speed under load for uniform sanding results
- Adjustable beveling table and belt angle provide flexibility for edge work, chamfers, and angled surfaces
- Quick-change sandpaper system minimizes downtime when switching between grits
- Pre-drilled mounting holes make permanent benchtop installation straightforward
Cons
- No customer reviews available yet, so real-world durability and long-term reliability remain unverified
- Limited to 2.5-inch dust ports, which may require adapter fittings for some larger shop vacuum systems
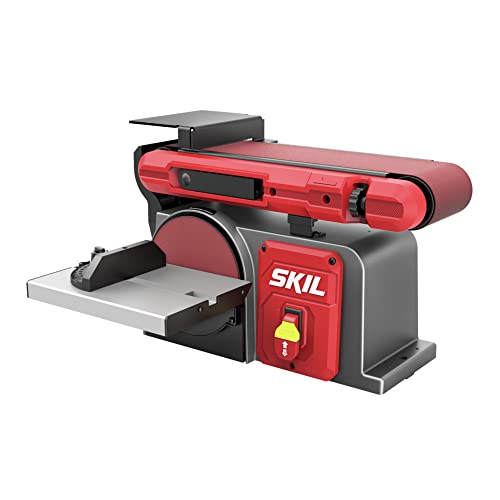
The SKIL BB9504-00 addresses a common workshop challenge: fitting both belt and disc sanding capabilities into limited space. By combining these two sanding surfaces on a single benchtop unit, it serves woodworkers and home improvers who need versatility without doubling their equipment footprint. The 4.5 amp induction motor is built to handle extended use, maintaining consistent speed whether you're working through hardwoods or softer materials.
The machine's adjustability is where it truly shines for varied projects. The beveling tabletop tilts from 0 to 45 degrees, making it easy to sand beveled edges, chamfers, and angled cuts. The belt itself can rotate from 0 to 90 degrees, opening up sanding options for different workpiece orientations and edge profiles. The integrated miter gauge helps you maintain square crosscuts when needed, while the quick tension release lever lets you swap sandpaper grits without tools or complicated adjustments.
Dust collection is handled through a standard 2.5-inch dust port that connects to most shop vacuums, helping keep your work area cleaner and reducing cleanup time. The pre-drilled base mounting holes make permanent installation straightforward, so you can secure it to your benchtop and get to work. This is a practical choice for DIYers and woodworkers who want reliable sanding performance without the space or budget commitment of separate machines.
| Specification | Details |
|---|---|
| Brand | SKIL |
| Model | BB9504-00 |
| Motor | 4.5 Amp Induction |
| Sanding Type | Belt and Disc Combination |
| Belt Angle Adjustment | 0 to 90 degrees |
| Beveling Tabletop | 0 to 45 degrees |
| Dust Port | 2.5-inch (standard vacuum hose compatible) |
| Miter Gauge | Yes |
| Quick Tension Release | Yes |
| Mounting | Pre-drilled holes for benchtop installation |
Getting Started: Secure the sander to your benchtop using the pre-drilled mounting holes and appropriate fasteners. Connect a shop vacuum to the 2.5-inch dust port. Install your chosen sandpaper grit on either the belt or disc surface depending on your project needs.
Belt Sanding: Use the belt sander for larger surface areas and stock removal. Adjust the belt angle from 0 to 90 degrees based on your workpiece orientation. For angled work, tilt the beveling tabletop to your desired angle (0 to 45 degrees) and guide your workpiece smoothly across the belt.
Disc Sanding: The disc sander excels at edge work, small surfaces, and detail sanding. Use the miter gauge for precise crosscuts and angled cuts. Always sand on the downward side of the disc to prevent kickback.
Changing Sandpaper: Use the quick tension release lever to loosen the belt or adjust disc tension without tools. This makes switching between grits fast and hassle-free, keeping your workflow moving.
Before Operation: Always inspect sandpaper for tears, fraying, or damage before use. Ensure the sander is securely mounted to your benchtop and all adjustment levers are tightened. Wear safety glasses to protect against dust and flying debris.
During Operation: Keep hands and loose clothing away from moving belt and disc surfaces. Never reach under or across the sanding surfaces while the motor is running. Feed workpieces slowly and steadily to avoid binding or kickback. Use the miter gauge and proper hand positioning for added control and safety.
Dust and Cleanup: Connect the dust port to a shop vacuum before starting work. Regular dust collection reduces fire risk and keeps your work area safe. Unplug the sander before changing sandpaper, performing maintenance, or making adjustments.
Maximize Belt Life: Let the motor reach full speed before contacting your workpiece. Apply light to moderate pressure and avoid forcing the workpiece into the belt. This extends sandpaper life and produces smoother, more consistent results.
Disc Sanding Best Practices: Always sand on the downward side of the disc where it moves toward the table. Use the lower half of the disc for best control and to minimize kickback risk. Rotate your workpiece frequently to avoid over-sanding in one spot.
Grit Progression: Start with coarser grits (60-80) for stock removal and surface preparation. Progress to medium grits (100-150) for smoothing, then finish with fine grits (180-220) for final preparation before staining or finishing. This three-stage approach saves time and produces superior results.
Dust Collection Efficiency: Keep the dust port clear and your vacuum filter clean. A clogged filter reduces suction and lets dust escape into your workspace. Consider using a cyclone separator or dust collector for better long-term performance.

Pros
- Auto-tracking belt system saves time and frustration by eliminating manual belt tracking adjustments
- Powerful motor handles aggressive stock removal on large deck, floor, and furniture projects
- Variable speed capability lets you slow down for delicate finishes or speed up for heavy material removal
- Flush-sanding nose and side design reaches corners and edges that standard sanders cannot
- Long power cord minimizes repositioning and extension cord clutter on job sites
Cons
- Heavier weight and size make it less portable than smaller handheld sanders, requiring dedicated storage space
- Limited online user feedback makes it harder to assess long-term durability and real-world performance issues
The Makita 9404 is a full-size belt sander built for homeowners and DIYers tackling substantial sanding projects. Its 8.8-amp motor delivers the power needed for fast material removal on decks, hardwood floors, and large furniture pieces. The 4-by-24-inch belt provides a generous sanding surface, making quick work of wide, flat areas that would take forever with smaller sanders.
What sets this model apart is its auto-tracking belt system, which automatically keeps the belt centered during operation. This feature alone saves hours of frustration compared to manual tracking adjustments. The variable speed control is equally practical, allowing you to dial down power for delicate finishing work or crank up speed when you need aggressive stock removal. At 84 decibels, it's remarkably quiet for a machine of this power level, which means less hearing fatigue during long sanding sessions.
The flush-sanding design is a thoughtful touch that lets you sand right up to walls, edges, and corners without leaving unfinished strips. The 16.4-foot power cord is generous enough to reduce the need for extension cords, keeping your work area cleaner and safer. This is a serious workhorse for anyone who sands regularly or has a major project ahead.
| Specification | Detail |
|---|---|
| Motor | 8.8 Amp |
| Belt Size | 4" x 24" |
| Speed Control | Variable Speed |
| Noise Level | 84 dB |
| Belt Tracking | Automatic |
| Power Cord Length | 16.4 feet |
| Special Features | Flush-sanding design, side and nose sanding capability |
| Brand | Makita |
| Model | 9404 |
Setup: Ensure the power cord is unplugged before assembly. Install the sanding belt by opening the belt tracking cover and sliding the belt onto the rollers. Close the cover and plug in the unit.
Operation: Place the sander on your work surface and turn it on. Let it reach full speed before lowering it onto the material. Move the sander in the direction of the wood grain for the smoothest finish. Use steady, even pressure and avoid stopping the sander in one spot, which can create divots. For flush sanding near walls or edges, use the nose or side of the sander as designed.
Speed Selection: Start with variable speed set to medium for general work. Lower speeds work better for fine finishes or delicate materials, while higher speeds tackle heavy stock removal faster. Always wear safety glasses and a dust mask during operation.
Personal Protection: Always wear safety glasses to protect your eyes from dust and debris. Use a dust mask or respirator to avoid inhaling fine sanding particles, which can accumulate over time. Hearing protection is recommended, even though this model runs at a lower 84 dB noise level.
Equipment Safety: Never reach under or near the sanding belt while the machine is running. Keep your hands and clothing clear of the belt at all times. Ensure the power cord is in good condition and positioned away from the sanding area to prevent tripping or damage.
Work Area: Sand in a well-ventilated space or use a dust collection system to manage debris. Secure your work piece firmly so it does not shift during sanding. Unplug the sander before making any adjustments, changing the belt, or performing maintenance.
Grain Direction: Always sand with the wood grain, not against it. Sanding against the grain can cause splintering and tear-out. If you are unsure of the grain direction, sand diagonally first to identify it, then switch to parallel strokes.
Progressive Sanding: Start with a coarser belt grit for heavy material removal, then progress to finer grits for a smooth finish. A typical progression might be 60-grit, then 100-grit, then 150-grit or higher depending on your desired finish quality.
Pressure and Speed: Let the sander do the work. Excessive downward pressure does not speed up sanding and can damage the belt or create uneven surfaces. Use the variable speed feature strategically: slower speeds for finishing work and delicate materials, faster speeds for aggressive removal on tough surfaces.
Belt Sander Buying Guide
Buying a belt sander without a clear plan is an easy way to spend money on a tool that sits unused. The sections below walk through every specification that matters, so you can match the right machine to your actual projects and workspace.
Belt Size and What It Means for Your Work
Belt width and length determine how much surface area you can cover in a single pass. Narrow belts in the 1/2-inch-by-18-inch range, like those on the WEN 6307 file sander, are designed for detail work: reaching into tight corners, deburring metal, and smoothing contours on shaped wood. Standard handheld models in the 3-inch-by-18-inch to 3-inch-by-21-inch range offer a balance of control and coverage that suits most trim carpentry and furniture work. The wider 4-inch-by-24-inch belt on the Makita 9403 and Makita 9404 makes fast work of large, flat surfaces like tabletops, doors, and wide plank flooring where a smaller sander would leave you running passes all day. Benchtop combo machines use a similar 4-inch-by-36-inch belt but orient it horizontally or vertically for precision shaping rather than surface removal.
Motor Amperage and Variable Speed
Amperage is the clearest indicator of sustained cutting power. A 4.5-amp to 6-amp motor handles softwoods and light stock removal without bogging down. Step up to the 9-amp Metabo HPT SB8V2 or the Makita 9403 and you have enough power to flatten hardwood slabs or strip heavy paint coats without overheating the motor. Variable speed adds real versatility: dialing down the belt speed lets you work on softer materials that would scorch at full throttle, and it is essential when sanding veneers, plastics, or metals where heat buildup causes damage. If you work with a variety of materials, choose a model with a clearly adjustable speed dial rather than a single fixed speed. Similarly, if you are outfitting a workshop with multiple power tools, pairing a belt sander with capable drill presses and a reliable bench grinder covers nearly every shaping and finishing task.
Corded vs. Cordless
Corded belt sanders deliver consistent, uninterrupted power for as long as you need it, which is why most professional woodworkers still prefer them for stationary and benchtop use. The DeWalt DCW220B changes that equation significantly. Built on DeWalt’s 20V MAX platform with a brushless motor, it delivers runtime and power density that earlier cordless sanders could not match, making it a strong choice for finish carpenters and contractors who move between jobsites and need freedom from extension cords. The trade-off is battery cost: the tool is sold without a battery, so factor that into your total budget. For shop use where an outlet is always nearby, a corded model still offers the best value per watt. If cordless convenience appeals to you across your tool collection, consider also looking at cordless drills and impact drivers that share the same battery platform.
Handheld vs. Benchtop
Handheld belt sanders let you bring the tool to the workpiece, which is essential for large panels, installed flooring, or anything too bulky to lift onto a stand. Benchtop belt-and-disc combo machines like the WEN 6502T, BUCKTOOL BD4603, and SKIL BB9504-00 are fixed in place and let you bring smaller workpieces to the tool. This arrangement gives you much more control over edge squareness, bevel angles, and fine shaping because both hands are free to guide the work. A cast iron or aluminum base keeps vibration low and the machine stable under load. If your workshop already has a drill press mounted to a bench, adding a benchtop sander nearby creates an efficient shaping station. For cleanup, connecting your sander to a quality shop vac dramatically reduces airborne dust compared to relying on the integrated bag alone.
Dust Collection
Belt sanders generate an enormous volume of fine dust, and poor dust management is a health hazard as well as a nuisance. Most handheld models include a fabric or cloth dust bag that captures a portion of the particles; these bags fill quickly and need frequent emptying. Look for models with a dedicated dust port that accepts a standard shop vacuum hose, which captures far more particulate than any integrated bag. The SKIL 7510-01 adds a pressure-control feature that helps maintain consistent contact and reduces the amount of dust blasted sideways across your bench. On benchtop machines, check that both the belt and the disc sides of a combo unit have separate dust ports. A well-organized shop with proper dust control pairs naturally with solid tool storage systems that keep abrasives, belts, and accessories sorted and close at hand.
Belt Changing and Tracking Adjustment
A sanding belt eventually wears out and needs replacement, so ease of belt changes matters more than it might seem. The best designs use a quick-release lever that tensions and releases the belt in one motion without tools. Equally important is tracking adjustment: a small knob or lever that shifts the belt laterally on the rollers to keep it centered. A belt that drifts to one side will shred on the housing edge within minutes. Test the tracking adjustment before buying by reading user reviews specifically mentioning belt drift under load. On combination benchtop machines, also check that the included table tilts to common angles like 45 degrees for bevel work.
Choosing the Right Abrasive Grit
The belt sander itself is only half the equation; the grit you run matters just as much. Start with 60-grit or 80-grit for heavy stock removal, paint stripping, and leveling uneven glue joints. Move to 100-grit or 120-grit for intermediate smoothing, and finish at 150-grit if you want a surface ready for staining or painting. Belt sanders are not finish sanders: if you need a swirl-free surface on fine furniture, follow up with a random orbital sander running 180-grit or finer. Always sand with the grain on wood to minimize cross-grain scratches that become visible under a stained finish.
Safety Considerations
Belt sanders are aggressive tools that can remove material faster than you expect, especially on softwoods. Always clamp your workpiece securely or use a bench vise; never try to hold a small part in one hand while sanding with the other. Keep the sander moving to avoid gouging a depression into the surface. Wear a properly rated dust respirator, not just a dust mask, when sanding any painted surfaces that may contain lead, as well as when working with MDF or exotic hardwoods. Safety glasses and hearing protection complete your minimum kit. Storing your belt sander safely alongside other workshop tools is easier with a well-planned tool organizer setup that keeps cords, belts, and accessories in order.
Why Trust HomeThru
HomeThru is an independent review publication with no affiliation to any manufacturer, retailer, or e-commerce platform. We do not sell products, process orders, or handle warranties. Our editorial team researches and evaluates tools by analyzing verified buyer reviews, manufacturer specifications, and published safety data. For this belt sander roundup, we reviewed thousands of verified purchase reviews across all 11 models, cross-referenced manufacturer specifications for motor amperage, belt speed, and weight, and assessed real-world usability factors like belt-change speed, dust port compatibility, and tracking stability. We have no financial incentive to favor any brand. Our goal is simple: give you the information you need to buy confidently the first time.
We apply the same rigorous independent approach across our entire power tools coverage, including our evaluations of jigsaws, reciprocating saws, and circular saws, so you can build your toolkit with confidence at every step.
Final Thoughts
After evaluating all 11 models across every performance and value metric, here are our standout picks by category:
- Best Overall: Makita 9403 4″ x 24″ Belt Sander delivers exceptional motor power, a wide sanding surface, and the kind of durability that professional woodworkers rely on day after day.
- Best Budget Pick: WEN 6321 3″ x 21″ Corded Belt Sander is a genuinely capable machine at an entry-level price, rated highly by thousands of verified buyers and well-suited to homeowners and beginners.
- Best Cordless: DeWalt DCW220B 20V MAX Cordless Belt Sander combines brushless motor efficiency with jobsite portability, making it the clear pick for contractors and anyone who wants freedom from cords.
- Best for Detail Work: WEN 6307 Variable Speed Detailing File Sander earns its spot with a narrow belt that reaches into grooves, contours, and tight spaces no standard sander can access.
- Best Benchtop Combo: WEN 6502T Belt and Disc Sander with Cast Iron Base offers a stable, vibration-damping platform with both belt and disc surfaces, giving small-shop woodworkers precision shaping capability in a single machine.
No matter which model you choose, pairing your sander with sharp mechanic tool sets for maintenance tasks and a properly ventilated workspace will keep it performing at its best for years. If you are outfitting an entire workshop, our guides to air compressors and bench grinders are natural next reads.
Frequently Asked Questions
What is the difference between a 3-inch and a 4-inch belt sander?
Width determines how much surface you cover in each pass. A 3-inch belt is more maneuverable and better suited to trim work, furniture legs, and narrower stock. A 4-inch belt removes material faster on wide panels, doors, and flooring, but it is heavier and harder to control in tight spaces. Most homeowners find a 3-inch model more versatile for general use, while woodworkers who process wide boards regularly will appreciate the extra coverage of a 4-inch machine.
Can I use a belt sander on hardwood floors?
Yes, a wide belt sander like the Makita 9403 or Makita 9404 can refinish hardwood floors effectively. Start with a coarser grit to level the surface and remove the old finish, then work through progressively finer grits. Keep the machine moving at all times and sand with the grain to avoid deep scratches. For final passes before staining or sealing, switch to a random orbital sander to eliminate any remaining belt marks.
Is a cordless belt sander as powerful as a corded one?
Modern brushless cordless models like the DeWalt DCW220B have closed the gap significantly. For most woodworking and finish carpentry tasks, the difference in real-world cutting power is minimal. Where corded models still have an advantage is in sustained, heavy-duty use where a battery would deplete mid-project. If you primarily work in a shop with outlet access, corded remains the better value. For jobsite and portable use, a quality cordless model is more than capable.
How do I prevent my belt sander from leaving gouges in the wood?
Always keep the sander moving in a consistent pattern and never let it sit stationary on the workpiece while the belt is running. Use moderate pressure and let the abrasive do the work rather than pressing hard. Start with the appropriate grit for the task: using 60-grit on a piece that only needs 120-grit will remove too much material too quickly. Checking your technique on scrap wood before moving to finished stock is always worthwhile.





Write Your Review
No reviews yet. Be the first to share your experience!