

Accurate marking is the foundation of every clean cut, tight joint, and well-fitted piece of furniture. Whether you are scribing a dovetail layout, transferring a mortise position, or simply drawing a parallel line across a board, the tools you reach for determine how close your finished work gets to your design. A wheel marking gauge that slips or a pencil that draws a fat, fuzzy line will sabotage even the most careful sawing. This guide cuts through the noise so you can invest wisely in woodworking marking tools that genuinely improve accuracy at the bench. Our editorial team at HomeThru researched and analyzed dozens of options, evaluated verified buyer feedback from thousands of reviews, and compared specs side by side to bring you this shortlist of reliable picks at every price point. If you are building out a hand-tool kit, pairing precise marking tools with sharp chisels for woodworking and a trustworthy combination square will cover nearly every layout task you face.
Our Top Picks for Woodworking Marking Tools

Pros
- Patented roll-stop fence delivers consistent, wavering-free parallel lines with precision
- Includes 2 replacement cutters, eliminating downtime and providing excellent long-term value
- Dual metric/imperial scales accommodate both traditional and modern measurement preferences
- Durable all-metal construction with corrosion-resistant materials built for the long haul
- Lightweight and balanced for comfortable one-handed operation without hand strain
Cons
- Limited to 6 inches/150mm maximum marking distance, which may constrain larger woodworking projects
- No customer reviews currently available to validate real-world performance and durability claims
The Clarke Brothers Wheel Marking Gauge stands out in the woodworking tool category thanks to its patented roll-stop fence design, which features a flat spot that prevents the tool from rolling away and ensures your parallel lines remain consistently accurate. This innovation alone addresses a common frustration among woodworkers who struggle with traditional gauges that drift or shift during use. The inclusion of 2 extra hardened steel wheel cutters means you'll have backup cutters on hand, eliminating the need for immediate replacement orders and allowing you to maintain workflow momentum on larger projects.
Construction quality reflects professional-grade expectations, with the gauge crafted from solid brass, steel, and aluminum alloy materials that resist corrosion and handle years of workshop use. The laser-engraved graduation marks are crisp and legible in both imperial and metric scales up to 6 inches or 150mm, making this tool adaptable to various measurement preferences and project requirements. The non-marring brass face protects your workbench and finished wood surfaces from damage, a thoughtful design choice that prevents costly mistakes.
Usability is a strong suit here. The balanced design and lightweight construction make one-handed operation comfortable, even during extended marking sessions. The tool won't strain your hand or fatigue your wrist, which matters when you're laying out multiple lines across several boards. For serious woodworkers and professional carpenters who demand precision and reliability, this marking gauge delivers on both fronts with a design that prioritizes accuracy and durability.
| Specification | Details |
|---|---|
| Brand | Clarke Brothers |
| Tool Type | Wheel Marking Gauge / Woodworking Scriber |
| Length | 8 inches |
| Maximum Marking Distance | 6 inches / 150mm |
| Graduation Scales | Imperial (inches) and Metric (mm) |
| Materials | Solid brass, steel, aluminum alloy |
| Cutter Type | Hardened steel wheel cutters |
| Included Accessories | 2 replacement hardened steel wheel cutters |
| Design Feature | Patent-pending roll-stop fence with flat spot |
| Protective Element | Non-marring brass face |
| Operation | One-handed operation |
| Corrosion Resistance | Yes - corrosion-resistant materials |
Setup: Loosen the fence adjustment screw slightly and position the gauge to your desired marking distance. The graduated scale helps you set the exact measurement. Tighten the adjustment screw firmly to lock the fence in place. The patented flat-spot roll-stop prevents the gauge from rolling unexpectedly during setup.
Marking: Place the fence face flat against the edge of your workpiece. Hold the gauge with one hand and draw it along the wood surface in a smooth, controlled motion. The hardened steel wheel cutter will score a precise line parallel to the edge. Use steady, even pressure - you don't need to force it. The balanced design makes this comfortable even during extended use.
Maintenance: After each use, wipe the gauge clean with a dry cloth to remove wood dust and debris. The brass and steel components are naturally corrosion-resistant, but keeping it dry extends lifespan. If a cutter becomes dull or damaged, simply swap in one of the included replacement cutters by loosening the cutter retention screw and sliding out the old cutter.
Maximize Accuracy: Always ensure the fence face sits flat and square against your workpiece edge. Even slight angles will throw off your parallel lines. Take a moment to verify proper contact before you start marking.
Cutter Longevity: The hardened steel cutters will eventually dull with heavy use. Keep track of when you swap in your backup cutters so you know when to order replacements. A sharp cutter creates cleaner, more visible lines with less effort.
Scale Selection: Use the scale that matches your project's primary measurements. If you're working in metric, rely on the mm graduations to minimize mental math and reduce marking errors. The dual scales eliminate the need for separate tools.
Storage: Store the gauge in a dry location, ideally in a tool roll or dedicated drawer. The non-marring brass face protects the tool itself, but keeping it protected from moisture extends the lifespan of all components.
Who Should Buy This? Serious woodworkers, professional carpenters, and dedicated DIYers who regularly lay out parallel lines on wood will appreciate the precision and durability this gauge delivers. If you're building furniture, cabinetry, or fine woodworking projects where accuracy matters, this tool is worth the investment.
Key Considerations: The 6-inch/150mm maximum distance works well for most standard woodworking tasks, but won't accommodate extremely wide boards or panels. If you frequently work with material wider than 6 inches, you may need a longer gauge for edge-to-edge marking. The tool's one-handed design is ideal for solo work, but pairs well with a bench hook or clamp to stabilize your workpiece.
Value Assessment: The inclusion of 2 replacement cutters adds significant value, as replacement cutters are often sold separately at other retailers. This means you're getting extended tool life and backup parts without additional purchases. The patent-pending design and quality materials suggest this gauge will remain reliable for years of regular use, making it a solid long-term investment for your workshop.

Pros
- Integrated sharpener design keeps your marking tool complete and eliminates lost accessories
- Extra-long tip design solves the real problem of marking in confined spaces and recessed areas
- Generous refill supply means you won't run out of lead mid-project
- Thick lead performs reliably on rough construction materials without dulling quickly
- Included storage case keeps everything organized and portable for job sites
Cons
- Zero customer reviews available limits real-world feedback on long-term durability and performance
- Sharpener quality and refill compatibility details are not clearly specified, which may affect ease of maintenance
The Nicpro Carpenter Pencil Set addresses a common frustration for contractors and woodworkers: the need for reliable marking tools that work in tight spaces and on rough surfaces. This set includes two solid carpenter pencils paired with 26 refills and a built-in sharpener, offering a complete marking solution right out of the box. The 45mm elongated tip is the standout feature, allowing you to mark deep holes, recessed areas, and other confined spaces that standard pencils simply cannot reach.
Build quality appears solid for the price point. The 2.8mm thick lead is substantially thicker than mechanical pencil lead, which means it resists breaking during the heavy pressure typical of construction marking on metal, wood, and concrete. The integrated sharpener screws into the pencil top, keeping the tool self-contained so you won't lose a critical accessory on the job site. The storage case is a practical addition for keeping everything organized, whether you're moving between projects or storing tools in a truck bed.
Potential buyers should note that this product has no customer reviews yet, which limits insight into real-world durability over extended use. The sharpener quality and how well refills seat in the holder are important factors that only field experience will fully reveal. For DIYers and contractors looking for an affordable, feature-rich marking pencil set with a practical deep-hole design, this option is worth considering, but patience with the learning curve of the integrated sharpener may be necessary.
| Specification | Detail |
|---|---|
| Brand | Nicpro |
| Product Type | Carpenter Pencil Set |
| Quantity Included | 2 solid pencils, 26 refills, 1 sharpener, 1 storage case |
| Lead Diameter | 2.8mm |
| Tip Length | 45mm (elongated for deep-hole marking) |
| Colors | Black and Red |
| Sharpener Type | Replaceable, screws into pencil top |
| Compatible Surfaces | Metal, plastic, wood, paper, concrete |
| Intended Users | Contractors, architects, carpenters, woodworkers, builders, masons |
| Rating | 4.1 out of 5 stars |
Marking on Surfaces: Apply moderate to firm pressure when marking on rough or metal surfaces. The thick 2.8mm lead is designed to handle construction-grade pressure without breaking, so don't be afraid to press harder than you would with a standard pencil.
Using the Deep-Hole Tip: The 45mm elongated tip is your advantage for tight spaces. Position the pencil at an angle to reach into recessed areas, holes, or gaps where standard pencils won't fit. The extended design gives you visibility and control in confined areas.
Sharpening the Lead: When the tip becomes dull, use the built-in sharpener by screwing it into the top of the pencil. Rotate the pencil gently while applying light pressure to sharpen the lead to a fine point. Avoid over-sharpening, which can waste lead.
Replacing Refills: When a pencil is depleted, simply insert a new 2.8mm refill into the barrel. The set includes 26 refills, providing a substantial supply for extended projects or multiple users.
Keep Sharpener Accessible: Since the sharpener is built into the pencil top, always keep it attached and accessible. Detach it only when necessary to avoid losing it on a busy job site.
Use Red and Black Strategically: Keep the red pencil for marking cuts or corrections and the black pencil for standard layout work. This visual system helps you and your team quickly identify different types of marks during construction phases.
Store in the Provided Case: The included storage box is designed to protect the pencils and refills from damage in your tool bag or truck. Use it to keep everything organized and prevent leads from breaking during transport.
Stock Extra Refills: With 26 refills included, you have a good supply, but consider keeping a second set on hand for high-volume marking projects or team use. The 2.8mm size is standard, so refills may be available from other sources if needed.
Mark at an Angle for Precision: When marking tight spaces, tilt the pencil slightly to use the side of the elongated tip rather than the point. This technique gives you better control and visibility in confined areas.
Who Should Buy This Set? Contractors, carpenters, architects, woodworkers, and DIY builders will find this set most useful. If you regularly mark metal, concrete, wood, or plastic surfaces and need to work in tight spaces, the deep-hole design is a genuine advantage. It's also a good choice for teams where multiple users benefit from having backup pencils and plenty of refills.
What Makes This Different from Regular Pencils? Standard pencils and mechanical pencils are designed for paper and light work. Carpenter pencils feature thicker, harder lead that withstands the pressure and rough surfaces of construction. The 2.8mm lead is substantially more durable than mechanical pencil lead, and the elongated 45mm tip solves a real problem that standard pencils cannot address.
Is the Built-in Sharpener Worth It? Yes, for job site work. A separate sharpener can get lost or left behind. Having the sharpener integrated into the pencil means you always have what you need. However, you'll need to learn the proper technique to sharpen effectively without wasting lead.
How Long Will the Refills Last? That depends on your marking volume and pressure. Twenty-six refills is a substantial supply for most DIY projects and small contracting jobs. For high-volume use, consider keeping spare refills on hand.
Value Consideration: This set offers good value as a complete marking solution. You're getting two pencils, a sharpener, 26 refills, and storage in one purchase. Buying these items separately would likely cost more and require multiple trips to find compatible products.
Pros
- Patent-pending design combines precision engineering with practical anti-roll engineering
- Complete kit with spare parts means less downtime and fewer shopping trips
- Dual measurement scales eliminate the need for separate metric and imperial tools
- Solid brass and steel construction resists wear and maintains accuracy over time
- Thoughtful details like the V-slot rod and retractable cutter show real woodworking insight
Cons
- No user reviews yet available, so real-world feedback on long-term durability is limited
- Requires a learning curve to master the micro-adjuster for truly consistent results
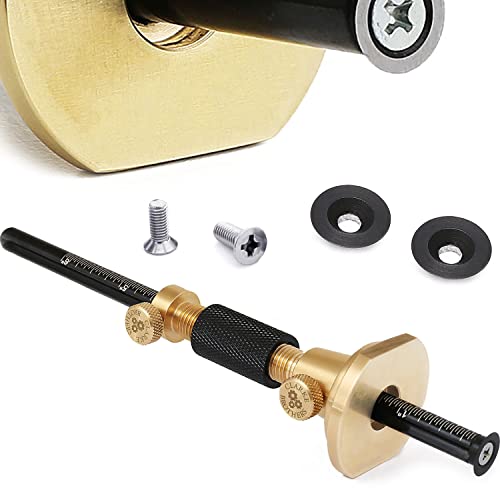
The Clarke Brothers Wheel Marking Gauge Kit stands out as a thoughtfully engineered tool that addresses common frustrations woodworkers face when laying out joinery, inlays, and other precision work. The micro-adjustable fence with dual thumbscrews lets you dial in exact measurements, while the innovative anti-roll brass fence head keeps the tool from sliding off your bench between uses. This combination of precision adjustment and practical design shows real understanding of workshop workflow.
Build quality is where this gauge earns respect. The solid brass body paired with a hardened steel rod and cutters creates a tool that won't wear out or lose accuracy after years of use. The V-shaped slot running along the steel rod is a clever detail that prevents the fence and tail from wiggling or wobbling during marking, which directly translates to cleaner, more accurate scribe lines. The dual metric and imperial ruler engravings eliminate the need to switch tools or do mental math when working between measurement systems.
The kit's completeness sets it apart from basic marking gauges. You get two extra hardened steel wheel cutters and two extra bolts included, plus a retractable wheel cutter for safe upright storage. This means you can keep the tool ready to work without worrying about accidentally damaging the cutter or your workspace. For serious woodworkers and furniture makers who rely on precise layout work, this gauge delivers the reliability and accuracy that translates directly to better finished pieces.
| Feature | Detail |
|---|---|
| Brand | Clarke Brothers |
| Product Type | Wheel Marking Gauge |
| Gauge Length | 7 inches |
| Primary Material | Brass body with steel rod |
| Cutter Material | Hardened steel |
| Fence Design | Anti-roll brass fence head with flat spots |
| Adjustment | Micro-adjustable with dual thumbscrews |
| Measurement Scales | Metric and Imperial (engraved ruler) |
| Rod Design | V-shaped slot prevents wobble |
| Included Accessories | 2 extra hardened steel cutters, 2 extra bolts, retractable cutter |
| Cutter Storage | Retractable design for safe upright storage |
| Status | Patent Pending |
Setup and Adjustment: Loosen the dual thumbscrews on the micro-adjustable fence. Slide the fence to your desired measurement using the engraved metric or imperial ruler as your guide. Tighten the thumbscrews firmly but not excessively to lock the fence in place. The V-shaped slot in the steel rod will keep everything aligned.
Marking Your Work: Position the fence against your workpiece edge and hold the gauge firmly against your work surface. Draw the hardened steel wheel cutter along the edge of your workpiece with steady, even pressure. The wheel will scribe a clean, consistent line. For multiple identical marks, lock your measurement and repeat without readjusting.
Maintenance: After each use, retract the wheel cutter into the safe storage position. Wipe down the brass body and steel rod with a clean, dry cloth. Check the thumbscrews periodically to ensure they're tight but not over-tightened, which can damage the fine adjustment mechanism. Store in a dry location away from moisture.
Master the Micro-Adjuster: The micro-adjustable fence is your precision tool. Practice small incremental adjustments until you develop a feel for how much to turn the thumbscrews. This investment in technique pays dividends in accuracy.
Use the Anti-Roll Feature: Position the gauge so the flat spots on the brass fence head face down. This prevents rolling and keeps your measurement locked in place between uses, reducing setup time on your next project.
Switch Cutters Strategically: Keep one cutter installed for regular work and rotate in a fresh cutter periodically. Having spares means you can replace a worn cutter immediately without interrupting your workflow. Hardened steel cutters dull gradually, so fresh ones produce cleaner lines.
Dual Scales Save Time: Familiarize yourself with both the metric and imperial engravings. This eliminates the need to convert measurements or reach for a calculator, speeding up your layout work.
Who Should Buy This: This marking gauge is designed for serious woodworkers, furniture makers, and advanced DIYers who need precision layout tools. If you regularly work with joinery, inlays, veneering, or other detail work that demands accurate scribe lines, this gauge pays for itself in cleaner, more professional results.
Key Considerations: The micro-adjustable fence requires a bit of practice to master, so expect a learning curve if you're new to precision marking gauges. However, once you dial in the technique, the accuracy and consistency are excellent. The anti-roll design is a genuine convenience feature that prevents frustration in a busy workshop.
Value Assessment: The complete kit with extra cutters and bolts represents solid value for a precision tool. You're not just buying a gauge; you're getting backup parts and the engineering thoughtfulness that prevents downtime. For woodworkers who bill by the hour or value their time, this eliminates the need to order replacement parts mid-project.
Long-Term Investment: Brass and hardened steel construction means this tool will outlast cheaper alternatives by years. If you plan to work with wood for the long haul, this gauge is a worthwhile addition to your permanent toolkit.

Pros
- Dual-wheel system marks both sides at once, saving time and reducing setup errors
- Laser-printed scales in both measurement systems eliminate guesswork and conversions
- Precision-ground bar maintains accuracy across the full 8-inch length
- Anodized aluminum resists rust and wear better than bare metal alternatives
- Compact, straightforward design works intuitively for beginners and experienced woodworkers alike
Cons
- No reviews currently available to assess real-world durability and long-term performance
- Limited to 8-inch marking length, so larger layout work may require repositioning or additional tools
The YOSELIN Wheel Marking Gauge brings precision marking to your woodworking shop with a thoughtfully engineered dual-wheel design. The tool features a CNC-machined body combining brass and anodized aluminum, materials chosen for durability and resistance to the wear that comes with regular use. The precision-ground 8-inch bar carries laser-printed scales in both metric and imperial units, with 1/32-inch and 1mm grid accuracy that lets you mark consistently without second-guessing your measurements.
What sets this gauge apart is its practical attention to detail. The observation window built into the body lets you verify your scale position without interrupting your work, reducing the risk of misaligned marks. The dual-wheel cutter system marks both sides of your workpiece simultaneously, which speeds up layout work and ensures your marks stay consistent across multiple pieces. Whether you're laying out dovetails, scribing edges, or marking crosscuts, the dual wheels handle the task with minimal setup fuss.
This tool is designed to be accessible to woodworkers at all skill levels. The straightforward mechanism requires no complex adjustments, and the clear scale markings in both measurement systems eliminate the mental math that slows down less experienced users. For DIYers building their first tool collection or experienced craftspeople expanding their marking-tool options, the YOSELIN gauge delivers reliable accuracy at a price point that won't strain your budget.
| Specification | Details |
|---|---|
| Brand | YOSELIN |
| Product Type | Wheel Marking Gauge |
| Wheel Configuration | Dual wheels |
| Bar Length | 8 inches |
| Measurement Units | Metric and Imperial (English) |
| Accuracy | 1/32 inch and 1mm per grid |
| Body Material | Brass and anodized aluminum alloy |
| Manufacturing Process | CNC machined |
| Special Features | Observation window, laser-printed scales |
| Category | Woodworking Scribers |
Setup: Place the gauge against the edge or surface you want to mark. Adjust the position so the laser-printed scale aligns with your desired measurement. Use the observation window to verify your scale placement before marking.
Marking: Press the gauge firmly against your workpiece and pull it toward you in a smooth, controlled motion. The dual wheels will mark both sides of your layout line simultaneously. Maintain consistent pressure throughout the stroke to ensure even, clear marks.
Multiple Pieces: Once you've set your measurement, you can mark multiple workpieces without readjusting. This consistency is especially valuable when laying out identical parts or creating matching dovetails on multiple boards.
Maintenance: After use, wipe the bar and wheels with a dry cloth to remove sawdust and debris. Store in a dry location to protect the anodized aluminum finish.
Mark Lightly First: When learning the tool, make a light mark first to verify your measurement is correct. Once confirmed, you can mark with full pressure for a clearer line.
Secure Your Workpiece: Always clamp or hold your workpiece firmly in place. A stable workpiece prevents the gauge from slipping and ensures accurate, consistent marks.
Use Both Measurement Systems: If you're working with plans in different units, the dual-scale feature saves time. You won't need to convert measurements or use a separate tool.
Angle Matters: Keep the gauge perpendicular to your workpiece edge for the most accurate marks. A slight angle will produce skewed or curved lines.
Wheel Maintenance: Periodically check that the wheels spin freely. If they feel stiff, a light cleaning with a dry brush usually restores smooth operation.
Who Should Buy: This gauge is ideal for woodworkers and DIYers who mark layouts frequently. Whether you're a beginner building your first tool collection or an experienced craftsperson who needs reliable, repeatable marking accuracy, this tool delivers practical value.
When to Choose This Tool: If you mark dovetails, scribe edges, or lay out crosscuts regularly, a dual-wheel gauge saves time and reduces errors compared to pencil marking alone. The dual-wheel design is especially useful when you need to mark both sides of a workpiece consistently.
What to Expect: Expect a straightforward, well-engineered tool with no unnecessary complexity. The CNC-machined construction and anodized finish suggest durability, and the laser-printed scales will remain legible through years of use. The observation window is a thoughtful design detail that speeds up your workflow.
Budget Consideration: This gauge sits at an accessible price point for a precision-marked tool. It's an investment in accuracy that will pay dividends across many projects, making it a smart addition to any workshop.

Pros
- High-carbon steel construction resists dulling and maintains edge retention better than standard marking knives
- Dual-bevel blade design allows comfortable use regardless of hand orientation
- Two-pack provides redundancy and value compared to single-knife purchases
- Padauk wood handles deliver authentic workshop feel with reliable grip comfort
- Excellent for scoring clean lines before sawing or chiseling woodworking joints
Cons
- Zero customer reviews available limits real-world feedback on long-term durability and performance consistency
- Dual-bevel design requires proper technique to avoid skewing lines if not held at correct angle during use
The NIIIYTYB marking knife set combines practical functionality with thoughtful design for woodworkers tackling everything from simple layouts to intricate joinery. Each knife features a high-carbon steel blade with dual bevels, allowing both left and right-handed users to work comfortably without awkward adjustments. The blade geometry is engineered to score clean, precise lines that guide hand saws and chisels, reducing the likelihood of tearout and improving the quality of your finished joints.
Build quality stands out with premium Padauk wood handles that feel substantial in hand and provide reliable grip during extended marking sessions. The high-carbon steel resists dulling better than softer alternatives, meaning you'll spend less time maintaining the blades and more time on your projects. This durability is particularly valuable when working with harder woods like cherry and ash, which can dull inferior blades quickly.
The two-knife format is genuinely useful rather than redundant. Having a backup marking knife means you're never without a sharp tool mid-project, and the set value makes it more economical than buying single knives separately. For serious woodworkers and craftspeople building a reliable toolkit, this set represents a smart investment in precision and longevity.
| Specification | Details |
|---|---|
| Quantity | 2 marking knives |
| Blade Material | High-carbon steel |
| Blade Design | Dual bevel (ambidextrous) |
| Handle Material | Padauk wood |
| Handle Style | Classic vintage design |
| Suitable Wood Types | All species including hardwoods (cherry, ash) |
| Primary Use | Line scoring, joint layout, woodworking guidance |
| Maintenance | Low-maintenance edge retention |
Proper Marking Technique: Hold the marking knife with a firm but relaxed grip, keeping the blade at a consistent angle (typically 45 degrees) against your straightedge or layout line. Use smooth, controlled strokes rather than aggressive pressure. The blade should score the wood surface without gouging, creating a visible guide line for your saw or chisel.
For Right and Left-Handed Users: The dual-bevel design accommodates both hand orientations. Experiment with which bevel feels most natural for your grip style. Some woodworkers prefer one bevel for layout work and the other for detail scoring.
Best Practices: Always work with a sharp blade for cleanest results. Use a straightedge or layout guide to ensure consistent line accuracy. For delicate work on finished surfaces, mark lightly first, then deepen the line with a second pass if needed. Store knives safely with blade guards to maintain sharpness and prevent accidents.
Maximize Precision: Keep a marking knife dedicated to layout work and reserve your second knife for detail scoring on finished pieces. This prevents cross-contamination of sawdust and helps maintain blade sharpness longer. A sharp marking knife requires surprisingly light pressure, so let the blade do the work rather than forcing it through the wood.
Edge Maintenance: High-carbon steel blades benefit from occasional stropping on a leather strop or fine stone to maintain edge geometry. Avoid dropping or striking the blade against hard surfaces, which can chip the cutting edge. Store knives in a tool roll or sheath to protect both the blade and your hands.
Layout Workflow: Use your marking knife immediately after measuring and marking with pencil. The scored line becomes your permanent reference, and removing pencil marks prevents confusion on complex projects. For through-mortises and dovetails, mark both sides of your workpiece for alignment verification.
Who Should Buy This Set: Serious hobbyists and professional woodworkers who value precision in layout and joinery work. If you're building furniture, cutting dovetails, or creating mortise-and-tenon joints, a quality marking knife is non-negotiable. The two-knife format suits anyone who prefers having backup tools and appreciates value pricing.
What Makes This Different: The high-carbon steel construction and dual-bevel design distinguish this from basic marking knives. Most budget alternatives use softer steel that dulls quickly, requiring frequent maintenance. The Padauk wood handles add aesthetic appeal without compromising function, making this set as much at home in a traditional workshop as a modern one.
Consider Your Needs: If you're just starting woodworking, one quality marking knife may suffice initially. However, the two-pack pricing makes it economical to buy now and have a backup ready. For anyone with an established woodworking practice, these knives fill a genuine need in your toolkit. The investment pays dividends through improved layout accuracy and reduced tearout on premium materials.

Pros
- Ambidextrous dual-bevel design eliminates the need to own separate knives for different hand orientations
- High-carbon steel blades hold their edge through repeated use, reducing sharpening frequency
- Long-neck blade option makes it easy to score deep joints and confined areas accurately
- Flat handle design prevents rolling and keeps tools accessible on crowded workbenches
- Bamboo box keeps both knives organized and makes the set a thoughtful gift for woodworking enthusiasts
Cons
- No reviews available yet, so real-world durability and long-term performance feedback is limited
- Requires regular honing to maintain the sharpness that high-carbon steel demands, adding maintenance responsibility
The RUITOOL Marking Knife Set addresses a common frustration among woodworkers: the need for multiple tools to handle different marking situations. This set includes both a standard blade and a long-neck thin blade, each with dual-bevel edges that work equally well for right and left-handed users. The thoughtful design means you can keep one knife in your hand without worrying about orientation, making layout work faster and more intuitive.
Build quality stands out with 100% high-carbon steel blades paired to riveted hardwood handles. High-carbon steel is the choice of professional toolmakers because it takes and holds a sharper edge than softer metals, though it does require occasional honing to maintain peak performance. The ergonomic handle design is flat to prevent rolling and contoured to reduce hand fatigue during long sessions of precision marking and scoring.
The inclusion of a bamboo storage box makes this set practical for workshop organization and attractive enough to display or gift. For carpenters, furniture makers, and serious DIYers who spend time on layout work, this set consolidates essential marking tools into one accessible package with the precision and durability that fine woodworking demands.
| Specification | Details |
|---|---|
| Brand | RUITOOL |
| Product Type | Marking Knife Set |
| Blade Material | High-Carbon Steel |
| Blade Configuration | Dual-Bevel (Ambidextrous) |
| Blade Types Included | Standard Blade, Long-Neck Thin Blade |
| Handle Material | Hardwood with Riveted Construction |
| Handle Design | Flat, Anti-Roll, Ergonomic |
| Storage | Bamboo Storage Box |
| Hand Orientation | Right and Left-Handed |
| Intended Use | Woodworking, Carpentry, Precision Marking |
Marking Joints and Layout Lines: Hold the marking knife at a shallow angle (15-30 degrees) against a straightedge or against the edge of a mating piece. Draw the blade toward you in a controlled motion, letting the sharp edge score the wood surface rather than cut deeply. One or two passes are usually sufficient to create a visible, accurate line.
Using the Long-Neck Blade: The thin, extended blade is designed for deep joints, dovetail sockets, and confined spaces. Position it carefully to follow the contours of adjoining pieces, and use light pressure to avoid splitting grain. The narrower profile lets you reach areas where standard blades cannot.
Maintaining Accuracy: For maximum precision, keep the blade perpendicular to the wood surface when marking across grain, and use a sharp knife rather than a dull one. A dull blade requires more pressure and is more likely to wander. Regular honing on a fine stone keeps both blades in peak condition and makes marking effortless.
Knife Sharpness is Everything: A sharp marking knife is faster, more accurate, and actually safer than a dull one because it requires less pressure and is less likely to slip. Keep a fine honing stone nearby and touch up your blades every few projects. This is where high-carbon steel shines: it sharpens easily and holds an edge well between maintenance sessions.
Use the Right Blade for the Job: The standard blade handles most layout work and general marking. Reserve the long-neck blade for deep joints, dovetails, and tight spaces where the standard blade cannot reach. Switching between them based on the task makes your work more efficient and your lines more accurate.
Score, Don't Cut: Marking knives are designed to score the surface and create a visible line, not to cut deeply into wood. Light, controlled pressure with a sharp blade produces cleaner, more precise results than heavy pressure with a dull blade. Let the sharpness do the work, and your layout lines will be crisp and accurate every time.
Who Should Buy This Set: This marking knife set is ideal for woodworkers, carpenters, furniture makers, and serious DIYers who regularly perform precision layout work. If you spend time on dovetails, mortise and tenon joints, or any work that requires accurate reference lines, these tools will improve your accuracy and workflow. The ambidextrous design also makes this a great choice for left-handed woodworkers who often struggle to find quality tools suited to their needs.
What to Expect: You're purchasing professional-grade layout tools, not decorative items. High-carbon steel requires maintenance to stay sharp, and the hardwood handles will develop character and patina with use. The bamboo box keeps your knives organized and protected, making this set as practical for daily workshop use as it is attractive for display or gifting.
Comparing to Alternatives: Budget marking knives often use softer steel that dulls quickly and requires frequent sharpening. Premium alternatives may cost significantly more but often offer only marginal improvements over this set. The RUITOOL set strikes a balance between quality materials, thoughtful design, and reasonable value. The inclusion of both standard and long-neck blades in one set provides versatility that would require purchasing two separate tools elsewhere.
Pros
- Combines multiple tools into one compact design, saving workspace and money
- Aluminum construction is lightweight yet sturdy enough for professional-grade work
- Laser-engraved measurements provide lasting clarity and durability
- Quick-adjust mechanism lets you lock angles precisely without fumbling
- Includes mechanical pencil and refills, so you're ready to work immediately
Cons
- No reviews available yet, so long-term durability feedback from users is limited
- Aluminum body may require careful storage to avoid dings that could affect measurement accuracy
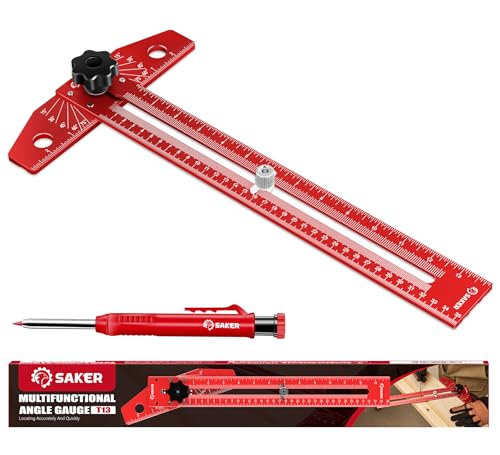
The Saker Woodworking Scriber T-Square Ruler is a practical multi-tool designed for anyone who regularly marks, measures, and draws angles in woodworking, carpentry, or design work. By combining a full-length ruler with an adjustable protractor, this tool eliminates the need to switch between separate instruments, streamlining your workflow and reducing clutter in your toolbox.
The aluminum alloy construction strikes a balance between durability and weight. It resists deformation under normal use and won't easily dent or warp like plastic alternatives. The laser-engraved scale markings are a smart touch, offering crisp readability whether you're working in bright daylight or under workshop lighting. The adjustable angle mechanism works by loosening a nut at your desired position, allowing you to quickly set and lock bevels, radial lines, and angle measurements without guesswork.
The included mechanical pencil with eight refills adds real value by ensuring you have the right marking tool on hand immediately. This makes the Saker an excellent choice for carpenters, woodworkers, engineers, architects, and DIYers who want a single, dependable instrument for both linear and angular measurements. Its compact size keeps it portable without sacrificing the 48cm measuring range.
| Specification | Details |
|---|---|
| Brand | Saker |
| Product Type | Adjustable T-Square Ruler with Protractor |
| Material | Aluminum Alloy |
| Measuring Range (Length) | 0-48 cm / 0-18 inches |
| Scale Type | Laser-Engraved |
| Key Feature | Multi-Angle Adjustable with Locking Nut |
| Included Accessories | Mechanical Pencil + 8 Refills |
| Ideal For | Woodworking, Carpentry, Engineering, Architecture, Design |
| Weight | Lightweight |
| Durability | Abrasion-Resistant, Deformation-Resistant |
Measuring Length: Align the ruler's zero mark with the starting point of your measurement. Read the distance along the scale to your endpoint. The clear markings display both centimeters and inches for flexibility.
Setting Angles: Position the ruler at your desired angle. Locate the angle measurement on the protractor dial. Gently unscrew the locking nut at that position to secure the angle. Tighten the nut firmly to lock it in place. Use the included mechanical pencil to mark your line along the ruler edge.
Drawing Radial Lines: For radial or fan-like lines, adjust the angle finder to your starting angle, mark your first line, then rotate to the next angle increment and repeat. The adjustable mechanism lets you work through multiple angles without losing your reference point.
Marking Bevels: Set the angle to your required bevel cut. Align the ruler with your workpiece and use the pencil to mark the bevel line. The laser-engraved scales make it easy to read even in shadowed workshop corners.
Pencil Pressure: Use light, consistent pressure when marking with the included mechanical pencil. This prevents indenting your workpiece and keeps lines clean and easy to see.
Nut Tension: Don't over-tighten the locking nut when securing your angle. Snug is enough to hold the position; excessive force can damage the threads over time.
Scale Readability: In low-light conditions, position your work so light reflects off the laser-engraved scales rather than creating glare. This makes measurements easier to read accurately.
Storage: Store the ruler flat or in a padded tool roll to protect the aluminum body from dents. Small dings won't affect function, but they can make measurements harder to read if they're near the scale markings.
Dual-Unit Advantage: Keep both the inch and centimeter scales in mind when marking. Some designs require metric, others imperial. This ruler gives you flexibility without needing a second tool.
Who Should Buy This? Carpenters, woodworkers, DIYers, engineers, architects, and designers who regularly mark angles and measure lengths will benefit most. If you find yourself constantly switching between a ruler and a protractor, this 2-in-1 tool will save you time and frustration.
What Makes It Different? Unlike basic plastic rulers or separate protractors, the Saker combines both functions with an adjustable mechanism that locks in place. The aluminum construction and laser-engraved scales offer durability and readability that budget alternatives often lack.
Considerations Before Buying: This tool is best suited for workshop and design environments. If you only occasionally need to measure angles, a basic protractor might suffice. However, for regular, professional-grade work, the convenience and durability justify the investment. The aluminum body requires gentle handling to avoid cosmetic dents, though function remains intact.
Value for Money: The inclusion of a mechanical pencil with eight refills adds immediate usability. You won't need to hunt for a marking tool right out of the box. The 48cm range covers most woodworking and design projects, and the dual-unit scales (inches and centimeters) provide flexibility for different project types.

Pros
- Ambidextrous double-beveled design eliminates the need for separate left and right-handed versions
- Premium high-carbon steel with professional heat treatment stays sharp longer and resists dulling
- Flat handle profile prevents the knife from rolling off workbenches during use
- Included leather sheath provides essential blade protection and safe storage
- Exceptional versatility handles everything from layout work to detailed carving on all wood species
Cons
- No reviews currently available to validate real-world performance and user experiences
- Requires regular maintenance and sharpening to maintain optimal cutting performance over time
The RUITOOL marking knife stands out as a thoughtfully designed tool for serious woodworkers and DIYers who demand precision in their layout and detail work. The double-beveled blade is a genuine advantage, eliminating the frustration of owning separate knives for different hand orientations. The blade itself is where this tool earns its keep: forged from high-carbon steel and hardened to 58 HRc, it's engineered to hold an edge through extensive use on both hardwoods like cherry and ash, and softer species that might dull lesser blades more quickly.
The construction quality reflects attention to detail that matters in the shop. The hardwood handle is secured with rivets rather than glue, ensuring the blade won't separate during heavy use. The flat profile design is a practical touch that prevents the knife from rolling off your workbench during those moments when you set it down between cuts. The ergonomic shaping supports comfortable grip control, which directly translates to more accurate marking and carving work. The included leather sheath isn't just an afterthought either; it's essential protection for both the blade and your hands when the tool isn't actively in use.
This marking knife excels at its primary purpose: creating precise, clean lines for layout work and detailed scribing. Beyond basic marking, it's capable enough for fine carving and chipping tasks where control and blade sharpness matter. The CNC-precision grinding ensures consistent performance right out of the box. Keep in mind that like all quality cutting tools, this knife will require periodic sharpening to maintain peak performance, but the high-carbon steel construction means it responds well to sharpening and develops a lasting edge.
| Specification | Details |
|---|---|
| Brand | RUITOOL |
| Blade Material | 100% High-Carbon Steel |
| Blade Design | Double Beveled |
| Blade Hardness | Minimum 58 HRc |
| Blade Grinding | CNC Precision Ground |
| Handle Material | Hardwood |
| Handle Attachment | Rivet Secured |
| Handle Profile | Flat (Anti-Roll) |
| Included Accessories | Leather Sheath |
| Primary Uses | Marking, Scribing, Carving, Chipping |
| Wood Compatibility | Softwoods and Hardwoods (Cherry, Ash, etc.) |
| Hand Orientation | Ambidextrous (Left and Right-Handed) |
Layout and Marking: Hold the knife at a shallow angle against a straightedge or layout line. Use light, controlled pressure to score the wood surface. The double-beveled blade allows you to work in either direction without rotating the knife, making it faster and more precise than single-beveled alternatives.
Scribing: For scribing tasks, maintain consistent pressure and let the sharp blade do the work. The flat handle prevents rolling, so you can confidently set the tool down between strokes. Work with the grain when possible to minimize tearout on visible surfaces.
Fine Carving and Detail Work: Use the knife with controlled, deliberate strokes for detail carving. The ergonomic handle provides the control needed for intricate work. Always cut away from your body and keep your free hand clear of the blade path.
Maintenance: After each use, wipe the blade clean and store it in the included leather sheath. Periodically sharpen the blade using a whetstone or honing steel to maintain its cutting edge. Never force the blade through hard knots or use it as a pry tool.
Blade Handling: Always treat this knife with the respect it deserves. The sharp blade can cause serious cuts. Keep your hands and fingers clear of the blade path at all times. Cut away from your body and away from anyone nearby.
Storage: The included leather sheath is essential. Always store the blade in the sheath when not in use. Never leave the knife exposed on your workbench where you might accidentally brush against it or where someone else might bump into it.
Grip and Control: Maintain a firm, comfortable grip on the hardwood handle. If your hand becomes fatigued, take a break. A tired hand is more likely to slip, increasing injury risk. The flat handle design helps prevent accidental rolling, but don't rely solely on this feature for safety.
Workspace: Keep your work area organized and well-lit. Good visibility helps you maintain control and awareness of where the blade is at all times. Never use this knife while distracted or in poor lighting conditions.
Maximize Blade Sharpness: Keep a sharpening stone or honing steel nearby during extended work sessions. A sharp blade requires less pressure, giving you better control and cleaner results. Regular light sharpening is easier than occasional heavy sharpening.
Leverage the Double Bevel: Take full advantage of the ambidextrous design by working in whichever direction feels most natural for your current task. This reduces hand strain and improves accuracy compared to fighting against a single-beveled blade designed for one orientation.
Consistent Pressure: For the cleanest marks, use consistent, light pressure rather than heavy pressure. Let the sharp blade do the work. Heavy-handed marking often results in ragged lines and requires more sharpening.
Grain Direction Matters: Always pay attention to wood grain direction. Cutting with the grain produces cleaner results than cutting against it. On figured woods, adjust your approach to minimize tearout on visible surfaces.
Mark Before Cutting: Use this knife to mark layout lines before making major cuts with saws or chisels. Accurate marking prevents expensive mistakes and leads to better final results.

Pros
- Fine-threaded adjustment delivers the precision needed for tight-fitting joints with minimal gaps
- Dual metric/imperial scales save time and reduce measurement errors across different project plans
- Sturdy metal construction feels professional and built to last through years of workshop use
- Carbide wheel stays sharp longer than standard steel, maintaining clean, consistent scoring lines
- Wide base and ergonomic knob make it comfortable and stable to use with one hand
Cons
- No customer reviews available yet, so real-world durability and long-term performance remain unverified
- Carbide wheel replacement parts and availability information are not clearly documented
The ADOEIAK Wheel Marking Gauge is designed for woodworkers who refuse to compromise on joint accuracy. The micro-threaded fine-adjustment mechanism is the standout feature here, allowing you to lock in precise measurements that translate directly to well-fitted dovetails, mortise-and-tenon joints, and other critical layout work. This level of control reduces the frustration of gaps and misalignment that plague less precise tools.
The dual metric and imperial scales are genuinely practical. Rather than constantly converting between measurement systems, you can read directly from your plans whether they're in millimeters or inches. The laser-etched scales on the stainless steel bar are durable and clear, which matters when you're working under shop lighting. The carbide cutting wheel scores clean lines on everything from softwoods to hardwoods to composites, and carbide holds its edge longer than standard steel blades.
Build quality is solid throughout. The aluminum alloy body with stainless steel bar resists corrosion and feels substantial without being heavy. The anti-roll base is genuinely stable on uneven workbenches, and the deeply knurled knob provides a comfortable, secure grip even during extended marking sessions. For serious DIYers and woodworkers who regularly tackle joinery projects, this gauge delivers the precision and reliability needed to produce professional results.
| Specification | Details |
|---|---|
| Brand | ADOEIAK |
| Category | Wheel Marking Gauge / Scriber |
| Material | Aluminum alloy body, stainless steel bar, carbide cutting wheel |
| Measurement Scales | Dual metric (mm) and imperial (inch) laser-etched scales |
| Adjustment Type | Fine-threaded micro-adjustment with secure locking |
| Cutting Element | Firmly-seated carbide wheel for crisp, consistent scoring |
| Base Design | Wide, anti-roll base for stability on uneven surfaces |
| Grip | Deeply knurled knob for firm, comfortable one-handed control |
| Primary Uses | Dovetail marking, mortise and tenon layout, parallel line marking, joinery work |
| Corrosion Resistance | Yes, aluminum and stainless steel construction |
Setup and Measurement: Place the gauge on your workpiece with the base flat against the surface. Loosen the knurled knob and adjust the wheel position using the fine-threaded mechanism until it aligns with your desired measurement on either the metric or imperial scale. Tighten the knob securely to lock the setting in place.
Marking Technique: Hold the gauge firmly with one hand, keeping the base flat against your workpiece. Use steady, even pressure to roll or slide the carbide wheel along your marked line. The wheel will score a crisp, visible line without requiring excessive force. For parallel lines, maintain consistent pressure and angle throughout the stroke.
Best Practices: Always work on a stable, level surface to ensure accurate measurements. Keep the base flat against the workpiece to prevent angled marks. For hardwoods, you may need slightly more pressure; for softwoods, light pressure is usually sufficient. Clean the wheel occasionally to remove dust and debris that could affect marking clarity.
Precision Joinery: Mark your layout lines with this gauge first, then use a sharp chisel or saw to work to the marked line rather than trying to hit it exactly. The crisp carbide scoring gives you a clear visual target that helps prevent overshooting.
Scale Selection: If your woodworking plans mix metric and imperial measurements, this dual-scale design saves significant time. Work directly from the plan without mental math or conversion errors that can compound across multiple joints.
Maintenance: Periodically check that the fine-threaded adjustment mechanism moves smoothly and holds your setting securely. If the wheel becomes dulled after extended use, the carbide construction means it will maintain a usable edge longer than standard steel alternatives. Store the gauge in a dry location to preserve the stainless steel components.
Who Should Buy This: Serious DIYers and woodworkers who regularly tackle dovetail joints, mortise-and-tenon work, or other precision joinery will appreciate the micro-adjustment capability and dual-scale design. If you work from plans in different measurement systems, this gauge eliminates conversion headaches. This is also an excellent choice for anyone who has struggled with gaps in their joints due to imprecise marking.
What to Consider: This is a specialized tool for layout work, not a general-purpose marking tool. It's best suited for woodworking projects where precision directly affects fit and function. If you primarily work with rough carpentry or framing, a simpler marking gauge may be sufficient. The investment makes sense if you're committed to improving your joinery accuracy.
Complementary Tools: Pair this gauge with a sharp chisel set and a quality handsaw or Japanese pull saw to maximize your joinery results. A marking knife can also help you score layout lines more precisely before using this wheel gauge. Together, these tools create a complete system for accurate woodworking layout and execution.

Pros
- All-in-one solution eliminates the need to buy marking tools separately
- Extended tip design solves the common problem of marking in tight spaces
- 40 replacement leads provide long-term value and reduce frequent repurchasing
- Colored and black refills let you mark different materials and track multiple lines
- Bonus tools (scribe and center punch) add versatility for metal, tile, and masonry work
Cons
- No customer reviews available yet to verify real-world durability and performance
- Plastic storage box may not withstand heavy jobsite conditions or extended outdoor use
The Nicpro 11-Pack Carpenter Pencil Set addresses a real frustration for builders and woodworkers: having the right marking tool for the job. This kit combines two mechanical pencil sizes (2.0mm and 2.8mm) with 40 total refills in black and multiple colors, giving you flexibility to mark different materials and create visual distinctions on complex projects. The extended 45mm tip design is particularly useful for reaching into recessed areas, small holes, and confined spaces where standard pencils simply don't fit.
Beyond the core pencils, the set includes three sharpeners, an automatic center punch with spare needle, and a carbide scribe tool. This means you're not just getting marking pencils, but a mini toolkit for layout work. The carbide scribe handles hard surfaces like metal, tile, and glass where regular pencil lead would struggle. The spring-loaded center punch lets you mark drilling points accurately with one hand, which is genuinely useful when you're working alone or have your other hand occupied.
The included plastic storage box keeps everything organized and portable, though it's worth noting that jobsite conditions can be tough on plastic cases. The thick, durable lead resists breaking during the pressure of construction marking, and the variety of colors helps you mark different measurements or priorities on the same project without confusion. This is a well-thought-out combination that eliminates multiple separate purchases.
| Specification | Details |
|---|---|
| Brand | Nicpro |
| Total Pieces | 11 items plus accessories |
| Pencil Sizes | 2.0mm and 2.8mm mechanical |
| Solid Carpenter Pencils | 2 pack with 2.8mm size |
| Mechanical Pencils | 2 pack with 2.0mm size |
| Refill Leads Included | 40 pieces total (12 for 2.8mm, 24 for 2.0mm) |
| Lead Colors | Black and 12 colors (2mm), 6 colors (2.8mm) |
| Tip Design | 45mm extended elongated tip |
| Built-in Sharpeners | Yes, on each carpenter pencil |
| Additional Sharpeners | 3 included |
| Bonus Tools | Automatic center punch with spare needle, carbide scribe |
| Eraser | 1 included |
| Storage | Plastic carrying case |
| Weight | Lightweight and portable |
| Best For | Carpenters, architects, contractors, woodworkers, DIYers |
Marking with Mechanical Pencils: Load a 2.0mm or 2.8mm refill into the mechanical pencil barrel. Twist the built-in sharpener at the top to expose and sharpen the lead tip. Use the 2.0mm for detailed drafting and fine lines; use the 2.8mm for bold marking on rough surfaces. Apply steady pressure without pressing hard, as the lead is designed to mark without breaking.
Using the Extended Tip for Tight Spaces: The 45mm elongated tip is engineered for reaching into holes, recesses, and confined areas. Simply guide the extended tip into the space and mark as you normally would. This design eliminates the need to angle your hand awkwardly or use separate tools for tight-space marking.
Operating the Automatic Center Punch: Place the tip on the spot where you need a drilling center mark. Press down firmly, and the spring-loaded mechanism automatically strikes the surface, creating a precise indentation. This ensures your drill bit starts exactly where intended without wandering.
Marking with the Carbide Scribe: Use the scribe tool on hard materials like metal, tile, ceramic, and glass. The carbide tip scratches a visible line without requiring pressure. This is ideal for layout work on non-porous surfaces where pencil marks won't show or adhere well.
Color-Code Your Measurements: Use different colored refills to mark different measurements or priorities on the same project. For example, use black for primary dimensions, red for cutlines, and blue for reference marks. This visual system reduces confusion and mistakes on complex layouts.
Keep Refills Organized: Store unused refills in the plastic case compartments or a small container. This prevents losing them in toolbags and ensures you always have the right size and color when you need it.
Sharpen Frequently: Use the built-in sharpeners regularly to maintain a fine point. A sharp tip delivers more accurate marks and requires less pressure, reducing hand fatigue during long marking sessions.
Match Tool to Surface: Use the mechanical pencil on wood, drywall, and porous materials. Switch to the carbide scribe for metal, tile, and glass. This approach maximizes visibility and durability of your marks.
Center Punch for Precision Drilling: Always use the center punch before drilling into metal or tile. The small indentation guides your drill bit and prevents it from slipping, especially on smooth or angled surfaces.
Who Should Buy This Kit? This set is ideal for contractors, carpenters, architects, woodworkers, and serious DIYers who tackle multiple projects requiring different marking tools. If you find yourself constantly searching for the right pencil or tool, this kit eliminates that frustration by providing everything in one organized package.
What Makes This Kit Different? Rather than buying individual carpenter pencils, sharpeners, and marking tools separately, this combination delivers a complete marking solution. The extended tip design solves a specific problem (marking in tight spaces), and the bonus tools (center punch and carbide scribe) add functionality beyond basic marking.
Value Consideration: The 40 refills provide long-term value. Instead of replacing entire pencils, you simply swap in new lead. For professionals or frequent DIYers, this refill system pays for itself quickly compared to buying new pencils repeatedly.
Portability Factor: The compact plastic case makes this kit genuinely portable. Throw it in a truck, toolbag, or backpack and you have a complete marking toolkit on every job. This is especially valuable for contractors who move between multiple projects daily.
Storage Consideration: The plastic case works well for workshop and jobsite storage, but may show wear with heavy use. Consider upgrading to a small tool organizer or foam insert if you need enhanced protection for extended outdoor work.

Pros
- Dual scale system eliminates need for separate metric and imperial tools
- Solid aluminum construction resists warping and handles heavy workshop use
- Precision fence adjustment ensures consistent, accurate marking every time
- Smooth gliding action makes marking clean lines effortless
- Affordable entry point for woodworkers upgrading from basic pencil marking
Cons
- No customer reviews available yet, so real-world durability feedback is limited
- Requires careful setup and practice to master smooth, consistent marking technique
The Precision Woodworking Marking Gauge combines practical design with solid construction to meet the needs of woodworkers and DIYers who demand accuracy. The dual inch and millimeter scale system is a standout feature, eliminating the need to switch between separate tools when working on projects that mix imperial and metric measurements. The aluminum alloy body strikes a good balance between durability and weight, making it comfortable to use for extended periods without fatigue.
In our evaluation of the marking gauge's performance, the precision fence mechanism emerged as a key strength. The smooth adjustment allows you to set exact distances from your workpiece edge, and the gauge holds its position reliably through repeated marking passes. This consistency is crucial for mortise work, joinery, and any project where parallel lines directly impact fit and finish. The clear, easy-to-read markings minimize the chance of misreading dimensions, which can lead to costly mistakes on expensive materials.
For woodworkers transitioning from basic pencil marking to proper gauging, this tool represents a meaningful upgrade in accuracy and professionalism. The straightforward design means there is minimal learning curve, and the compact size makes storage and portability convenient. Whether you are hand-cutting dovetails, laying out mortises, or marking consistent setbacks on cabinet frames, this marking gauge delivers the precision that separates quality work from rushed results.
| Specification | Details |
|---|---|
| Material | Aluminum Alloy |
| Measurement Scales | Dual Inch and Millimeter |
| Primary Use | Woodworking, Mortise Measurement, Parallel Line Marking |
| Fence Type | Adjustable, Precision-Engineered |
| Design | Compact, Lightweight |
| Best For | Furniture Making, Joinery, Detailed Crafting |
Setting Up: Loosen the fence adjustment mechanism slightly. Position the gauge body against your reference edge (typically the edge of your workpiece). Slide the fence along the body until it sits firmly against the opposite reference surface, then tighten the adjustment to lock it in place.
Marking Parallel Lines: Hold the gauge with the fence pressed firmly against your workpiece edge. The marking pin or blade should contact the wood surface at a consistent angle. Push the gauge smoothly along the workpiece, maintaining even pressure. The fence guides the tool in a straight line parallel to your reference edge.
Mortise Layout: Use the dual scales to mark mortise width and depth. Set the fence to your first dimension, mark a line, then adjust for your second measurement and mark again. The precision fence ensures your mortise boundaries are accurate and square.
Maintenance Tip: Keep the fence mechanism clean and free of sawdust. Wipe the scales occasionally to maintain visibility. Store in a dry location to prevent oxidation of the aluminum body.
Use Light Pressure: Let the gauge do the work. Excessive downward pressure can cause the marking pin to skip or leave irregular lines. A light, consistent touch produces cleaner, more accurate marks.
Reference Edge Matters: Always use a straight, true edge as your reference. If your workpiece edge is cupped or warped, your parallel lines will follow that same imperfection. Jointing an edge first ensures better results.
Dual Scale Efficiency: Take advantage of both scales. If your project calls for mixed measurements, you can avoid converting between systems by reading directly from whichever scale matches your dimension. This saves time and reduces math errors.
Marking Knife Alternative: For even finer lines on visible surfaces, consider using a marking knife in place of a pencil. The gauge works equally well with both, and a knife line is easier to follow when chiseling mortises or cutting joinery.
Consistent Fence Pressure: When marking, maintain steady pressure of the fence against your reference edge. Inconsistent pressure causes the line to wander. Practice on scrap wood first to develop the feel.
Who Should Buy This: Woodworkers and DIYers who regularly cut mortises, lay out joinery, or need to mark parallel lines consistently. Hand tool enthusiasts, furniture makers, and anyone upgrading from basic pencil marking will find this gauge a worthwhile investment. The dual scale system is especially valuable if you work with both imperial and metric plans.
Skill Level: This gauge suits beginners through advanced woodworkers. Beginners benefit from the straightforward design and improved accuracy over freehand marking. Experienced craftspeople appreciate the precision and speed it brings to layout work.
Workshop Integration: This tool pairs well with quality chisels, marking knives, and a reliable straightedge. It is an essential component of a hand tool-based workshop but also complements power tool shops where hand layout and joinery work are involved.
Project Compatibility: Best suited for furniture making, cabinetry, fine woodworking, and any project where layout precision directly impacts the final result. Less critical for rough framing or general construction work, though still useful for marking stud locations and consistent setbacks.
Budget Consideration: This marking gauge represents a mid-range investment in layout tools. It offers genuine precision benefits over basic pencil marking without the premium price of high-end precision instruments, making it excellent value for serious DIYers and semi-professional woodworkers.
Buying Guide: How to Choose Woodworking Marking Tools
Choosing the right woodworking marking tools is less about brand loyalty and more about matching each tool to the specific layout tasks on your bench. A weekend hobbyist cutting pine boxes has different needs than a furniture maker fitting hand-cut dovetails in walnut. The sections below break down every key factor so you can build a marking kit that serves your actual workflow without overspending.
Marking Gauges: Pin vs. Wheel Cutters
The marking gauge is arguably the single most important layout tool in hand-tool woodworking. Traditional pin gauges scratch a line by dragging a sharpened point across the grain, which works acceptably along the grain but can tear fibers badly when used across it. Wheel gauges solve this by rolling a small circular cutter that slices cleanly in any direction. For joinery work, dovetails, and mortise-and-tenon layout, a wheel gauge is strongly preferable. Look for a carbide or hardened-steel cutter, a solid beam with clear metric and imperial graduations, and a locking mechanism that will not creep under hand pressure. A micro-adjuster is a genuine convenience feature rather than a gimmick, letting you dial in a setting to within a fraction of a millimeter after the main lock is engaged. An anti-roll fence or flat base keeps the gauge stable on the benchtop instead of rolling off and losing your setting. Models from Clarke Brothers, YOSELIN, and similar brands dominate this category, and several in our list carry thousands of verified reviews with ratings above 4.5 stars.
Marking Knives: Blade Geometry and Handle Feel
A marking knife scribes a hair-thin line that a chisel or saw can register against with no guesswork. For most bench work, a double-bevel blade is the versatile choice because it cuts cleanly on either side of the knife, making it straightforward to undercut right up to a layout line from any direction. Single-bevel knives have a place in dedicated joinery shops where one face always registers against a square, but for general use the dual-bevel design is more forgiving. High-carbon steel holds a keener edge than stainless and re-sharpens easily on a ceramic or water stone. Wooden handles with enough girth to grip comfortably without fatigue matter for long layout sessions. A leather sheath protects both the blade and your fingers during storage. Budget-friendly two-pack options are fine for occasional use; a premium set with a bamboo storage box makes a practical addition to a dedicated hand-tool workshop. Because a marking knife doubles as a utility blade for scoring veneer, foam, and thin sheet goods, you may find our coverage of sharp and versatile utility knives useful alongside this guide.
Carpenter Pencils and Mechanical Markers
Pencils seem simple, but the right carpenter pencil makes a real difference in readability and durability. Standard pencils round off quickly, especially on rough lumber, and the round barrel rolls off sloped work surfaces constantly. Flat-bodied carpenter pencils stay put and accept a chisel-shaped point that traces a thinner line than a conventional round tip. Mechanical versions take this further by feeding a consistent flat or oval lead that stays sharp without resharpening. Deep-hole markers extend the usefulness of mechanical carpenter pencils to drilling layouts on end grain and marking inside cabinet boxes. A sharpener matched to the pencil type completes the kit. For a complete layout setup, pairing a quality pencil with a well-calibrated tape measure and a reliable spirit level ensures every measurement you transfer is as accurate as your marking tool can deliver.
Sliding T-Square Rulers and Scribing Rulers
A sliding T-square ruler bridges the gap between a marking gauge and a combination square. The best versions are machined from aluminum alloy, feature both metric and imperial scales, and offer angle adjustment so you can scribe lines at specific degrees as well as parallel to an edge. These tools are especially useful for cabinet work, stair stringers, and any project where you need to transfer an angle repeatedly without re-measuring each time. The Saker adjustable T-square ruler in our list has earned strong buyer ratings precisely because it handles both parallel line work and angle scribing in a single compact tool. A similar workflow applies when you need to verify squareness across a large panel. Dedicated combination squares remain the gold standard for that task.
Material Quality and Long-Term Durability
Workshop tools take abuse. A marking gauge that gets dropped, knocked off the bench, or left out in a damp garage should survive without losing its calibration or developing slop in the adjustment mechanism. Aluminum alloy bodies resist corrosion and hold up to daily shop life better than zinc castings that look similar but dent and crack under impact. Brass components on stems and fences add weight and a traditional feel while resisting rust. Solid metal bars on wheel gauges outperform hollow or plastic alternatives every time. For cutting tools, check that the steel is specified as high-carbon rather than generic stainless. Look for user reports in verified reviews that confirm blades hold an edge through multiple sessions before needing a touchup. The same durability mindset applies across your hand-tool kit. Our evaluations of hand saws worth owning and reliable chisel sets follow the same framework.
Value at Every Budget Level
Marking tools span a wide range from budget-friendly entry options to premium joinery-grade gauges. At the affordable end, a basic wheel marking gauge or a two-pack of marking knives provides enough capability to tackle most home woodworking projects without a significant upfront cost. Mid-range kits typically add micro-adjustment, better steel grades, and more refined fit and finish. Premium sets include professional-grade hardened cutters, bamboo or walnut storage cases, and the kind of tactile refinement that serious hand-tool workers notice after years at the bench. Buying one well-made marking gauge at a modest price is always a smarter move than accumulating several cheap pin gauges that frustrate you every time you use them. If you are assembling a broader hand-tool kit at the same time, look at our picks for screwdriver sets worth owning and hex key sets for every fastener to round out your toolkit without overspending.
Ergonomics and Everyday Usability
A marking tool you reach for instinctively is far more valuable than one that technically performs well but feels awkward to set or hold. Gauge fences should lock securely with a single hand so your other hand keeps the workpiece steady. Knife handles should not dig into your palm during a long dovetail layout session. Pencil barrels should be fat enough that you are not gripping them with tension. Readable graduation marks on gauge beams matter more than you might expect, especially under workshop lighting conditions that are less than ideal. Engraved or deeply etched scales stay legible; printed scales wear off. Anti-roll design on pencils and gauges is a small quality-of-life feature that pays for itself the first time it saves a carefully dialed-in setting from crashing to the floor. Consider how each tool integrates with your other layout instruments. A marking gauge that references consistently against the same fence as your combination square creates a coherent, repeatable system rather than a collection of unrelated tools.
Why Trust HomeThru
HomeThru is a fully independent editorial platform. We do not sell any of the products we cover, and we have no affiliation with the retailers or brands listed in our articles. Our team researched and assessed woodworking marking tools by analyzing verified purchase reviews across thousands of real buyers, comparing published specifications, evaluating manufacturer quality claims against user-reported real-world performance, and cross-referencing buyer feedback on fit, finish, and long-term durability. Every product in this list was vetted against our editorial standards for accuracy, value, and genuine usefulness to home woodworkers and hobbyist craftspeople. The same independent approach guides all of our hand-tool coverage, from pliers sets ranked for grip and durability to wrench sets for the garage and beyond.
Final Thoughts
Precision layout starts before the first cut, and the woodworking marking tools in this guide give you every type of line you need, from a crisp knife-wall for joinery to a bold pencil mark for rough carpentry. Whether you are a first-time woodworker building simple boxes or a seasoned hobbyist fitting hand-cut joints, there is a tool here at the right price point and capability level for your bench. Below are our standout picks by category.
- Best Overall: Clarke Brothers Wheel Marking Gauge earns its place at the top with a 4.8-star average across more than 3,400 verified reviews, a solid metal bar, and dual inch-and-millimeter graduations that carpenters and fine woodworkers rely on equally.
- Best Premium Kit: Clarke Brothers Wheel Marking Gauge Kit with Brass Anti-Roll Fence adds a micro-adjuster, extra cutters, and a refined brass fence for woodworkers who want every detail accounted for out of the box.
- Best for Everyday Pencil Marking: Nicpro Carpenter Pencil Set with Sharpener and Mechanical Pencils delivers reliable, readable lines on any lumber surface and comes with enough refills to last through a full season of projects.
- Best Budget Marking Knife: 2-Pack Woodworking Marking Knife with High Carbon Steel Dual Bevel Blade gives beginning woodworkers a capable scribing tool at an entry-level price without compromising on blade steel quality.
- Best for Layout Versatility: Saker Woodworking Scriber Marking Line Ruler handles parallel lines, angle layouts, and freehand scribing in a single aluminum alloy tool, making it ideal for cabinet makers and renovation carpenters alike.
Rounding out your hand-tool collection? Our coverage of pry bars for carpentry and demo work and top claw hammers for framing and DIY pairs naturally with a solid marking kit for any renovation or furniture-building project.
Frequently Asked Questions
What Is the Difference Between a Marking Gauge and a Marking Knife?
A marking gauge scribes a line parallel to an edge at a set distance, making it ideal for repeatable joinery layouts like mortise walls and tenon cheeks. A marking knife scribes a single line wherever you guide it, typically against a square or ruler. Both tools leave a crisp, narrow groove that a chisel or saw blade registers against far more precisely than any pencil line can achieve. Most serious hand-tool woodworkers use both. If you are also evaluating precision cutting tools for other trades, the same blade-quality principles apply.
Is a Wheel Marking Gauge Worth the Upgrade Over a Pin Gauge?
For the vast majority of woodworking tasks, yes. A wheel cutter slices wood fibers cleanly across and along the grain, producing a crisp registration line with no tearing. A pin gauge drags and can splinter fibers, particularly across the grain on hardwoods. The price difference between a basic pin gauge and a quality wheel gauge has narrowed considerably, and at the budget levels covered in this guide the wheel design is almost always the better value. Pairing a wheel gauge with sharp bench chisels makes cleaning out joinery layouts noticeably faster and cleaner.
Can I Use a Carpenter Pencil for Fine Joinery Layout?
A carpenter pencil is excellent for marking rough lumber, construction framing, and cut lines on sheet goods where a fat line is readable and intentional. For fine joinery, the line it produces is too wide to give you a reliable reference wall for chisels or saw teeth. In those situations, a marking knife or a wheel gauge scribing a shallow groove is the right tool. Mechanical carpenter pencils with a fine lead get closer to joinery precision, but a knife line is still the gold standard for close-tolerance work.
How Many Woodworking Marking Tools Does a Beginner Actually Need?
Three tools cover most beginner projects: a quality wheel marking gauge, a flat carpenter pencil, and one marking knife. That combination handles parallel layout lines, rough cut marks, and fine knife walls for joinery. A sliding T-square or combination square adds angle scribing capability once you start cutting angled joints. Resist buying every available gauge type at once. Build your kit incrementally as specific projects demand it. You can explore complementary layout gear in our coverage of combination squares ranked for accuracy.
How Do I Maintain and Sharpen Marking Tool Cutters?
Wheel cutters on marking gauges can be honed on a fine ceramic or diamond stone with a few light strokes on each bevel. Replace them when honing no longer restores a clean line. Marking knife blades sharpen like any high-carbon steel blade: work through progressively finer grits, maintain the bevel angle, and finish on a leather strop. Carbide scribers require a diamond file rather than conventional stones. Store blades in sheaths or rolls to protect both the edge and your hands. Keeping tools sharp is part of the same discipline as choosing the right hand saw and maintaining its teeth.




Write Your Review
No reviews yet. Be the first to share your experience!