

A detail sander is one of those tools that earns its keep the moment you try to smooth a tight inside corner by hand. Folded sandpaper slips, your fingers ache, and the result still looks rough. A good detail sander, sometimes called a mouse sander for its distinctive triangular shape, drives a pointed pad into corners, along trim profiles, and into furniture joints where no orbital or sheet sander can reach. The result is a clean, consistent surface without the cross-grain scratches that come from hand sanding under pressure.
Whether you are refinishing a piece of furniture, prepping cabinet doors for paint, or smoothing decorative molding, the best detail sanders give you control that larger tools simply cannot offer. The market ranges from budget-friendly corded models priced for occasional hobbyists to professional-grade cordless units built for tradespeople already invested in a battery platform. Our team at HomeThru independently researched, compared, and evaluated the top-selling detail sanders on the market, weighing power, weight, dust collection, sanding pad design, and real-world usability. Below you will find our full picks, followed by a practical buying guide covering everything you need to make the right choice.
Our Top Picks for Detail Sanders
Pros
- Interchangeable attachments let you handle multiple sanding tasks without buying separate tools
- Excellent dust management with both internal micro-filtration and external vacuum compatibility
- Low vibration and soft rubber grip make this sander comfortable for longer work sessions
- Strong motor performance handles a variety of sanding applications consistently
- Generous accessory bundle includes enough sanding sheets and attachments for immediate use
Cons
- Corded design limits mobility and requires proximity to a power outlet during use
- No customer reviews available yet, so real-world durability and long-term performance data is limited
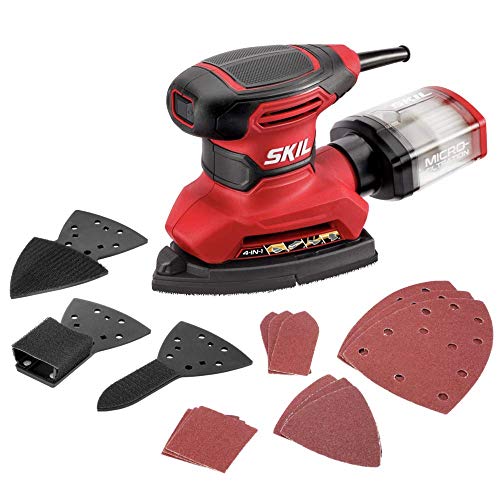
The SKIL SR232301 is a well-engineered detail sander built for homeowners and DIYers who need precision sanding across multiple surface types. The 1.2-amp motor runs at 13,500 orbits per minute, providing enough power to handle both delicate finishing work and more aggressive material removal without bogging down. The real strength of this sander lies in its 4-in-1 versatility: the included attachments allow you to switch between flat surfaces, corners, edges, and contoured work without purchasing additional tools, and the tool-free design means you can swap attachments in seconds.
Dust control is a priority with this model, and SKIL addressed it from two angles. The built-in micro-filter system captures fine particles, while the 1.25-inch dust port accepts standard shop vacuum hoses for those who prefer external collection. This dual approach gives you flexibility depending on your workspace and the type of sanding you're doing. The sealed on/off switch is a thoughtful design detail that keeps dust out of the power mechanism, potentially extending the tool's working life. Combined with the hook-and-loop sanding sheet system, sheet changes are genuinely quick and tool-free.
Comfort and control are evident in the ergonomic design. The soft rubber grip and counterweight balance system work together to reduce hand fatigue during extended sessions, which matters when you're tackling detailed finishing work that demands precision. The generous accessory package includes 12 pre-cut sanding sheets in various grits plus the three interchangeable attachments, so you can start a project immediately without additional purchases. For DIYers focused on furniture refinishing, trim work, and fine detail sanding, this corded sander delivers solid performance at a reasonable investment.
| Specification | Details |
|---|---|
| Motor Power | 1.2 Amps |
| Orbits Per Minute | 13,500 OPM |
| Sanding Configurations | 4-in-1 (includes 3 interchangeable attachments) |
| Dust Collection | Micro-filter system + 1.25-inch vacuum port |
| Sanding Sheet System | Hook and loop (tool-free change) |
| Grip Design | Soft rubber with ergonomic contour |
| Vibration Control | Counterweight balance system |
| Power Cord | Corded electric (AC powered) |
| Included Accessories | 12 pre-cut sanding sheets, 3 detail attachments |
| On/Off Switch | Dust-sealed design |
Getting Started: Before your first use, charge the micro-filter by running the sander briefly without a sanding sheet. Attach the appropriate detail head for your task: flat head for large surfaces, pointed head for corners, edge head for trim, or contoured head for curved work. Simply push the attachment onto the quick-change base until it clicks into place.
Attaching Sanding Sheets: Select the appropriate grit for your material and task. Align the hook-and-loop sanding sheet with the attachment base and press firmly across the entire surface. The hook-and-loop system grips securely without fasteners, and you can remove and replace sheets by peeling them away from the base.
Sanding Technique: Let the sander do the work. Move the sander smoothly across the surface in the direction of the wood grain when possible. Avoid pressing down hard, as the motor's vibration provides the cutting action. For dust control, connect your shop vacuum to the 1.25-inch port, or allow the internal micro-filter to collect dust. Empty the micro-filter box regularly to maintain suction and motor performance.
Changing Attachments: The tool-free design makes switching quick. Simply grasp the current attachment and pull it straight away from the base. Align the new attachment and push it on until you feel it click. This allows you to move between different sanding tasks without interruption or tools.
Before Operation: Always inspect the power cord for damage before plugging in. Ensure the sanding sheet is properly attached and the attachment head is fully seated on the base. Never operate the sander with missing or damaged sanding sheets. Wear safety glasses to protect your eyes from dust and debris, and use a dust mask or respirator when sanding materials that create fine particles.
During Use: Keep your hands and fingers away from the sanding surface and attachment edges while the sander is running. Never reach under or around the sanding head during operation. Maintain a firm, balanced grip with both hands whenever possible. Be aware of the power cord location to avoid tripping or tangling it during use. Do not force the sander or apply excessive pressure; let the motor speed do the work.
Dust and Ventilation: Use the vacuum port attachment whenever possible to minimize airborne dust. If using the internal micro-filter only, work in a well-ventilated area and empty the dust box frequently to prevent clogging and motor strain. Never operate the sander in enclosed spaces without adequate ventilation.
After Use: Always unplug the sander before changing attachments, sanding sheets, or performing any maintenance. Allow the motor to come to a complete stop before setting the tool down. Store the sander in a dry location away from moisture and extreme temperatures. Periodically clean the micro-filter and check all attachments for wear or damage.
Maximize Dust Collection: Connect the vacuum port to a shop vacuum with a quality filter for the cleanest operation. This setup keeps your workspace cleaner and prevents fine dust from clogging the internal micro-filter, which can reduce motor performance over time. Empty your vacuum bag or filter frequently when sanding to maintain consistent suction.
Choose the Right Grit Sequence: Start with a coarser grit (80-120) to remove old finishes or imperfections, then progress to medium grits (150-180) for smoothing, and finish with fine grits (220-320) for the final surface preparation. This staged approach produces superior results and uses less time and material than jumping straight to fine grits.
Match the Attachment to the Task: Use the flat head for large, flat surfaces like table tops and cabinet faces. The pointed head excels in tight corners and crevices. The edge head works best along trim, molding, and frame edges. The contoured head tackles curved surfaces and decorative details. Switching to the right attachment for each area prevents rework and speeds up your project.
Work With the Grain: When possible, sand in the direction of the wood grain to minimize scratches and tearout. This is especially important when moving from coarser to finer grits. If you must sand across the grain, use lighter pressure and finer grits to minimize visible cross-grain scratches in the finished surface.
Keep Sanding Sheets Fresh: Replace worn or clogged sanding sheets promptly. A dull sheet requires more pressure and generates excess heat, which can damage some finishes and reduce the sander's effectiveness. The hook-and-loop system makes sheet changes so quick that there's no reason to work with worn abrasives.

Pros
- Exceptional maneuverability in confined spaces thanks to its compact footprint and detail attachments
- Reliable 1.2 Amp motor delivers consistent power without the runtime limitations of cordless models
- Integrated dust collection system minimizes mess and keeps your work area visible
- Three-position grip adapts to different hand positions and working angles for comfort
Cons
- Corded design limits mobility and requires proximity to a power outlet, which can be restrictive in large projects
- 1.2 Amp motor has less power than heavier-duty sanders, making it slower on dense hardwoods or thick material removal
The BLACK+DECKER Detail Sander BDEMS600 excels at what it's designed to do: reach places where standard sanders simply cannot go. The compact form factor and detail finger attachment make it invaluable for sanding trim, baseboards, crown molding, and furniture edges. The three-position grip ensures you can maintain control and comfort whether you're working overhead, at odd angles, or in tight corners where larger tools would be impossible to maneuver.
Performance-wise, the 16,000 orbits per minute motor delivers respectable sanding speed for detail work. The included dust collection canister captures a meaningful amount of sawdust, keeping your workspace cleaner than working without collection and reducing the fine dust that settles on surrounding surfaces. The dust-sealed switch is a thoughtful engineering detail that protects the tool's internal mechanisms from debris infiltration, which extends the tool's operational lifespan.
The main trade-off is the corded design. While it eliminates battery anxiety and ensures consistent power throughout your project, you'll need to manage a power cord and stay within reach of an outlet. This tool is best suited for homeowners and DIYers tackling detail finishing work around the house rather than those needing maximum portability or working in locations far from power sources.
| Specification | Details |
|---|---|
| Brand | BLACK+DECKER |
| Model | BDEMS600 |
| Motor | 1.2 Amp |
| Orbits Per Minute | 16,000 OPM |
| Power Type | Corded Electric |
| Design | Compact Detail Sander |
| Grip Style | 3-Position Ergonomic Comfort Grip |
| Included Attachments | Detail Finger Attachment, Detail Sanding Pad |
| Dust Management | Dust Collection Canister, Dust-Sealed Switch |
Setup and Safety: Before operating, inspect the power cord for damage. Ensure the dust collection canister is properly attached. Always wear safety glasses and a dust mask when sanding, as fine particles will be released even with dust collection active.
Selecting the Right Attachment: Use the main detail sanding pad for flat surfaces and general detail work. Switch to the detail finger attachment when you need to access narrow crevices, corners, or tight spaces between trim pieces. The three-position grip allows you to adjust your hand position for comfort and control depending on your working angle.
Sanding Technique: Let the sander do the work; avoid pressing hard, which reduces efficiency and causes fatigue. Move the sander in the direction of the wood grain when possible. Start with medium-grit sandpaper and progress to finer grits for a smooth finish. Empty the dust canister regularly to maintain optimal collection performance.
Personal Protective Equipment: Always wear safety glasses to protect your eyes from dust and debris. Use a dust mask or respirator, especially during extended sanding sessions, as fine dust particles can affect respiratory health even with dust collection running.
Power Cord Management: Keep the power cord away from the sanding surface and moving parts. Do not operate the sander near water or in damp conditions. Inspect the cord before each use for cuts or damage that could create electrical hazards.
Tool Operation: Never reach into the sanding pad while the tool is running. Allow the sander to come to a complete stop before setting it down or changing attachments. Do not leave the running sander unattended, and always unplug it when making adjustments or changing sandpaper.
Sandpaper Selection and Maintenance: Stock multiple grit levels: 80-120 for material removal, 150-180 for smoothing, and 220+ for final finishing. Replace sandpaper when it becomes clogged or dull rather than pushing a worn sheet, which reduces efficiency and creates heat buildup. Keep extra sandpaper on hand since detail pads use less material than full-size sheets.
Dust Collection Optimization: Empty the canister frequently, even during a single project, to maintain suction efficiency. If collection performance drops, check for clogs in the canister connection or filter. A shop vacuum adapter can boost collection if your model supports it, capturing even more fine dust before it becomes airborne.
Workspace and Comfort: Work in good lighting so you can see exactly what you're sanding. Take breaks during extended sessions to reduce hand fatigue, even with the ergonomic grip. Clamp or secure your workpiece whenever possible to free both hands for controlling the sander with stability and precision.
Pros
- Lightweight and maneuverable for detailed work on trim, edges, and contoured surfaces
- Excellent dust control with dual options: built-in micro-filtration or vacuum attachment
- Low vibration and ergonomic design reduce hand fatigue for longer work sessions
- Quick sanding sheet changes save time and frustration on multi-surface projects
Cons
- Corded design limits mobility and requires proximity to a power outlet or extension cord
- No reviews available yet, so real-world user feedback on durability and long-term performance is limited
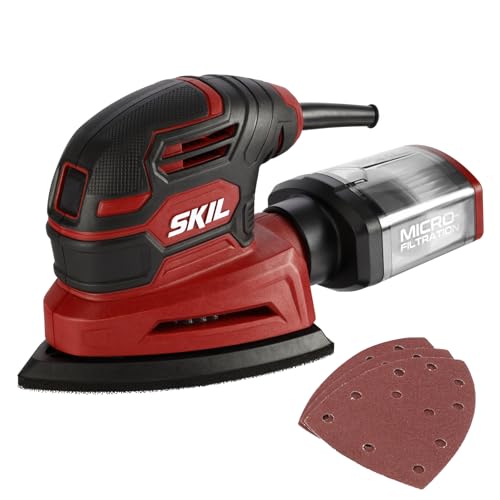
The SKIL SR250801 detail sander is engineered for homeowners and DIYers who prioritize precision and comfort in their finishing work. With a 1-amp motor spinning at 12,000 orbits per minute, it delivers the smooth, consistent sanding action needed for detail work on trim, furniture, and intricate woodworking projects. The orbital motion is fine enough for final finishing passes without aggressive material removal, making it a smart choice for work where surface quality matters.
Dust management is a standout feature. The sander includes a micro-filtration system that captures fine particles, and a 1.25-inch dust port accommodates standard shop vacuums for those who prefer external collection. This dual approach gives you flexibility based on your workshop setup and the scope of your project. The hook-and-loop sanding sheet system is refreshingly simple, allowing you to swap sheets in seconds without fumbling with clamps or tools.
Comfort and control are built into the design. The counterweight balance system actively reduces vibration, while the soft-grip handle and overall ergonomics keep your hand stable and fatigue-free during extended sanding sessions. The dust-sealed on-off switch is a thoughtful detail that prevents debris from interfering with the switch mechanism. For detail-oriented DIYers working on smaller projects or finishing work, this sander offers solid performance and user-friendly operation.
| Specification | Detail |
|---|---|
| Brand | SKIL |
| Model | SR250801 |
| Motor | 1 Amp |
| Orbits Per Minute | 12,000 |
| Dust Port Size | 1.25 inches |
| Dust Collection | Micro-filtration system with vacuum attachment option |
| Sanding Sheet System | Hook and loop (includes 3 sanding sheets) |
| Handle Design | Soft rubber grip, ergonomic |
| Vibration Control | Counterweight balance |
| Switch Type | Dust-sealed on-off |
| Power Type | Corded electric |
| Included Accessories | 3 sanding sheets, dust box |
Setup and Safety: Before starting, ensure your work surface is secure and well-lit. Wear safety glasses and a dust mask, especially if not using a vacuum. Check that the power cord is in good condition and that your work area is clear of obstacles.
Attaching Sanding Sheets: The hook-and-loop system makes this simple. Press the sanding sheet firmly onto the sanding plate, starting from one end and working across to avoid air bubbles. The sheet should lie flat and secure before you power on the tool.
Dust Collection: You have two options: use the built-in dust box (which collects finer particles through the micro-filtration system) or attach a standard shop vacuum to the 1.25-inch dust port. The vacuum option is ideal for larger projects or if you prefer maximum collection efficiency.
Sanding Technique: Let the tool do the work. Apply light, even pressure and move the sander smoothly across the surface in overlapping passes. For detail work and edges, use controlled, deliberate movements. Avoid pressing hard, as this can reduce the sander's effectiveness and cause uneven results.
Changing Sheets: When a sanding sheet becomes worn, simply peel it off and replace it with a fresh one from the included set. No tools required.
Choose the Right Grit: Start with coarser grits (80-120) for removing old finishes or leveling surfaces, then progress to finer grits (150-220+) for smooth, finished results. The detail sander excels at final finishing, so save it for the last passes.
Maintain Even Pressure: One of the keys to professional-looking results is consistent, light pressure. Let the 12,000 orbits per minute do the work. Heavy pressure doesn't sand faster; it just creates uneven surfaces and wears out sheets quicker.
Work with the Grain: Whenever possible, sand with the wood grain to avoid creating visible scratches. On end grain or figured wood, light passes with progressively finer grits yield the best results.
Empty the Dust Box Regularly: A clogged dust collection system reduces suction and forces the motor to work harder. Empty the dust box frequently, especially on longer projects, to maintain peak performance and keep your workspace clean.
Secure Your Workpiece: Use clamps or a vise to hold your work steady. A stable surface means better sanding results and safer operation. Never try to hold small pieces by hand while sanding.
Personal Protective Equipment: Always wear safety glasses to protect against dust and debris. Use a dust mask or respirator, especially when sanding without a vacuum attachment. Hearing protection is recommended for extended use.
Inspect Before Use: Check the power cord for damage before plugging in. Ensure the sanding sheet is securely attached and the dust box is properly installed. Never operate the sander with loose or missing components.
Secure Your Workpiece: Always clamp or secure the item you're sanding. Never hold small pieces by hand or attempt to sand while holding the workpiece unsupported. This prevents slips and ensures consistent results.
Keep Hands Clear: Keep your hands and fingers away from the sanding plate while the motor is running. Always wait for the plate to come to a complete stop before changing sheets or inspecting the work.
Proper Ventilation: Use the sander in a well-ventilated area or with a shop vacuum attached. Prolonged exposure to wood dust can be harmful to your respiratory system. Empty the dust box frequently to prevent overflow.
Cord Management: Keep the power cord away from the sanding plate and your work area. Use a cord reel or management system to prevent tripping hazards and accidental damage to the cord.
Cool-Down Time: Allow the sander to cool for a few minutes before storing it, especially after extended use. This protects the motor and extends the tool's lifespan.

Pros
- Exceptional control and precision for detail work, edge sanding, and finishing passes
- Lightweight design minimizes user fatigue, making it comfortable for longer sanding sessions
- Quick Velcro pad system saves time swapping between different grit sandpapers
- Dust collection port helps maintain a cleaner work environment
Cons
- Limited pad size means larger flat surfaces will require multiple passes or a different sander type
- One-amp motor is less powerful than full-size sheet sanders, making it unsuitable for heavy material removal
The WEN 6301 is a specialized tool designed for precision sanding work where control and maneuverability matter more than raw power. The angled tip and compact 3.75 x 5.5 inch pad make this palm sander exceptionally well-suited for detail work, edge finishing, and intricate projects. Whether you're working on fine woodworking, cabinet refinishing, or touch-up sanding, the ergonomic design fits naturally in your hand and lets you guide the sander exactly where you need it.
Performance-wise, the 13,500 OPM motor delivers consistent, controlled sanding action without aggressive material removal. The lightweight two-pound construction is a genuine advantage for detail work, as it reduces hand and wrist fatigue during extended use. The Velcro base pad system is genuinely convenient, allowing you to swap sandpaper grits in seconds without fumbling with clamps or adhesives. The dust collection port is a practical addition that helps minimize loose sawdust around your workspace.
This sander excels in its intended role as a finishing and detail tool but isn't designed for heavy stock removal or large flat surfaces. If your project involves primarily fine detail work, edge sanding, or finishing passes on smaller pieces, the WEN 6301 delivers excellent precision and ease of use. For larger projects or aggressive material removal, you'll want a full-size sheet sander alongside this one.
| Specification | Detail |
|---|---|
| Brand | WEN |
| Model | 6301 |
| Sander Type | Electric Detailing Palm Sander |
| Pad Size | 3.75 x 5.5 inches |
| Motor Power | 1 amp |
| Oscillations per Minute | 13,500 OPM |
| Weight | 2 pounds |
| Pad Base | Velcro |
| Dust Collection | Collection port included |
| Pad Tip Design | Angled for precision work |
Getting Started: Before connecting to power, install your sandpaper by pressing it firmly onto the Velcro pad. Start with a coarser grit (80-120) for initial sanding and progress to finer grits (150-220+) for finishing. Always sand with the grain when working with wood to achieve the smoothest results.
Technique: Hold the sander with a light grip, letting the motor do the work. Use gentle pressure and allow the sanding pad to glide across the surface. The angled tip is designed for edges and corners, so tilt the sander slightly to access tight areas. Work in overlapping, even passes rather than staying in one spot, which can create divots.
Dust Management: Connect a shop vacuum to the dust collection port to capture sawdust and maintain visibility of your work area. Empty the vacuum regularly to maintain suction. Always wear a dust mask, especially when sanding materials that produce fine particles.
Before Operating: Inspect the power cord for damage and ensure the Velcro pad is securely attached. Tie back long hair and avoid loose clothing that could catch on the sanding pad. Always work on a stable, secure surface.
During Use: Wear safety glasses to protect against dust and debris. Use a dust mask or respirator, particularly when sanding hardwoods or finishes that create fine particles. Keep your hands clear of the sanding pad while it's running, and never reach underneath the sander while operating.
After Use: Unplug the sander before changing sandpaper or performing any maintenance. Allow the pad to come to a complete stop before setting it down. Store in a dry location away from moisture and extreme temperatures. Check the power cord regularly for signs of wear.
Sandpaper Selection: Stock multiple grits (80, 120, 150, 220) to handle different stages of your project. Finer grits (220+) create the smoothest finish for staining or painting. Replace sandpaper when it becomes clogged with dust or loses its cutting ability, as worn sandpaper requires more pressure and produces inferior results.
Workspace Setup: Work in good lighting so you can see exactly where you're sanding. Clamp or secure your workpiece to prevent movement. Connect your shop vacuum before starting to keep dust from settling on your project and to maintain clear visibility of your sanding progress.
Edge and Corner Work: Use the angled tip to get into corners and along edges where larger sanders can't reach. For edge sanding, position the sander at a slight angle rather than flat, which lets you control the pressure more precisely. This technique is especially valuable for finishing cabinet edges and trim work.

Pros
- Exceptional maneuverability in confined spaces where full-size sanders won't fit
- Brushless motor runs cooler and quieter while maximizing battery efficiency
- Included 2.5 Ah battery charges quickly and holds power well between uses
- Smooth orbital motion minimizes swirl marks on finished surfaces
- Well-balanced weight distribution reduces hand and arm strain
Cons
- Smaller sanding pad means longer job times on large, open surfaces compared to full-size models
- Battery and charger sold separately on some configurations, adding to initial investment
The Milwaukee M12 FUEL orbital detail sander excels at what it's designed to do: tackle precision sanding in spaces where larger tools simply don't fit. The brushless motor runs remarkably smooth and efficient, delivering consistent power throughout the battery's charge cycle. Whether you're smoothing furniture edges, refining trim work, or preparing surfaces for stain and finish, this sander handles detail work with impressive control and minimal vibration.
Battery performance is a major strength here. The included High Output 2.5 Ah battery provides genuine runtime for typical DIY projects, and the brushless design means you're getting more actual sanding time compared to brushed alternatives. The variable speed control is genuinely useful, allowing you to dial back RPM for delicate work on veneers or fine woods and ramp up for aggressive stock removal on hardwoods. The dust collection system works effectively, keeping your work area cleaner and your visibility sharp throughout the job.
The real value proposition lies in compatibility and versatility. If you're already invested in Milwaukee's M12 ecosystem, this sander becomes an obvious addition. Even as a standalone tool, it fills a genuine gap in most DIYer toolboxes. The learning curve is minimal, and the ergonomic design means you can work comfortably for extended periods without excessive fatigue. For homeowners and woodworkers who prioritize precision over raw speed, this is a thoughtfully engineered tool.
| Brand | Milwaukee |
| Model | M12 FUEL (ASIN: B0BPTMCJCR) |
| Tool Type | Cordless Orbital Detail Sander |
| Motor Type | Brushless |
| Voltage | 12V Lithium-Ion |
| Battery Included | High Output 2.5 Ah |
| Sanding Pad Type | Orbital Detail (compact) |
| Speed Control | Variable Speed |
| Dust Collection | Yes |
| Weight | Lightweight (exact weight varies by configuration) |
| Primary Use | Detail work, furniture, trim, fine woodworking |
Setup and Safety: Before first use, fully charge the included 2.5 Ah battery. Inspect the sanding pad and dust collection bag for any debris or damage. Always wear safety glasses and a dust mask when operating, as fine dust particles can irritate eyes and lungs even with dust collection active.
Getting Started: Insert the charged battery into the tool and power on. Start with a lower speed setting to get a feel for the sander's motion and control. The orbital motion is gentle enough for detail work but powerful enough for stock removal when needed. Let the tool do the work; don't force it or apply excessive downward pressure, which can slow the motor and reduce battery life.
Technique Tips: Move the sander in smooth, overlapping strokes to avoid creating divots or uneven surfaces. On vertical surfaces or overhead work, maintain a firm grip with both hands for stability and control. Check your progress frequently by running your hand across the surface to feel for remaining imperfections. Empty the dust collection bag regularly to maintain suction and visibility. After use, allow the tool to cool before storing, and recharge the battery promptly for next time.
Material-Specific Speed Settings: Use lower speeds (2000-3000 RPM) for delicate work like veneers, fine furniture, or final finishing coats. Medium speeds work well for general smoothing on hardwoods and painted surfaces. Reserve higher speeds for aggressive stock removal and initial prep work on rough lumber. This approach minimizes swirl marks and extends sandpaper life.
Sandpaper Selection and Maintenance: Stock a variety of grits from 80 (rough) to 220 (fine). Start coarse and work progressively finer for the smoothest finish. Replace sandpaper when it becomes clogged with dust or loses cutting ability; a worn pad will slow you down more than a fresh one. Keep extra pads on hand so you can switch grits without stopping mid-project.
Battery Strategy: If you have access to additional M12 batteries, charge one while using another to eliminate downtime on larger projects. The High Output 2.5 Ah battery is efficient, but having a backup extends your working window significantly. Store batteries in a cool, dry place and avoid leaving them fully charged for extended periods to maximize long-term lifespan.
Personal Protective Equipment (PPE): Always wear ANSI-approved safety glasses to protect against dust and debris ejection. A dust mask or respirator is essential, especially during extended sanding sessions or when working with exotic woods or paint dust, which can be harmful to inhale. Hearing protection is recommended for prolonged use, as the motor generates noise around 80-85 dB.
Operational Safety: Never operate the sander with wet hands or in damp conditions. Keep loose clothing, jewelry, and long hair away from the moving pad. Always ensure the battery is fully seated and locked before starting the tool. Never force the sander or apply excessive pressure; let the brushless motor do the work at its designed speed. Shut off the tool and wait for the pad to stop completely before setting it down or changing sandpaper.
Work Environment and Storage: Maintain a clean work area free of tripping hazards and clutter. Ensure adequate ventilation to manage dust accumulation. Never leave the tool running unattended. Store the sander in a dry location away from children and pets. Keep the battery charger away from water and extreme temperatures. Regularly inspect the tool for damage, cracks in the housing, or loose components before use.

Pros
- Extremely lightweight design reduces hand fatigue during extended detail work
- Precise 1.5mm orbit minimizes swirl marks and delivers professional-quality finishes
- Four speed settings allow easy adjustment for different materials and tasks
- Built-in LED light improves visibility in shadowed work areas
- Compact footprint accesses tight spaces and edges standard sanders cannot reach
Cons
- No reviews currently available, making it difficult to assess long-term durability or real-world performance
- Cordless operation means battery charging time between sessions, limiting extended continuous use without spare batteries
The Milwaukee M12 Fuel Orbital Detail Sander is purpose-built for precision finishing work where larger sanders simply won't fit. At just 1.3 pounds, it's designed to be held in one hand for extended periods without causing fatigue, making it particularly valuable for furniture refinishing, trim work, and detailed edge preparation. The 1.5mm orbit diameter is intentionally small, which translates to smooth, swirl-free finishes on delicate surfaces where aggressive sanding would cause visible damage.
Variable speed control is the real standout here. The trigger responds smoothly across a range of speeds, and four preset settings let you dial in the exact pace needed for your material. Softer woods and veneers benefit from slower speeds, while harder materials and painted surfaces can handle faster operation. The integrated LED work light is a practical addition that illuminates tight corners and recessed areas where natural light doesn't reach, improving both accuracy and safety.
This tool excels in situations where full-size orbital or belt sanders are impractical. Whether you're smoothing edges on custom cabinetry, prepping detailed trim for finishing, or refining a furniture restoration project, the compact design and lightweight construction make it accessible for detailed work that demands precision. The M12 Fuel battery platform provides consistent power delivery, and the tool integrates seamlessly into existing Milwaukee cordless ecosystems.
| Brand | Milwaukee |
| Model | M12 Fuel Orbital Detail Sander |
| Weight | 1.3 lbs |
| Orbit Diameter | 1.5mm |
| Speed Control | Variable trigger with 4 preset settings |
| Lighting | Integrated LED work light |
| Power System | M12 Fuel Cordless Battery (not included) |
| Primary Use | Detail finishing, furniture, trim, edges |
| Best For | Precision work in tight spaces |
Setup: Install a charged M12 Fuel battery into the tool and ensure your sanding pad is clean and free of debris. Insert the appropriate sanding sheet for your material (finer grits for finishing, coarser for prep work).
Basic Operation: Hold the sander with a light grip, allowing the tool to do the work. Start with a lower speed setting using the trigger or preset buttons, then gradually increase as needed. Move the sander in smooth, overlapping passes across the work surface. Let the small 1.5mm orbit do the fine work without applying excessive pressure.
Speed Selection: Use lower speeds (settings 1-2) for delicate surfaces, veneers, and finished wood to avoid swirl marks. Use higher speeds (settings 3-4) for harder materials, paint removal, and aggressive prep work. The variable trigger allows fine-tuning between preset speeds for specific tasks.
Detail Work: The compact size makes this ideal for edges, corners, and recessed areas. Use the LED light to illuminate shadowed work zones. Keep the sanding pad flat against the surface for even results, and change sanding sheets when they become clogged or worn to maintain effectiveness.
Personal Protection: Always wear safety glasses or a face shield to protect against dust and debris. Use a dust mask or respirator, especially when sanding painted surfaces or composite materials that may release harmful particles. Hearing protection is recommended if you work in noise-sensitive environments.
Work Surface Safety: Secure your workpiece firmly before sanding to prevent movement or slipping. Ensure the work area is clear of obstacles that could cause you to lose balance. Keep hands and fingers away from the sanding pad at all times, even when the tool is off.
Battery and Tool Maintenance: Inspect the sanding pad and sheet for damage before use. Allow the tool to cool between extended use sessions. Keep the LED lens clean for optimal visibility. Store the battery in a cool, dry location and follow Milwaukee's charging guidelines to maintain battery health and safety.
Material Considerations: Be aware of what you're sanding. Lead-based paints, asbestos, and certain composite materials require special precautions. If unsure, research the material beforehand and use appropriate respiratory protection. Never sand in enclosed spaces without proper ventilation.
Sanding Sheet Selection: Match your grit to the task. Start with 80-120 grit for paint removal or heavy prep, move to 150-180 for general smoothing, and finish with 220-320 grit for final finishing and between-coat sanding. Keep multiple grits on hand so you can switch quickly without stopping work.
Technique for Best Results: Maintain light, even pressure and let the tool's orbital motion do the work. Pressing hard doesn't sand faster and actually increases swirl marks and dust clogging. Overlap each pass slightly for uniform coverage, and work with the wood grain when possible to minimize visible scratches.
Speed Strategy: Start conservatively on unfamiliar materials. Test your speed and pressure on a hidden area first. Delicate finishes and veneers benefit from slower speeds and finer grits. For aggressive material removal, higher speeds work better, but monitor heat buildup on the work surface.
Battery Management: Keep a spare M12 Fuel battery charged so you can swap seamlessly during longer projects. Battery life extends when you avoid running the tool at maximum speed unnecessarily. Allow batteries to cool between heavy use sessions for optimal lifespan.
Dust Management: Connect a shop vacuum to your dust collection port if available to reduce airborne particles and improve visibility. Clogged sanding sheets reduce efficiency and generate excess heat. Replace sheets frequently for consistent results and faster completion times.
Pros
- Angle adjustment up to 55 degrees opens up detail work and contour sanding possibilities
- Auto-tracking belt saves frustration and keeps you sanding instead of troubleshooting
- Variable speed dial gives you control over aggression and finish quality
- Tool-free belt changes keep workflow smooth during longer projects
- Includes everything needed to start sanding right out of the box
Cons
- No user reviews available online, so real-world durability and long-term reliability remain unconfirmed
- Limited to 1/2-by-18-inch belt size, which may feel small for larger flat-surface projects
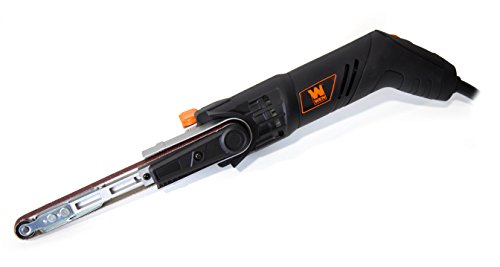
The WEN 6307 is purpose-built for detail and contour work that standard belt sanders struggle with. Its 55-degree pivot range and compact footprint make it valuable for DIYers working on curved furniture edges, moldings, and intricate surfaces where precision matters. The variable speed dial gives you meaningful control, allowing you to dial down to 1080 FPM for delicate finishing work or crank up to 1800 FPM when you need aggressive material removal.
What sets this sander apart is its no-fuss design. The auto-tracking belt system eliminates the frustration of manual tensioning and alignment adjustments that plague many budget sanders. Tool-free belt installation means you can swap grits quickly without hunting for wrenches, keeping your momentum going during longer projects. The included dust port attachment helps manage sawdust, and you get three abrasive belts to start working immediately.
This is a solid choice for homeowners and serious DIYers who need a specialized sander for detail work rather than a general-purpose machine. The two-year warranty backs the build quality, and the thoughtful feature set suggests WEN understands what users actually encounter in the workshop. However, the 1/2-by-18-inch belt size keeps it in the detail category, so it won't replace a larger sander for flat surface work.
| Brand | WEN |
| Model | 6307 |
| Type | Variable Speed Detailing Belt Sander |
| Belt Size | 1/2 inch by 18 inches |
| Speed Range | 1080 to 1800 feet per minute |
| Speed Control | Variable speed dial |
| Pivot Range | Up to 55 degrees |
| Belt Tracking | Automatic (no manual tensioning) |
| Belt Installation | Tool-free design |
| Included Accessories | Three abrasive sanding belts, dust port attachment |
| Warranty | Two years |
Getting Started: Unpack the sander and familiarize yourself with the speed dial and pivot lever. Install one of the three included belts by lifting the belt cover and sliding it onto the rollers. No tools needed. Attach the dust port to keep your workspace cleaner.
Basic Technique: Plug in the unit and set your desired speed using the variable dial. For delicate finishes, start at 1080 FPM; for material removal, move toward 1800 FPM. Let the belt do the work. Hold the sander firmly and move it along the grain or contour. Use the pivot function by adjusting the angle lever to reach curved edges and detailed surfaces up to 55 degrees.
Belt Changes: When a belt wears out, simply lift the belt cover and slide the old belt off. No tensioning adjustments needed thanks to the auto-tracking system. Slide the new belt on and you're ready to sand again. Keep spare belts on hand to maintain workflow.
Speed Selection: Match your speed to your material and goal. Softwoods and paint removal tolerate higher speeds (1600-1800 FPM), while hardwoods and final finishes benefit from lower speeds (1080-1400 FPM) to reduce burn marks and tearout.
Angle Advantage: The 55-degree pivot isn't just a nice-to-have. Use it strategically on chair legs, table edges, and moldings where a flat sander leaves ridges. The angle lets you sand perpendicular to the surface for smoother results.
Dust Management: Connect the dust port to a shop vacuum or dust collector. This keeps your workspace cleaner and helps the sander breathe, extending motor life. A clogged dust system forces the motor to work harder.
Belt Longevity: Avoid sanding metal or other materials that dull belts quickly unless absolutely necessary. Keep belts dry and store them flat. Worn belts reduce speed and increase heat, so rotate them out when performance drops.
Before You Start: Always unplug the sander before installing or changing belts. Wear safety glasses to protect against dust and debris. Use a dust mask or respirator, especially when sanding painted surfaces or exotic woods that produce fine particles.
During Operation: Keep hands clear of the moving belt at all times. Never reach under or over the sander while it's running. Secure your workpiece so it won't shift unexpectedly. Let the belt reach full speed before making contact with the work surface.
Proper Grip: Hold the sander with both hands and maintain firm control. The variable speed dial means the sander can behave differently at different speeds, so stay alert. Never force the sander into the work. Let the belt speed do the job.
Workspace Safety: Keep the work area well-lit and clear of clutter. Ensure the power cord won't snag or get pinched. If you're sanding in an enclosed space, use adequate ventilation. After use, allow the belt to stop completely before setting the sander down.

Pros
- Detail finger attachment is genuinely useful for sanding intricate trim, moldings, and corners that larger sanders can't reach
- Two-position grip gives you flexibility to sand at different angles without repositioning your entire body
- Quick hook-and-loop sandpaper changes save time and frustration compared to adhesive-backed alternatives
- Cordless convenience eliminates extension cord hassles in confined spaces
- Reasonably priced for a detail sander with solid construction and real utility
Cons
- No reviews available yet, so real-world durability and long-term reliability remain unproven
- Sheet sander design limits sanding area compared to larger orbital or belt sanders, making it slower for open surfaces
The BLACK+DECKER BDCMS20C fills a specific niche in the sander market: detail work and tight spaces where larger sanders simply don't fit. At 12,000 oscillations per minute, it delivers respectable material removal speed without the bulk of a full-size orbital sander. The sheet sander design is intentional here, optimized for precision rather than aggressive stock removal on large flat surfaces.
What sets this model apart is the detail finger attachment, a genuinely useful feature that extends the sanding surface into corners and along edges. Combined with the two-position grip, this sander adapts to the awkward angles you encounter in real-world projects like furniture refinishing, trim work, and edge blending. The hook-and-loop sandpaper system is convenient and mess-free compared to older adhesive-backed alternatives, and the compact ergonomic design means you can maneuver it comfortably in confined spaces without arm fatigue.
The 20V MAX cordless platform is a practical advantage if you already own BLACK+DECKER tools, though you'll want to ensure you have adequate battery capacity for longer sessions. This sander is best suited for detail-oriented DIYers tackling projects where precision and access matter more than raw power, such as refinishing antique furniture, sanding between spindles, or working on intricate trim details.
| Specification | Details |
|---|---|
| Brand | BLACK+DECKER |
| Model | BDCMS20C |
| Type | Detail Sheet Sander |
| Power Source | 20V MAX Lithium-Ion Cordless |
| Oscillation Speed | 12,000 opm |
| Sanding Surface | Sheet sander with detail finger attachment |
| Grip Style | 2-position ergonomic grip |
| Sandpaper System | Hook-and-loop |
| Design Focus | Compact, maneuverable for corners and tight spaces |
| Battery Compatibility | 20V MAX BLACK+DECKER batteries |
Setup and Safety: Before each use, inspect the sanding pad and detail finger attachment for damage. Ensure the sandpaper is securely attached using the hook-and-loop system with no loose edges. Always wear safety glasses and a dust mask, as sanding creates fine particles. Keep hair and loose clothing away from the moving pad.
Basic Technique: Let the sander do the work; apply light to moderate pressure only. Move the sander in smooth, overlapping strokes following the wood grain when possible. Use the standard pad for open surfaces and the detail finger for corners, edges, and tight spaces. The two-position grip allows you to adjust your hand angle for better control on vertical or angled surfaces.
Maintenance Tips: After each use, clear dust from the sanding pad and attachment points. Check battery charge levels to avoid running out of power mid-project. Replace sandpaper when it becomes clogged or worn; the hook-and-loop system makes changes quick and easy. Store in a dry location and keep batteries charged for next use.
Choose the Right Grit: Start with coarser grit (60-80) for material removal and heavy surface prep, then progress to medium (100-150) and fine (180-220) for finishing. For detail work and trim, fine grits prevent visible scratches and create a smoother final surface.
Master the Detail Finger: The detail finger attachment is most effective when you angle it into corners rather than pushing straight in. Let the sander's motion work for you; guide it gently and let the oscillations handle the abrading action. This technique works especially well on spindles, chair legs, and decorative trim.
Battery Strategy: For longer projects, have a second charged battery on hand so you can swap without interruption. The cordless design is a huge advantage in tight spaces where extension cords create tangles and safety hazards, but battery runtime does have limits.
Dust Control: While this sander isn't designed for a dust collection system, working outdoors or in a well-ventilated space significantly reduces airborne particles. A shop vac nearby with a dust collection attachment (if compatible) can help manage debris.
Who Should Buy This Sander: The BDCMS20C is ideal for DIYers and hobbyists who regularly work on detail projects like furniture refinishing, trim restoration, edge blending, and intricate woodwork. If your projects involve tight spaces, corners, or decorative elements where larger sanders can't reach, this is a practical investment. It's also a good choice if you already own BLACK+DECKER 20V MAX tools and want to expand your collection with compatible batteries.
Who Might Want to Look Elsewhere: If you primarily sand large flat surfaces like cabinet sides, tabletops, or flooring, a larger orbital or random orbital sander will be faster and more efficient. Professional contractors doing high-volume work may find the sheet sander format limiting for production-speed projects. If you need aggressive stock removal on rough surfaces, a belt sander is more appropriate.
Budget Considerations: As a detail sander, this tool occupies a mid-range price point. You're paying for precision, maneuverability, and the detail finger attachment rather than raw power. Consider your typical projects and whether the features justify the investment for your specific needs. If detail work is only occasional, renting might make more sense.
Buying Guide: How to Choose the Right Detail Sander
Picking the right detail sander comes down to understanding how you will actually use it. A hobbyist sanding furniture once a season has very different needs from a finish carpenter running the tool for hours each week. The sections below walk through the decisions that matter most, so you can match the spec sheet to your real-world workflow.
Corded vs. Cordless Power
Corded detail sanders deliver consistent power without worrying about battery life, which makes them well suited for long finishing sessions at a workbench. They tend to be lighter because there is no battery pack adding weight at the base, and they cost significantly less than their cordless counterparts. The trade-off is an extension cord that can tangle or limit your reach on a jobsite.
Cordless models, such as the Milwaukee M12 FUEL units in our lineup, are built for professionals who need freedom of movement or who are already invested in a battery platform. If you own multiple tools on the same 12-volt or 20-volt system, sharing batteries across a cordless drill, an impact driver, or a cordless circular saw makes the higher upfront cost easier to justify.
Motor Speed and Orbits Per Minute
Detail sanders are rated in orbits per minute (OPM), which describes how many tiny elliptical movements the pad makes each minute. Higher OPM translates to faster material removal, while lower OPM gives you finer control on delicate surfaces. Most corded detail sanders in this price range operate between 14,000 and 16,000 OPM. Variable speed is a bonus feature worth paying for if you plan to work on softwoods, veneer, or painted surfaces where an aggressive setting could burn through too quickly.
Triangular Pad and Attachment Options
The triangular pad is what makes a detail sander unique. The pointed tip fits squarely into 90-degree corners, and the flat faces handle broad surfaces efficiently. Look for a pad that accepts hook-and-loop sanding sheets, which swap out in seconds without adhesive mess. Some models, like the SKIL SR232301, include multiple attachment shapes for contoured surfaces and finger-shaped profiles. These extras are genuinely useful for furniture work and molding, not just marketing add-ons.
If your projects involve a lot of long, narrow grooves or channels, also consider a belt sander as a complementary tool. For broader flat panels, pairing your detail sander with a random orbital sander is a classic finishing combination that covers every surface type efficiently.
Dust Collection System
Fine sanding dust is both a health hazard and a finishing problem. Dust that settles back onto a freshly sanded surface contaminates the wood before you can apply stain or paint. Every model in our lineup includes some form of dust collection, ranging from a basic foam-filtered dust box to a port compatible with a shop vacuum hose. The BLACK+DECKER BDEMS600 earned particular praise in user reviews for its included dust collector, which keeps the work surface cleaner than most corded competitors in its price class.
If you do serious finish work, connecting your sander to a dedicated dust extractor through the vacuum port is the cleanest approach. This pairs well with having a capable workbench with integrated storage so dust does not migrate across your entire shop.
Weight and Ergonomics
Because detail sanders are used in awkward positions, weight and grip design matter more than the spec sheet suggests. Most corded models fall between 2 and 3 pounds, which sounds light but becomes noticeable after extended overhead or vertical sanding. Look for rubberized grips, a low-profile body that fits comfortably in one hand, and a power switch that does not require you to reposition your grip every time you turn the tool on or off. The BLACK+DECKER BDEMS600 features a three-position grip that accommodates different hand sizes and working angles, a practical detail that is easy to overlook until you actually need it.
Sanding Sheet Availability and Cost
A detail sander is only as good as the sandpaper you can source for it. Before committing to a model, confirm that replacement sheets are widely available and reasonably priced. Most standard triangular detail pads take sheets sold in bulk multi-packs online, but proprietary pad shapes can lock you into expensive branded replacements. Stick with brands and pad shapes that have broad third-party sheet availability to keep your long-term costs down.
Corded Detail Sanders vs. File Sanders
The WEN 6307 in our lineup is technically a detailing file sander, not a traditional mouse sander. Rather than a triangular pad, it uses a narrow belt that wraps around a long, thin platen. File sanders excel at getting inside slots, deep carvings, and curved profiles that defeat even a sharp-tipped triangular pad. If your work regularly involves sculpted or contoured pieces, a file sander can replace a significant amount of hand sanding. For most general furniture and trim work, though, a standard triangular detail sander handles the majority of tasks more conveniently.
Why Trust HomeThru
HomeThru is an independent review publication. We do not sell tools, fulfill orders, or accept payment from manufacturers in exchange for favorable coverage. Our editorial team researches and evaluates products by analyzing verified buyer feedback, manufacturer specifications, comparative data, and hands-on reporting from tradespeople and serious hobbyists. We earn a commission if you purchase through our links, but that arrangement never influences which products we recommend or how we rank them. Every product in this guide was selected on merit.
For this guide we evaluated detail sanders across the full price spectrum, from the value-oriented WEN 6301 to the professional Milwaukee M12 FUEL platform. We assessed motor performance, dust management, pad versatility, ergonomics, sanding sheet availability, and the depth of real-world user reviews, with special attention to patterns in long-term reliability feedback. Our goal is to give you the same quality of information a knowledgeable friend in the trades would share over a workbench conversation.
If detail sanders are just one part of your power tool research, our coverage of angle grinders, jigsaws, and reciprocating saws follows the same independent methodology.
Final Thoughts
The best detail sander for your shop depends on how often you use it, whether you need cordless freedom, and how seriously you take dust management. For most DIYers and occasional woodworkers, a corded model in the budget-to-mid-range price tier delivers everything needed to get into corners cleanly and produce a finish-ready surface. Professionals and those already on the Milwaukee M12 platform will find the cordless options worth the premium for jobsite flexibility.
Here are our standout picks from the lineup reviewed above:
- Best Overall: BLACK+DECKER BDEMS600 Detail Sander combines a powerful 1.2-amp motor, a three-position comfort grip, and a genuinely effective dust collector into a compact package backed by nearly 19,000 verified ratings.
- Best Budget Pick: WEN 6301 Electric Detailing Palm Sander offers reliable orbital sanding performance at an entry-level price that removes any barrier to getting started with powered detail work.
- Best Multi-Function Value: SKIL SR232301 Corded Multi-Function Detail Sander ships with three additional attachment shapes and twelve sanding sheets, giving hobbyists genuine versatility without a significant price jump.
- Best Cordless for Professionals: Milwaukee M12 FUEL Orbital Detail Sander earns the highest average rating in this group, delivering brushless cordless performance at a mid-range cordless price for tradespeople on the M12 platform.
- Best for Narrow Grooves and Contours: WEN 6307 Variable Speed Detailing File Sander swaps the triangular pad for a narrow belt, reaching deep slots and curved profiles that no mouse sander can access.
Whichever model you choose, pair it with quality sandpaper in a range of grits, start coarser than you think you need, and finish with a fine grit for a smooth, paint-ready surface. A bench grinder or a solid set of hex key sets for pad changes rounds out a well-equipped finishing station. For larger surface prep work before reaching for the detail sander, track saws and circular saws handle the rough dimensioning that comes first. For hammer and rotary work on renovation projects alongside finishing, hammer drills and rotary hammers are worth reviewing too.
Frequently Asked Questions
For additional questions about choosing finishing tools, our coverage of random orbital sanders addresses many of the same sizing and grit-selection questions that come up with detail sanders.
What Is the Difference Between a Detail Sander and a Mouse Sander?
The terms are used interchangeably. Both refer to compact triangular-pad sanders designed for tight corners and small surfaces. The nickname “mouse sander” comes from the tool’s small, rounded body and pointed tip, which resembles the shape of the rodent. Functionally, any detail sander and any mouse sander work the same way.
Can a Detail Sander Replace a Random Orbital Sander?
Not entirely. A detail sander excels in corners, along edges, and in tight profiles, but it covers broad flat surfaces slowly compared to a five-inch random orbital. Most woodworkers use both tools together: the random orbital for large panel faces and the detail sander for edges, joints, and inside corners. Using only a detail sander on wide surfaces would take significantly longer and tire your hand unnecessarily.
What Sandpaper Grit Should I Start With on a Detail Sander?
For raw wood, begin with 80 or 100 grit to remove mill marks and level the surface, then progress through 120, 150, and finish with 220 grit before applying stain or paint. For light scuff sanding between coats of finish, 220 to 320 grit is appropriate. Using too fine a grit at the start wastes sheets and time without meaningfully improving the outcome.
How Do I Prevent Swirl Marks When Using a Detail Sander?
Keep the sander moving at a steady, moderate pace and avoid pressing down hard. Let the tool do the work. Finishing with progressively finer grits removes the scratch pattern from the previous sheet. Always do a final light pass moving with the grain on open-grained woods, and wipe the surface with a tack cloth before applying any finish to reveal remaining marks before they are sealed in.
Are Detail Sanders Useful for Painted Surfaces and Drywall?
Yes, with caveats. Detail sanders work well for scuff-sanding between paint coats, smoothing dried spackle in corners, and feathering drywall compound around patches. Use a fine grit to avoid cutting through primer. Be aware that lead paint in older homes creates a serious hazard when sanded: always test before sanding any painted surface in a home built before 1978 and use appropriate respiratory protection.




Write Your Review
No reviews yet. Be the first to share your experience!