

Picking up welding for the first time is exciting, but the machine you start with will either build your confidence or break it. The market is flooded with compact, affordable inverter-based units that promise beginner-friendly operation, yet not all of them deliver on that promise once you strike your first arc. Our team independently researched and evaluated dozens of entry-level welders, cross-referencing real-world user feedback, manufacturer specs, and hands-on community data to narrow the field to these nine standout machines. Whether you want a simple stick welder for quick repairs or a versatile MIG/TIG/Stick combo for learning multiple processes, this guide covers exactly what you need to get started safely and successfully.
Before you fire up any welder, make sure your workspace is properly set up. A solid workbench built for heavy shop use gives you a stable, grounded surface to weld on, and pairing it with proper garage floor protection keeps spatter from damaging your concrete. We also strongly recommend picking up a quality auto-darkening helmet before your first bead. Our roundup of welding helmets worth wearing covers the best auto-darkening options at every budget.
Top Welding Machines for Beginners
Pros
- Three processes (MIG, stick, TIG) in one compact unit saves money and shop space compared to buying separate welders
- Synergic control technology removes guesswork by automatically adjusting voltage as you change wire speed, ideal for less experienced welders
- Lightweight and portable design with carrying handle makes it easy to transport between projects
- Includes bonus flux core wire, eliminating the need to purchase consumables before your first weld
- Digital display provides real-time amperage feedback for better control and monitoring
Cons
- 135 Amp capacity limits you to thinner mild steel (up to 3/32 inch), so heavier fabrication work requires a more powerful machine
- No reviews currently available, so you cannot verify real-world performance and long-term durability from actual users
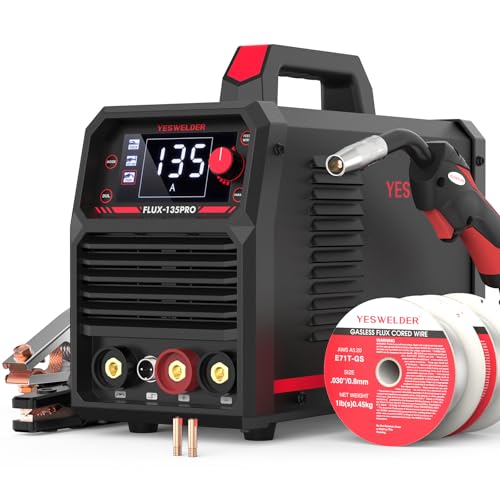
The YESWELDER 135A delivers solid versatility for homeowners and DIYers who need multiple welding capabilities without the cost and clutter of separate machines. Its three-in-one design covers gasless flux core MIG, stick, and lift TIG welding, making it practical for a wide range of projects from automotive repair to structural work and fabrication. The 110V input means you can set it up in most garages or workshops without special electrical upgrades, and the 11.4 lb weight keeps it portable enough to move between locations.
The standout feature is the synergic control system, which automatically adjusts voltage to match your wire speed setting. This takes much of the trial-and-error out of setup, especially valuable if you are newer to welding or switching between different wire sizes. The digital display shows real-time amperage, giving you immediate feedback on what the machine is doing. Wire feed speeds are adjustable from 120 to 420 inches per minute on .030" wire and 120 to 308 on .035", with fine-tuning available between -3V and 3V, so you have flexibility to dial in your preferred settings.
Safety features include automatic voltage compensation for power fluctuations, plus overload, overcurrent, and overheat protection to prevent damage during extended use. The included 2 lb spool of E71T-GS flux core wire lets you start welding right away without additional purchases. Keep in mind the 135 Amp output is designed for lighter work on mild steel up to 3/32 inch thick; if your projects regularly involve thicker material, you will want to look at higher-amperage models.
| Brand | YESWELDER |
| Model | 135A MIG Welder |
| Input Voltage | 110V |
| Output Amperage | 135 Amps |
| Welding Processes | Gasless Flux Core MIG, Stick, Lift TIG |
| Max Material Thickness | 3/32 inch (2.5 mm) mild steel |
| Compatible Wire Sizes | .030" and .035" (2 lb spools) |
| Wire Feed Speed (.030") | 120-420 inches per minute |
| Wire Feed Speed (.035") | 120-308 inches per minute |
| Voltage Fine-Tuning Range | -3V to +3V |
| Weight | 11.4 lbs |
| Portability | Compact design with carrying handle |
| Display | Digital LED display with real-time amperage |
| Safety Features | Automatic voltage compensation, overload protection, overcurrent protection, overheat protection |
| Included Accessories | 2 lb spool of E71T-GS .030" flux core welding wire |
| Stick Welding Features | Adjustable Hot Start and Arc Force |
Getting Started: Connect the YESWELDER 135A to a standard 110V outlet. For gasless flux core MIG welding (the most common process for beginners), load a 2 lb spool of .030" or .035" flux core wire into the wire feeder. Set your desired wire feed speed using the dial, and the synergic control will automatically suggest a voltage. You can fine-tune the voltage up or down by 3V if needed. Attach the MIG gun ground cable to your workpiece and you are ready to weld.
For Stick Welding: Insert an electrode into the electrode holder and set your amperage. Use the Hot Start and Arc Force adjustment knobs to customize how the arc initiates and behaves. Stick welding requires more manual skill but is excellent for thicker materials and outdoor work.
For Lift TIG Welding: You will need to purchase a separate lift TIG torch (10-25V rated), which is not included. TIG welding gives you the most precise control and cleanest welds but has the steepest learning curve. Always wear appropriate safety gear, including a welding helmet with proper shade, gloves, and flame-resistant clothing.
Before You Start: Inspect the power cord for damage and ensure your outlet is properly grounded. Keep the welder away from moisture and damp environments. Allow adequate ventilation in your work area to disperse welding fumes. Read the full manual and familiarize yourself with all controls and safety features before your first use.
During Welding: Always wear a welding helmet with the correct shade (typically #10 or higher), leather gloves, long sleeves, and closed-toe shoes. Ensure your workpiece is securely clamped or held in place. Keep flammable materials away from your work area. Never touch the electrode, gun tip, or workpiece with bare hands while the machine is powered on. The machine includes automatic overload and overheat protection, but do not rely on it alone; monitor the digital display and stop if the amperage seems abnormal.
After Welding: Allow the machine to cool before storing it. Regularly inspect the power cord, gun, and wire feeder for wear or damage. Keep the machine clean and free of dust, which can impair cooling. Store in a dry location and protect from extreme temperatures. If you experience any electrical issues, overheating, or unusual behavior, discontinue use and consult the manual or contact customer support.
Is This Welder Right for You? The YESWELDER 135A is ideal if you are a hobbyist, DIYer, or small shop owner who needs versatility without breaking the bank. Its three processes cover most common welding tasks on light to moderate projects. The 110V requirement means you can set up in a standard garage or workshop. However, if your work regularly involves thick steel (over 3/32 inch) or high-volume production, you will outgrow this machine quickly and should consider a 200+ Amp model.
What to Consider Before Buying: Evaluate your typical project thickness and material type. If you mostly work with thin sheet metal or light structural work, this 135A capacity is sufficient. Check that your workshop has adequate ventilation, especially if you plan to weld frequently. Decide which processes you will actually use: if you only need MIG welding, a dedicated MIG-only machine might be more cost-effective, but the 3-in-1 design offers better long-term flexibility. The included flux core wire is a nice bonus, but budget for additional wire and potentially a TIG torch if you plan to use that process.
Long-Term Value: This machine is lightweight and portable, making it a good choice if you move between job sites. The digital display and synergic control reduce the learning curve compared to older machines. The built-in safety protections help extend machine life. Factor in the cost of consumables (wire, electrodes, TIG cups) and any additional torches you might need. For the price point, the YESWELDER 135A delivers solid versatility and ease of use for entry-level to intermediate welders.

Pros
- Lightweight and truly portable design makes it practical for garage, rooftop, farm, or remote job sites without heavy equipment strain
- IGBT inverter technology delivers consistent, stable arc quality that produces cleaner beads and better penetration than basic welders
- Excellent beginner-friendly features including hot start, anti-sticking, and arc pushing force reduce learning curve frustration
- Comprehensive safety systems protect both the equipment and operator during extended use
- All-inclusive starter kit eliminates need for separate tool purchases, saving money upfront
Cons
- Limited to 110V household power means slower duty cycle and longer cooling periods compared to 220V industrial models
- No customer reviews available yet, so real-world durability and long-term reliability remain unverified
The Hpoouo 200Amp Stick Welder represents a significant leap forward for homeowners and DIYers seeking professional welding capability without the bulk and complexity of traditional machines. Its 200-amp adjustable current range (20-200A) handles a wide variety of metal thicknesses from 0.06 to 0.2 inches, making it suitable for everything from thin sheet metal repairs to thicker structural work. The IGBT inverter control technology is the real standout here, automatically adjusting output current in microseconds to maintain a stable, powerful arc that produces smooth, penetrating welds with minimal spatter.
What makes this welder particularly appealing for DIYers is the thoughtful integration of beginner-friendly features. The hot start function ignites the arc quickly and reliably, while the anti-stick technology prevents electrode rods from bonding to the workpiece during startup, a common frustration for newcomers. The arc pushing force further enhances control and smoothness. These features combine to dramatically reduce the learning curve and help users achieve professional-looking results faster. Built-in protections against over-voltage, over-current, over-heating, and overload ensure safe operation, while the high-power cooling fan accelerates heat dissipation during extended use sessions.
The complete starter package is another major advantage. Buyers receive 20 welding rods, two chip hammers for slag removal, and professional welding gloves, eliminating the need to purchase accessories separately. The machine's compact dimensions (7.8 x 3.9 x 5.3 inches) and featherweight 3.7-pound construction mean you can genuinely carry it anywhere. Compatibility with 90% of standard welding rod types, including AWS E6013, E6011, E6010, and E308 variants, provides flexibility for different projects and materials, though users will need to adjust terminal connections for alkaline versus acidic rods.
| Specification | Details |
|---|---|
| Power Input | 110V AC |
| Welding Current Range | 20-200 Amps (Adjustable) |
| Metal Thickness Capacity | 0.06-0.2 inches |
| Dimensions | 7.8 x 3.9 x 5.3 inches |
| Weight | 3.7 lbs |
| Control Technology | Advanced IGBT Inverter |
| Compatible Rod Types | AWS E6013, E6011, E6010, E308 (1/16"-1/8") |
| Special Features | Hot Start, Anti-Stick, Arc Pushing Force |
| Safety Features | Over-voltage, Over-current, Over-heating, Overload Protection |
| Cooling | High-power fan with heat dissipation |
| Included Accessories | 20 Welding Rods, 2 Chip Hammers, 1 Pair Welding Gloves |
| Suitable Materials | Cast Iron, Mild Steel, and Other Metals |
Setup and Safety: Before operating, ensure your 110V power outlet is properly grounded and capable of handling the welder's demands. Read all safety instructions and wear appropriate personal protective equipment including welding helmet, gloves (included), and long sleeves. Never operate in damp conditions or with wet hands.
Basic Operation Steps: First, determine your welding rod type and connect the electrode holder and earth clamp to the appropriate terminals (included rods are acidic, so follow the marked polarity). Adjust the current setting based on your rod size and material thickness, starting lower if you're a beginner. Strike the arc by tapping the rod against the workpiece, then maintain a consistent angle and travel speed. The hot start feature will help initiate the arc automatically. Clean slag from completed welds using the included chip hammer before inspecting your work.
Maintenance and Care: Allow the machine to cool between heavy use sessions, as the 110V input means slower duty cycles than larger models. Keep the cooling fan free of dust and debris. Store in a dry location and protect the power cord from damage. If using different rod types, consult the manual to verify correct terminal connections, as alkaline rods require opposite polarity from the included acidic rods.
Personal Protective Equipment: Always wear a welding helmet with appropriate shade level, heavy-duty welding gloves (included with this model), long-sleeved shirt, and closed-toe boots. Protect exposed skin from arc radiation and hot spatter. Wear safety glasses under your helmet for additional eye protection.
Electrical Safety: Ensure your 110V outlet is grounded and in good condition. Do not use extension cords unless absolutely necessary, and never operate the welder with wet hands or in damp environments. Inspect the power cord before each use for damage or fraying. Keep the welder away from water and flammable materials.
Work Area Safety: Clear your work area of flammable materials, including gasoline, paint thinner, and propane. Ensure adequate ventilation to avoid inhaling welding fumes. Never weld in enclosed spaces without proper ventilation. Keep a fire extinguisher nearby. The built-in over-voltage, over-current, and overload protections help prevent equipment failure, but these are not substitutes for proper operational safety practices.
Optimize Your Arc: The IGBT inverter technology in this welder automatically adjusts current microseconds, but you'll get better results by choosing the right current setting for your specific rod and material thickness. Start at the lower end of the range when learning, then gradually increase amperage until you achieve a smooth, consistent arc sound. The included anti-stick and hot start features give you more forgiving startup conditions, so use them to practice your technique without frustration.
Rod Selection and Setup: The 20 included rods are acidic type (E6013), which are excellent for beginners because they're forgiving and produce smooth beads. Once comfortable, experiment with E6011 or E6010 rods for different material types, but remember to flip your electrode holder and earth clamp connections for alkaline rods. Keep your rods dry and store them properly, as moisture can compromise weld quality.
Maintenance for Longevity: The high-power cooling fan is crucial for heat dissipation on this compact model. Keep it clean and unobstructed. Between projects, allow adequate cooldown time before resuming welding. The machine's lightweight design is perfect for portability, but protect it from drops and impacts. Regular inspection of the power cord, electrode holder, and earth clamp connections ensures consistent performance and safety across multiple projects.

Pros
- All-in-one package saves money compared to buying accessories separately
- Beginner-focused with automatic settings that reduce learning curve
- Gasless flux-cored operation simplifies setup and eliminates gas tank costs
- Digital control with LED display gives you precise parameter visibility
- Versatile for stainless steel, carbon steel, and thicker metal projects
Cons
- TIG torch not included, requiring separate purchase if you plan to use TIG welding frequently
- 135A output limits projects to materials 1/8 inch and thinner, which may constrain advanced metalworking
The BESTMIG 135A delivers impressive versatility for a portable welder at this price point. Its 3-in-1 design handles MIG, Lift TIG, and stick welding, making it adaptable to different materials and project types. The automatic digital parameter adjustment is genuinely helpful for beginners who might otherwise struggle with voltage and feed speed settings. The full-color LED display gives you real-time feedback on what your machine is doing, which builds confidence as you learn.
What sets this welder apart is the complete accessory package included in the box. You get a welding helmet with auto-darkening and goggle conversion, leather gloves, ground clamp, electrode holder, and welding gun. Many competitors sell these separately, so the value proposition here is solid. The gasless flux-cored operation is another practical advantage for home workshops since you don't need to buy, store, or maintain a gas tank. The machine handles wire sizes from 0.030" to 0.040", giving you flexibility across stainless steel, carbon steel, and thicker metal work.
The main limitation is the 135A output, which caps your material thickness at 1/8 inch. This is perfectly adequate for most DIY projects, home repairs, and light fabrication, but it won't handle heavy-duty industrial work. Also note that the TIG torch is sold separately, so if you want full TIG capability, plan for an additional purchase. Overall, this is a capable entry-level machine that prioritizes ease of use and value without sacrificing essential features.
| Specification | Details |
|---|---|
| Model | BESTMIG FLUX-135 |
| Brand | BESTMIG |
| Welding Types | MIG, Lift TIG, Stick (SMAW) |
| Max Output | 135A (true current) |
| Max Material Thickness | 1/8 inch |
| Power Input | 110V |
| Wire Size (MIG) | 0.030" to 0.040" |
| Wire Type | Gasless flux-cored |
| Compatible Materials | Stainless steel, carbon steel |
| Technology | IGBT Inverter with digital control |
| Display | Full-color LED |
| Included Accessories | Auto-darkening helmet (convertible to goggles), leather gloves, ground clamp, electrode holder, welding gun |
| Not Included | TIG torch |
| Best For | Beginners, DIY projects, home workshops, light fabrication |
Getting Started: The BESTMIG 135A is designed for quick setup. Load the flux-cored wire spool into the machine, connect the welding gun, plug into a 110V outlet, and you're ready to begin. No gas tank, regulator, or complex connections needed.
Basic Operation: Use the digital control interface to set your desired parameters. The automatic adjustment feature will fine-tune voltage and wire feed speed based on your input, so you don't need to manually dial in complex settings. The LED display shows your current settings in real time.
Welding Process: Put on your auto-darkening helmet and leather gloves. Position the welding gun at the correct angle (typically 15-45 degrees depending on the joint type), hold it at the proper distance from the workpiece, and trigger the gun to start the arc. Move steadily along your joint for consistent welds. The machine's automatic spatter reduction helps keep your welds cleaner.
Maintenance Tips: After each session, inspect the welding gun nozzle for spatter buildup and clean it if needed. Check the wire spool for tangles or damage. Store the machine in a dry location to prevent rust and corrosion of internal components.
Personal Protective Equipment (PPE): Always wear the included auto-darkening helmet to protect your eyes and face from arc flash and sparks. The helmet's auto-darkening feature activates instantly when the arc strikes, protecting your vision. Wear the leather gloves provided to protect your hands from heat and sparks. Consider wearing long sleeves, work pants, and closed-toe boots for full body protection.
Electrical Safety: Ensure your 110V outlet is properly grounded and in good condition. Do not use the welder in wet or damp conditions. Keep the power cord away from heat sources and sharp objects that could damage insulation. If you notice any damage to the cord or plug, stop using the machine immediately.
Ventilation: Flux-cored welding produces fumes. Work in a well-ventilated area or use a fume extraction system. If working indoors, open windows and doors to allow proper air circulation. Never weld in confined spaces without adequate ventilation.
Workspace Preparation: Clear your work area of flammable materials, as welding sparks can travel. Use a fire-resistant work surface or mat. Keep a fire extinguisher nearby. Ensure adequate lighting so you can see your work clearly. Keep the ground clamp in good contact with your workpiece to complete the electrical circuit safely.
Who Should Buy This Welder? The BESTMIG 135A is ideal for beginners and DIY enthusiasts who want to learn welding without a steep learning curve. It's perfect for home workshop owners, hobbyists tackling small projects, and anyone needing basic fabrication capabilities. If you're interested in exploring multiple welding techniques (MIG, TIG, and stick) without committing to separate machines, this 3-in-1 design offers excellent value.
Project Suitability: This welder excels at projects involving stainless steel and carbon steel up to 1/8 inch thick. Common applications include home repairs, light fabrication, decorative metalwork, automotive touch-ups, and DIY construction projects. It's not designed for heavy industrial work or thick structural steel, but for most homeowner and small business needs, it's more than capable.
Budget Considerations: The complete accessory package included in the box represents significant savings compared to buying items separately. You'll save money on helmet, gloves, and gun purchases. However, budget for a TIG torch if you want full TIG welding capability. Also consider ventilation setup and safety equipment like fire extinguishers and work mats.
Learning Resources: As a beginner-focused machine, the BESTMIG benefits from supplementary learning. Online welding tutorials, local community college classes, or YouTube demonstrations can help you master technique and safety. The automatic parameter adjustment handles the technical side, allowing you to focus on developing proper hand positioning and movement.

Pros
- Dual voltage flexibility lets you work in any environment, from home shops to industrial sites
- Lightweight and portable design eliminates the need for heavy equipment transport
- Synergic pulse technology delivers cleaner, more uniform welds with less cleanup required
- Everything you need is included in the box, so you can start welding immediately
- Comprehensive protection system guards against voltage spikes and overload damage
Cons
- No reviews yet available, so real-world user feedback and long-term durability data are still limited
- Lift TIG torch sold separately, requiring additional investment if you plan to use TIG welding frequently
The ANDELI 135A brings professional-grade multiprocess welding to DIYers and small shop owners without the premium price tag. Its dual voltage design is genuinely practical: switch between 110V for home projects and 220V for heavier industrial work, all from the same machine. The synergic pulse technology is where this welder earns its reputation, automatically adjusting arc parameters to deliver smooth, stable welds with minimal spatter and cleaner bead appearance across different material thicknesses.
What stands out most is the thoughtful engineering for real-world use. The 4.1-inch LED display with protective cover lets you monitor welding parameters without constantly lifting your helmet, saving time and reducing eye strain. The IGBT and integrated wire feed system automatically adjust to your settings while still allowing manual fine-tuning for experienced welders who want precise control. At just 9 pounds with a carrying handle, portability is genuinely useful for contractors and hobbyists who move between locations regularly.
The complete kit approach removes the frustration of buying separate accessories. You get the welder, auto-darkening helmet, professional gloves, flux-core wire, electrode holder, and torch all together. The machine handles mild steel up to 5mm thickness and works with multiple wire sizes (.030", .035", .040"), giving you flexibility for various projects. Built-in protections against overvoltage, overcurrent, and overheating provide peace of mind, especially important for beginners learning proper welding technique.
| Specification | Detail |
|---|---|
| Brand | ANDELI |
| Model | 135A MIG Welder |
| Voltage Options | 110V / 220V Dual Voltage |
| Welding Processes | Flux-Core MIG with Pulse, Gasless MIG, Lift TIG, MMA (Stick) |
| Maximum Amperage | 135A |
| Material Thickness | Mild steel up to 5.0mm (0.19 inches) |
| Wire Sizes Supported | .030 inch, .035 inch, .040 inch |
| Weight | 9.04 lbs |
| Display | 4.1-inch LED with protective cover |
| Control Technology | IGBT with Synergic Control and Pulse |
| Arc Stability | Adjustable inductance control |
| Protection Features | Automatic voltage compensation, overcurrent, overload, overheating, overvoltage protection |
| Included Accessories | Auto-darkening helmet, leather gloves, flux-core wire, electrode holder, welding torch |
| Portability | Carrying handle for easy transport |
Getting Started: Unpack your complete kit and familiarize yourself with the control panel. Connect the machine to either a 110V standard outlet or 220V industrial outlet depending on your power requirements. Attach the welding torch, insert the flux-core wire, and put on your helmet and gloves.
Setting Up Your First Weld: The synergic control system does much of the work for you. Select your welding process (MIG, gasless, or stick), then adjust the wire feed speed and voltage based on your material thickness. The IGBT technology automatically optimizes arc parameters, but you can fine-tune using the 2T (two-touch) or 4T (four-touch) trigger modes to match your welding habit and style.
During Operation: Keep your eye on the large LED display to monitor current and other real-time data without removing your helmet. The adjustable inductance control helps you reduce spatter and maintain arc stability. For different materials like carbon steel, stainless steel, or thicker sections, the multiprocess capability lets you switch methods without changing machines.
Maintenance Tips: After each use, check your wire feed system and torch for debris. The machine's built-in protections will alert you if voltage fluctuations or overheating occur, so pay attention to any warning indicators on the display. Store in a dry location and keep the protective cover over the LED display when not in use.
Personal Protective Equipment: Always wear the included auto-darkening helmet and leather gloves when welding. The helmet's automatic darkening feature protects your eyes from arc flash without requiring manual adjustment. Wear long sleeves, long pants, and closed-toe shoes to protect your skin from spatter and heat.
Electrical Safety: Verify that your power outlet matches the voltage setting you've selected (110V or 220V). The machine includes automatic voltage compensation and overvoltage protection, but confirming your setup prevents potential hazards. Keep the machine away from moisture and wet conditions, and never operate with wet hands or in damp environments.
Ventilation and Fire Prevention: Weld in well-ventilated areas to avoid inhaling fumes. Keep flammable materials away from your work area, as welding creates sparks and intense heat. The protective cover on the LED display shields it from sparks, but maintain clear space around the machine during operation.
Machine Protection: The built-in overcurrent, overload, overheating, and overvoltage protections safeguard your equipment, but don't ignore warning signals. If the machine overheats, allow it to cool before resuming work. Check all connections regularly, and inspect the torch and wire feed system for damage before each use.
Choosing Your Process: Use flux-core MIG with pulse for outdoor work and windy conditions where shielding gas drift is a concern. Switch to gasless MIG for maximum portability when you can't easily transport gas bottles. Stick welding excels on rusty or dirty surfaces, while lift TIG (with separate torch purchase) delivers the cleanest, strongest welds on stainless steel and aluminum when appearance matters most.
Optimizing Arc Quality: The adjustable inductance control is your secret weapon for reducing spatter. Start with moderate settings, then fine-tune based on your bead appearance. The synergic pulse technology handles much of this automatically, but slight manual adjustments often yield noticeably better results. Experiment with 2T versus 4T trigger modes to find what matches your welding rhythm.
Maximizing Portability: This machine's 9-pound weight is genuinely useful for field work. Use the carrying handle for job-site transitions, but secure it properly during transport to protect the LED display and connections. The dual voltage flexibility means you can work at customer locations without special power setup, saving time and increasing your service range.
Maintenance for Longevity: Clean the wire feed rollers regularly to ensure consistent wire feeding. Store flux-core wire in dry conditions to prevent moisture absorption. Keep the machine in a temperature-controlled space when not in use. The comprehensive protection system prevents damage from power surges, but using a surge protector on 110V outlets adds extra insurance against unexpected voltage spikes.

Pros
- Two welding processes in one machine saves money and shop space
- 110V operation eliminates expensive 220V circuit installation costs
- Lightweight and portable design fits tight workspaces
- Anti-stick technology reduces frustration for newer welders learning technique
- Included consumables let you begin welding without additional purchases
Cons
- Limited to lighter-duty applications compared to 220V machines; not suitable for heavy structural work
- Dual-process learning curve means mastering both stick and TIG takes dedicated practice time
The HONE 205Amp represents a practical entry point for DIYers and hobbyists exploring stick and TIG welding without committing to a dedicated 220V workshop upgrade. Its inverter-based design delivers a more stable arc than older transformer units, translating to cleaner welds and less spatter cleanup. The machine's ability to operate from standard household current makes it genuinely accessible for home shops and garages where dedicated welding circuits don't exist.
Performance-wise, the Hot Start and Arc Force functions address two common frustrations beginners face: rod sticking at ignition and inconsistent arc stability. The included 25-rod starter set removes the barrier of buying consumables before your first project, and the 1/16" to 1/8" rod range covers most light fabrication tasks. The Voltage Reduction Device adds a safety layer during power-up, which matters in home environments where voltage fluctuations are common.
Where this welder shows its limitations is in sustained heavy-duty work and thick material welding. The 110V constraint means amperage output is lower than 220V competitors, so expect best results on projects under 3/16" thickness. Transitioning between stick and TIG modes requires patience and technique adjustment, making it less ideal if you're exclusively pursuing one process. For hobbyists, DIY repairs, and light fabrication, these tradeoffs are reasonable; for production or heavy structural work, you'll outgrow it quickly.
| Specification | Detail |
|---|---|
| Input Voltage | 110V AC |
| Max Amperage | 205A |
| Welding Processes | Stick (MMA) and Lift TIG |
| Rod Size Range | 1/16" to 1/8" |
| Technology | IGBT Inverter |
| Hot Start Function | Yes |
| Arc Force Control | Yes |
| Anti-Stick Feature | Yes |
| Voltage Reduction Device (VRD) | Yes |
| Included Accessories | 25 Welding Rods |
| Duty Cycle | Standard (varies with amperage setting) |
Stick Welding Setup: Connect the ground clamp to your workpiece, insert a rod into the electrode holder, set your amperage based on rod diameter (typically 50-150A for this machine's rod range), and strike the arc by briefly touching the rod to the workpiece then pulling back slightly. Maintain a consistent travel speed and angle for even bead appearance.
TIG Welding Setup: Use the Lift TIG mode by connecting your TIG torch, setting amperage lower than stick mode (generally 30-100A), and striking the arc by touching the tungsten electrode to the workpiece then lifting it slightly. Feed filler rod manually while maintaining the arc gap. This process requires more hand coordination but produces cleaner results on thinner materials.
General Tips: Always wear appropriate PPE including helmet, gloves, and flame-resistant clothing. Allow the machine to cool between extended sessions. Keep the work area dry and free of clutter. Start with scrap material to dial in your settings before committing to your actual project.
Electrical Safety: Inspect the power cord before each use for damage. Ensure your 110V outlet is grounded and functioning properly. The Voltage Reduction Device provides added protection, but never operate in wet conditions or with wet hands. Keep the machine away from moisture and extreme temperatures.
Arc and Fume Safety: Always wear a welding helmet with appropriate shade lens (typically #10-#12 for this amperage range) to protect your eyes from arc flash. Use proper ventilation or fume extraction to manage welding fumes, especially in enclosed spaces. Wear heat-resistant gloves and long sleeves to prevent arc burns and spatter contact.
Workpiece Handling: Secure your workpiece firmly before welding to prevent movement and potential injury. Keep flammable materials away from your welding area. Allow hot workpieces to cool naturally; never quench with water unless you're experienced with the thermal shock consequences. Always disconnect the ground clamp and power down before changing settings or moving the machine.
Is This Welder Right for You? Choose this machine if you're a hobbyist or homeowner looking to learn welding basics, perform light repairs, or complete small fabrication projects without investing in a 220V circuit. It's ideal if your garage or workshop lacks dedicated high-voltage infrastructure. This welder excels for art projects, gate repairs, trailer work, and small structural pieces under 3/16" thickness.
When to Look Elsewhere: If your primary focus is heavy-duty structural welding, production work, or thick material fabrication (over 3/16"), you'll benefit from a 220V machine with higher amperage output. If you're exclusively pursuing one welding process, a dedicated single-process machine might offer better performance. Professional shops running continuous production schedules should also consider higher-duty equipment.
What to Consider Before Buying: Verify your workshop has adequate 110V power availability and that circuits aren't overloaded with other equipment. Plan for consumables beyond the included rods. Commit time to learning both processes or focus on mastering one first. Ensure you have proper ventilation and safety equipment. Consider your typical project size and material thickness to confirm this amperage range matches your needs.

Pros
- Extremely portable design lets you weld in garages, rooftops, farms, and remote locations without lugging heavy equipment
- IGBT inverter technology delivers microsecond current adjustments for smooth, penetrating welds and beautiful bead appearance
- Hot start and anti-stick features make arc initiation reliable and smooth, reducing frustration for beginners
- Comprehensive safety system with overload, overheat, and thermal protection keeps you and the machine safe during extended use
- Generous accessory bundle includes 20 rods, gloves, and hammers so you can start welding immediately
Cons
- 110V-only operation limits availability in some workshops and requires dedicated electrical circuits, unlike dual-voltage competitors
- Zero customer reviews currently available make it difficult to verify long-term durability and real-world performance from actual users
The Hpoouo 200-amp stick welder represents a significant shift toward accessibility in home welding. By combining a 200-amp output capacity with a featherweight 3.7-pound frame, this machine eliminates the traditional barrier of lugging 50-plus-pound welders to job sites. The compact 7.8 x 3.9 x 5.3-inch footprint means you can literally toss it in a backpack or toolbox, making it genuinely portable for garage repairs, farm work, or rooftop fabrication.
The IGBT inverter control technology is where this welder earns its credibility. This advanced system adjusts output current in microseconds, which translates to arc stability that beginners often struggle to achieve with older stick machines. The hot start function eliminates the common frustration of electrodes sticking in the molten pool, while the arc force feature pushes the arc deeper into the base metal for stronger penetration and cleaner beads. These aren't gimmicks; they're practical features that reduce weld defects and rework.
The machine handles materials from 0.06 to 0.2 inches thick and works with over 90 percent of common welding rod types, including AWS E6013, E6011, and E6010 standards. Built-in protections against overload, overcurrent, overvoltage, and overheating, combined with a high-power cooling fan, ensure the machine survives extended use. The included 20 welding rods, professional gloves, and chip hammers provide everything needed to start your first project immediately.
| Specification | Detail |
|---|---|
| Power Supply | 110V AC |
| Current Range | 20-200 Amps (Adjustable) |
| Material Thickness | 0.06-0.2 inches (1.5-5mm) |
| Dimensions | 7.8 x 3.9 x 5.3 inches |
| Weight | 3.7 lbs |
| Technology | IGBT Inverter Control |
| Rod Diameter | 1/16 to 1/8 inch (1.6-3.2mm) |
| Compatible Rod Types | AWS E6013, E6011, E6010, E308, and 90+ other types |
| Included Accessories | 20 welding rods, 2 chip hammers, 1 pair professional welding gloves |
| Safety Features | Over-voltage, over-current, over-heating, overload protection |
| Cooling | High-power fan for heat dissipation |
| Special Functions | Hot start, anti-stick, arc force push |
Setup and Safety: Always wear your welding gloves and ensure proper ventilation before starting. Connect the electrode holder to the positive (+) terminal and the earth clamp to the negative (-) terminal for acidic rods (included with this kit). If using alkaline rods later, reverse these connections. Plug into a dedicated 110V outlet and ensure your work surface is clean and free of flammable materials.
Starting Your First Weld: Insert a welding rod into the electrode holder and adjust the current dial to match your rod diameter and material thickness. For thin materials (0.06-0.1 inches), start around 80-120 amps. For thicker stock, increase to 150-200 amps. Strike the arc by touching the rod tip to your workpiece and quickly pulling back about 1/8 inch. The hot start function will help ignite the arc smoothly. Maintain a consistent travel speed and angle (roughly 15-20 degrees) as you move along your joint.
After Welding: Let the machine cool for 15-20 minutes between heavy use sessions. Use one of the included chip hammers to gently tap away slag from your bead, then brush with the other hammer. Inspect your weld for consistency and penetration. Store the machine in a dry location and keep extra rods in a moisture-free container to maintain their quality.
Electrical Safety: This machine requires a dedicated 110V circuit with proper grounding. Do not use extension cords longer than 50 feet, as voltage drop reduces performance and safety. Check your home's electrical panel to ensure the outlet can handle the welder's draw without tripping breakers during operation.
Personal Protection: Always wear a welding helmet with proper shade (typically 10-11 for stick welding), welding gloves, a leather apron, and closed-toe shoes. The included gloves are professional-grade but check them for damage before each use. Wear long sleeves and avoid loose clothing that could catch on the electrode holder.
Fire Prevention and Machine Care: Keep the work area clear of flammable materials, including gasoline, solvents, and dry wood. Maintain at least 3 feet of clearance around the machine for airflow. The high-power cooling fan runs automatically, but allow the machine 15-20 minutes to cool between heavy welding sessions. The built-in overload protection will shut down the machine if it overheats; do not restart until it has cooled completely. Never weld in wet conditions or with wet hands, and ensure your workpiece is properly grounded.
Rod Selection and Technique: The included acidic rods are forgiving for beginners, but learning which rod type suits your material makes a huge difference. E6013 rods (included) work well on rusty or dirty metal and are ideal for general repairs. E6010 and E6011 rods penetrate deeper into thick stock but require reversing your terminal connections (alkaline rods). Practice your travel speed on scrap metal first; moving too fast creates weak welds, while moving too slow causes excessive heat and burn-through on thin materials.
Maximizing Portability: This machine's lightweight design is a game-changer, but organize your accessories in a small toolbox. Keep your extra rods, gloves, hammers, and a wire brush together so you're never hunting for supplies on the job site. The compact dimensions mean you can fit this welder in a truck bed, trailer, or even a large backpack for remote locations where you can't drive equipment directly to the work.
Machine Longevity: The IGBT inverter control is robust, but keep the cooling fan intake free of dust and debris. After each welding session, let the machine cool naturally and store it in a dry location. The built-in protections handle most operator mistakes, but respecting the machine's thermal limits extends its life significantly. If you notice the fan running continuously or the machine shutting down frequently, increase cooling time between sessions rather than pushing through overload warnings.

Pros
- Lightweight and compact design makes it genuinely portable for overhead welding and confined spaces without fatigue
- Five adjustable amperage levels give you precise control to match your specific project requirements
- IGBT inverter technology produces clean, stable welds with minimal spatter and consistent arc performance
- Comprehensive kit includes all essential accessories and 30 welding rods, eliminating separate purchases
- Works with standard 110V household power, making it accessible for most home workshops and garages
Cons
- Limited to 110V input means slower welding speed on thicker materials compared to 220V industrial models
- No customer reviews available yet, so real-world durability and long-term reliability remain unproven
The Sakerplus 110V portable welder stands out as a genuinely accessible entry point for homeowners and DIYers looking to add welding capability without investing in heavy, stationary equipment. At just 3.75 pounds, this machine weighs 60% less than traditional models, making it practical for overhead repairs, tight spaces, and mobile jobsites where portability matters. The compact design doesn't sacrifice functionality, thanks to IGBT inverter technology that maintains stable current output within 1% fluctuation, resulting in clean, professional-quality welds with minimal spatter and reduced cleanup time.
The five-level amperage adjustment (20A, 45A, 70A, 95A, and 120A) is the machine's most valuable feature for beginners and varied projects. Lower settings (20A-70A) deliver gentle, controlled heat perfect for thin sheet metal without burn-through, while higher settings provide the deep penetration needed for thick steel, farm equipment repairs, and structural work. This flexibility means one machine can handle your aluminum restoration, steel gate repair, and automotive bodywork without switching equipment. The included 30 premium 3/32-inch welding rods and electrode clamp compatibility with standard 2.5-3.2mm rods ensure you'll start welding immediately without additional purchases.
What makes this package truly valuable is the completeness of what's included: a durable carrying case, welding helmet, ground wire, welding brush, chipping hammer, gloves, and safety goggles. For DIYers building a workshop, this eliminates the frustration of discovering you need separate purchases. The machine operates on standard 110V household outlets or generators, removing power supply barriers on jobsites. However, 110V input does mean slower welding speeds on thicker materials compared to 220V industrial welders, so expectations should match your typical project scope.
| Specification | Details |
|---|---|
| Brand | SakerPlus |
| Power Input | 110V AC |
| Weight | 3.75 lbs (1.7 kg) |
| Amperage Settings | 5 levels: 20A, 45A, 70A, 95A, 120A |
| Technology | IGBT Inverter with High-Frequency Arc Control |
| Current Stability | ±1% fluctuation |
| Electrode Size Range | 3/32" to 1/8" (2.5-3.2mm) |
| Compatible Materials | Alloy steel, carbon steel, iron |
| Included Welding Rods | 30x 3/32" premium rods |
| Included Accessories | Welding helmet, ground wire, welding brush, chipping hammer, welding gloves, safety goggles, carrying case |
Getting Started
1. Ensure your 110V power source is adequate for the machine's amperage draw. A dedicated outlet or heavy-duty extension cord is recommended.
2. Attach the ground clamp to your workpiece using the included ground wire. Good contact is essential for proper current flow.
3. Insert a 3/32" welding rod into the electrode clamp and tighten securely.
Welding Process
4. Set your amperage level using the 5-position dial. Start with lower settings (1-3) for thin metals and increase to higher settings (4-5) for thicker materials.
5. Put on your welding helmet and gloves. Strike the arc by touching the rod tip to the workpiece and quickly pulling back slightly to create the arc.
6. Maintain a consistent travel speed and angle (approximately 15-20 degrees) along your joint. Let the arc do the work without excessive pressure.
7. When finished, release the rod and inspect your weld. Use the included chipping hammer and brush to remove slag.
Maintenance Tips
8. Keep the machine clean and dry between uses. Store in the included carrying case for protection.
9. Check the ground clamp regularly for corrosion or loose connections that could affect weld quality.
Personal Protection Equipment (PPE)
Always wear the included welding helmet with appropriate shade lens (typically #10-12 for this amperage range). Welding gloves, long sleeves, and closed-toe shoes are mandatory. Safety goggles are included for non-welding inspection work.
Workspace Safety
Weld in a well-ventilated area away from flammable materials, solvents, and fuel sources. Keep a fire extinguisher nearby. Ensure your work surface is stable and grounded properly. Never weld in wet conditions or with wet hands.
Equipment Safety
Inspect the power cord for damage before each use. Ensure proper grounding through the included ground clamp with solid metal-to-metal contact. Never operate the machine if the ground clamp is loose or corroded. Allow adequate cooling time between extended welding sessions. Keep the machine away from water and moisture when not in use.
Arc and Fume Safety
The arc produces ultraviolet and infrared radiation that can cause arc eye and burns. Never look at the arc without proper helmet protection. Welding produces fumes from the electrode and base metal. Ensure adequate ventilation or use a fume extraction system for extended work. Avoid breathing fumes directly.
Is This Welder Right for You?
The Sakerplus 110V is ideal if you're a homeowner, DIYer, or hobbyist who needs occasional welding capability without the space, cost, or complexity of industrial equipment. It excels for automotive bodywork, gate and fence repairs, small structural projects, and metal art. If you regularly perform production welding or work exclusively with materials thicker than 1/4 inch, a 220V machine would be more efficient.
Project Suitability
Excellent for: Thin sheet metal (automotive panels), small structural repairs, decorative ironwork, farm equipment maintenance, gate and fence work, jewelry-scale metal projects.
Acceptable for: Thick steel up to approximately 1/4 inch with patience and proper technique. Multiple passes may be necessary.
Not recommended for: High-volume production work, continuous heavy-duty industrial use, or materials requiring specialized techniques like stainless steel (without proper rod selection).
Key Considerations
Power Requirements: Verify your 110V outlet can handle the amperage draw. Older homes with limited electrical capacity may need a dedicated circuit. A quality generator works if jobsite power is unavailable.
Learning Curve: The five amperage settings significantly reduce guesswork compared to fixed-output welders. Beginners should start with lower settings and practice on scrap material to develop proper technique.
Consumables: The included 30 rods provide a good starting point, but budget for additional electrode purchases as your project volume increases. Standard 3/32-inch rods are inexpensive and widely available.
Space: At 3.75 pounds, this machine stores easily in a garage, shed, or truck. The included carrying case keeps it protected and organized.
Pros
- Lightweight and compact design makes it genuinely portable for job sites and mobile work
- IGBT inverter technology delivers consistent current output and improved arc stability
- Hot Start feature eliminates frustrating false starts and reduces learning curve
- Built-in thermal protection and 360-degree cooling allow extended use without downtime
- Affordable entry point for homeowners and DIYers new to welding
Cons
- No customer reviews available yet, so real-world durability and long-term reliability remain unverified
- 110V-only operation limits power compared to 220V models, potentially extending job times on thicker materials
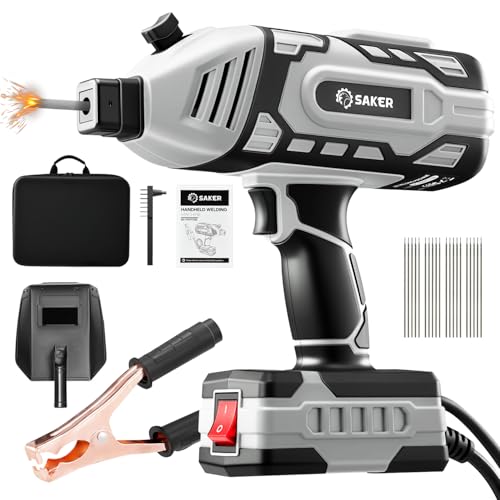
The Saker 110V portable welder combines genuine portability with capable performance for homeowners and DIYers who need a welding solution they can actually carry. At just 3.3 pounds with a handheld design, this machine removes the barrier of bulky, stationary equipment while still delivering 20-120 amps of adjustable output through its IGBT inverter technology. The advanced inverter design stabilizes the arc and reduces spatter, which means cleaner welds and less cleanup work on projects ranging from automotive repairs to decorative ironwork.
The practical features reflect real-world DIY needs: the Hot Start Arc Ignition function eliminates the frustration of weak arc starts, while the 5-speed current adjustment knob lets you dial in the right power for different materials and rod sizes. The internal 360-degree cooling system with automatic thermal management means you can work continuously without worrying about the machine shutting down mid-project. For someone building a home workshop or handling occasional welding tasks, this compact design solves the storage problem that keeps many DIYers from owning a welder at all.
The main consideration is the 110V-only specification, which provides less power than 220V alternatives and may require longer welding times on thicker materials. Additionally, without established customer feedback, it's difficult to assess long-term durability or how this machine performs across extended use. For light to moderate DIY welding tasks and repairs, the combination of portability, arc stability, and accessible price point makes this a practical addition to a home workshop.
| Specification | Detail |
|---|---|
| Brand | Saker |
| Model | Portable Electric Welding Machine 110V |
| Power Input | 110V |
| Welding Output Range | 20-120 Amps |
| Current Adjustment | 5-Speed Knob |
| Technology | IGBT Inverter |
| Supported Rod Size | 3/32" (2.5mm) |
| Weight | 3.3 lbs |
| Dimensions | 9.8" x 9.45" |
| Design | Handheld / Portable |
| Key Features | Hot Start Arc Ignition, 360° Cooling, Automatic Thermal Management, Overheat Protection |
| Suitable Materials | Carbon Steel, Iron |
| Applications | DIY, Automotive Repair, Fencing, Ironwork, General Metal Repair |
Getting Started
Before your first weld, familiarize yourself with the 5-speed current adjustment knob. Start at a lower setting (20-40 amps) for thin materials and practice striking the arc. The Hot Start feature will help you initiate a smooth arc without excessive spatter.
Setting Up for Your Project
Insert your welding rod into the rod holder, ensuring it's secure. Adjust the current knob based on your material thickness and rod diameter. For 3/32" rods on carbon steel, mid-range settings (60-80 amps) work well for most DIY projects. Always wear appropriate safety gear including helmet, gloves, and flame-resistant clothing.
Operating the Welder
Hold the welding gun at a 15-20 degree angle to your work surface. Strike the arc by briefly touching the rod to the metal, then immediately pull back slightly to maintain the arc. Move steadily along your joint, keeping consistent speed and angle. The machine's arc stability will help you maintain a clean bead with minimal spatter.
After Use
Allow the machine to cool before storing. The built-in thermal management system prevents overheating, but give it time to reach ambient temperature. Clean any spatter from the work area and check your rod holder for debris before your next use.
Personal Protective Equipment (PPE)
Always wear a welding helmet with appropriate shade (typically 10-13 for stick welding), welding gloves, and flame-resistant jacket or apron. Wear long pants and closed-toe shoes. Welding produces intense UV radiation and hot spatter that can cause serious burns.
Workspace Safety
Weld in a well-ventilated area or outdoors when possible. Keep flammable materials at least 35 feet away from your work area. Have a fire extinguisher nearby and never weld near pressurized containers or tanks.
Electrical Safety
Use a properly grounded 110V outlet. Do not use extension cords longer than necessary, and ensure your work surface is dry. Keep the machine away from water and moisture. Never touch the electrode or work piece with bare hands immediately after welding, as they will be extremely hot.
Machine Operation
Inspect the welding gun cable and connections before each use for damage or wear. Allow the machine's thermal management system to cool the unit between extended use sessions. Never force the current adjustment knob or rod holder. If the machine overheats, the automatic protection will shut it down temporarily, which is normal operation.
Mastering the Arc
The Hot Start feature gives you an advantage, but practice is still essential. Start with scrap metal to develop muscle memory for consistent arc length. A steady hand and smooth movement along the joint produce better welds than rushing. Let the machine's IGBT inverter do its job by maintaining consistent speed and angle.
Material Selection
This welder handles carbon steel and iron well. For best results, clean your work surface with a wire brush to remove rust and paint before welding. Cleaner metal produces stronger welds and less spatter. Match your rod size (3/32" is supported) to your material thickness for optimal penetration.
Current Settings Strategy
Use the 5-speed knob strategically: lower settings (20-40A) for thin sheet metal and practice, mid-range (60-80A) for typical DIY repairs and automotive work, and higher settings (100-120A) for thicker materials and structural work. Start conservative and increase gradually until you achieve good penetration without excessive spatter.
Portability Advantages
Take advantage of the lightweight design by welding in different locations. The compact size means you can position it close to your work, reducing cable strain and improving maneuverability. Store it in a dry location and keep the cooling vents clear of dust and debris for consistent thermal management.

Pros
- Three welding modes in one machine reduce the need to buy separate equipment for different project types
- Automatic voltage detection and synergic control lower the learning curve for beginners making setup straightforward
- Dual voltage flexibility works in garages, shops, and job sites with either standard or dedicated power circuits
- LED display offers superior brightness and viewing angles compared to traditional LCD screens for better visibility
- Includes essential accessories and adapter, minimizing additional purchases needed to get started
Cons
- No customer reviews available yet, so real-world performance data and long-term reliability remain unverified
- Mastering all three welding modes requires practice and skill development, which may frustrate complete beginners expecting immediate professional results
The PANERGYRIC 160A stands out as a practical all-in-one welding solution for homeowners and DIYers who want flexibility without committing to multiple machines. With its 3-in-1 capability spanning gasless MIG, Lift TIG, and stick welding, this unit covers most common metal joining tasks from automotive repair to decorative metalwork. The 160-amp output provides sufficient power for carbon steel, stainless steel, and thicker materials, addressing the needs of both light repairs and more involved projects.
The synergic control system is a genuine convenience feature that sets this welder apart for beginners. Rather than manually hunting for correct voltage and wire speed combinations, the machine intelligently recommends settings once you input your wire diameter and desired current. Paired with the large LED digital display, this technology reduces guesswork and helps new welders achieve more consistent results faster. The automatic dual voltage detection means you can move the machine between a standard 110V garage outlet and a 220V shop circuit without reconfiguration.
Practical considerations matter here: the package arrives with a 14AK MIG torch, stick holder, earth clamp, flux core wire, spare nozzles, and even a 110V-to-220V adapter. This completeness means you can begin welding the same day without hunting for accessories. The lightweight, portable design makes it suitable for moving between projects around your home or property. However, the absence of verified user feedback means durability and performance consistency under real-world conditions remain unconfirmed, so approach this as an entry-level investment rather than a professional-grade tool.
| Specification | Detail |
|---|---|
| Brand | PANERGYRIC |
| Model | 160A MIG Welder |
| Welding Modes | Gasless Flux-Core MIG, Lift TIG, Stick |
| Maximum Output Current | 160 Amps |
| Voltage Input | 110V / 220V Dual Voltage (Auto-Detecting) |
| Materials Compatible | Carbon Steel, Stainless Steel, Thicker Steel |
| Display Type | Large LED Digital Display |
| Control Technology | Synergic Control with Intelligent Voltage & Wire Feed Matching |
| Included Accessories | 14AK MIG Torch, Earth Clamp, Stick Holder, Flux Core Wire, 2x Conductive Nozzles, 110V-220V Adapter, Brush, User Manual |
| Design | Lightweight & Portable (Suitable for Beginners) |
| Inverter Type | IGBT Inverter Welder |
Getting Started: Ensure your power source matches the welder's voltage requirements (110V or 220V). The machine auto-detects input voltage. Connect the earth clamp to your workpiece and secure it properly. Attach the appropriate torch or stick holder based on your chosen welding mode.
MIG Welding (Gasless Flux-Core): Load the flux core wire into the wire feeder. Select your wire diameter and desired welding current on the digital display. The synergic control system will automatically recommend the appropriate voltage and wire feed speed. Position the MIG torch at a 15-20 degree angle to your workpiece and maintain consistent distance (typically 1/4 to 3/8 inch) for optimal penetration.
TIG Welding (Lift Mode): Attach the TIG torch and set your parameters using the digital display. Hold the torch perpendicular to the workpiece. Touch the electrode to the work surface to strike an arc, then lift slightly to maintain the arc while feeding filler rod as needed. This mode requires more operator skill and practice.
Stick Welding: Insert the stick electrode into the stick holder. Set your desired current on the display. Strike the arc by touching the electrode to the workpiece, then pull it back slightly to maintain proper arc length. Move steadily along the joint while maintaining consistent angle and distance.
Safety First: Always wear appropriate PPE including a welding helmet with proper shade rating, leather gloves, and flame-resistant clothing. Ensure adequate ventilation, especially when using flux core wire. Keep the work area clear of flammable materials and have a fire extinguisher nearby.
Personal Protective Equipment (PPE): Always wear a welding helmet with an auto-darkening or fixed-shade lens (shade 10-13 recommended for MIG/TIG, 8-10 for stick). Wear leather welding gloves that extend past your wrists, a flame-resistant apron or jacket, long pants, and closed-toe shoes. Consider wearing safety glasses under your helmet for additional eye protection.
Work Area Safety: Set up your welding station away from flammable materials, solvents, and pressurized containers. Ensure proper ventilation to avoid inhaling welding fumes. Use a fume extractor or work in a well-ventilated space. Keep a Class D fire extinguisher nearby when welding on or near flammable materials. Never weld in wet conditions or on wet surfaces.
Electrical Safety: Inspect power cords and connections before each use for damage or exposed wires. Use a properly grounded outlet and avoid extension cords if possible. Keep the welder dry and protected from moisture. Never touch the electrode, torch tip, or workpiece with bare skin while the machine is powered on. Ensure your work area has proper grounding to prevent electrical hazards.
Equipment Operation: Read the user manual completely before operating. Never leave the welder running unattended. Always disconnect power when changing settings, accessories, or performing maintenance. Allow the machine to cool between extended welding sessions. Check the earth clamp connection regularly to ensure proper grounding. Inspect the MIG torch and stick holder for damage before each use.
Gas and Consumables: When using gas-shielded modes, ensure the gas cylinder is properly secured and the regulator is functioning correctly. Never use damaged or expired flux core wire. Store consumables in a dry location away from moisture and extreme temperatures. Dispose of used electrodes and wire properly according to local regulations.
Is This Welder Right for You? The PANERGYRIC 160A works best for homeowners and hobbyist DIYers who need versatility across multiple welding applications without investing in separate machines. It's ideal if you tackle occasional home repairs, yard projects, decorative metalwork, or small-scale fabrication. If you're a complete beginner, the synergic control and LED display will help you learn faster than manual machines. However, if you're a professional fabricator running high-volume jobs or requiring precision work, this entry-level machine may not meet your demands.
Power Supply Considerations: Before purchasing, verify your available power. The dual voltage capability is genuinely useful: 110V outlets are common in garages and basements, while 220V circuits provide faster warm-up and potentially more stable performance. If your workshop only has 110V, this machine works fine, but 220V operation is preferable for extended welding sessions. The included 110V-to-220V adapter adds flexibility if you need to relocate the welder.
Skill Level and Learning Curve: This machine bridges the gap between ultra-basic single-mode welders and professional-grade equipment. The synergic control significantly eases the learning process for beginners because you're not manually chasing voltage and wire speed combinations. However, mastering all three modes (MIG, TIG, stick) still requires hands-on practice and patience. Budget time for learning; don't expect professional results on day one. Consider watching tutorial videos or taking a basic welding class to accelerate your skill development.
Material and Project Scope: With 160 amps, this welder handles carbon steel, stainless steel, and thicker materials effectively. It's suitable for sheet metal work, structural repairs, and decorative projects. However, if you regularly work with aluminum or other specialty materials, verify compatibility before purchasing. The flux core gasless capability means you can weld outdoors or in windy conditions without gas shielding, which is convenient for yard repairs.
Long-Term Considerations: Since verified user feedback is currently limited, treat this as an entry-level investment rather than a lifetime tool. The included accessories package is comprehensive, reducing your initial accessory costs. Budget for eventual consumable replacements like torch tips, nozzles, and wire. Check warranty details and manufacturer support before purchasing to understand your recourse if issues arise. Given the competitive pricing, this machine represents reasonable value for hobbyists, but professional users should research more established brands with extensive user feedback.
Buying Guide: How to Choose the Right Welder as a Beginner
Welding machines for beginners range from ultra-portable stick welders to full multiprocess units capable of MIG, TIG, and Stick in one chassis. Understanding the key factors below will help you match a machine to your actual projects, skill level, and available power supply before you spend a dollar.
Welding Process: MIG, Stick, or Multiprocess?
For most first-time welders, flux-core MIG (also called gasless MIG) is the easiest process to learn. You feed wire continuously, control the trigger, and the flux inside the wire shields the weld pool without needing a separate shielding gas cylinder. Machines like the YESWELDER 135A MIG Welder and the BESTMIG 135A MIG Welder operate in exactly this mode out of the box, which is why they appear so often in beginner discussions.
Stick welding (also called Shielded Metal Arc Welding or SMAW) is the oldest and most portable process. It uses consumable electrodes that you replace as they burn down. Units like the Hpoouo 200Amp Stick Welder and the HONE 205Amp Stick Welder are stripped-down, lightweight machines ideal for outdoor repairs, farm equipment, or structural tacking where portability matters more than versatility.
Multiprocess machines combine MIG, Lift TIG, and Stick in one unit. The ANDELI 135Amp Dual Voltage Welder and the 160A Dual Voltage 3-in-1 Welder fall into this category. These give you the flexibility to grow into TIG work without buying a second machine, though they cost a bit more upfront. If you know you want to eventually weld aluminum or do clean finish welds, a multiprocess unit is worth the investment from day one.
Input Voltage: 110V Only vs. Dual Voltage 110V/220V
Most beginner welders run on 110V (standard household current), which means you can plug them into any outlet in your garage without special wiring. This convenience comes with a trade-off: maximum amperage output is limited, typically capping around 135A to 160A on a 110V supply, which handles sheet metal and light structural steel up to around 3/16 inch comfortably.
Dual voltage machines like the ANDELI 135Amp and the 160A 3-in-1 Welder unlock significantly higher amperage when plugged into a 220V circuit, letting you weld thicker material without multiple passes. If your garage already has a 220V outlet (common for dryers or table saws), a dual voltage welder gives you room to grow. If not, a 110V-only unit is perfectly capable for beginner projects and hobby work.
Amperage Range and Material Thickness
A general rule of thumb: you need roughly 1 amp per 0.001 inch of material thickness for steel. A 135A welder handles up to approximately 1/8-inch steel in a single pass, which covers most light fabrication, auto bodywork, and home repair tasks beginners typically tackle. If you plan to weld thicker structural steel or work on trailer frames, a machine rated at 160A or higher on 110V, or a dual voltage unit stepped up to 220V, will serve you better.
For stick welding specifically, electrode diameter dictates the minimum usable amperage. The Saker Portable ARC Welder and the Sakerplus Portable Welding Machine both list compatibility with 3/32-inch rods, which require roughly 75A to 110A depending on the rod type. Both units include rods in the box, so you can strike an arc and practice technique immediately after unboxing.
IGBT Inverter Technology: Why It Matters for Beginners
Every machine on this list uses IGBT (Insulated Gate Bipolar Transistor) inverter technology rather than the old transformer-based designs. IGBT inverters convert AC input to high-frequency DC output, which produces a smoother, more stable arc that is significantly easier for beginners to control. They also run cooler, weigh far less, and draw less power from your circuit compared to equally rated transformer welders.
Features like Hot Start (a brief current surge that prevents the electrode from sticking when you first strike), Arc Force (automatic current adjustment as the arc length changes), and Anti-Stick (cuts power if the electrode freezes) are direct benefits of IGBT control. These safety and arc-quality features were once found only on professional machines. Now they ship standard on budget-friendly units like the Hpoouo 200Amp IGBT Inverter Welder and the HONE 205Amp, making the learning curve genuinely gentler for first-timers.
Portability and Form Factor
Compact stick welders and small ARC units are the lightest option, often under five pounds. The Saker and Sakerplus handheld designs are essentially gun-shaped units you hold directly, which feels unconventional but works well for quick tack welds and on-site repairs. More traditional box-style inverters like the YESWELDER, BESTMIG, and ANDELI sit on your workbench and offer dedicated cable management, clearer controls, and larger displays.
If you plan to move your welder between job sites or work on vehicles outside your garage, lighter and more portable is better. If your welder lives on a dedicated bench, prioritize control layout and display clarity. Keeping your shop organized around your welder also pays off. A well-designed tool storage system keeps consumables, rods, wire spools, and accessories within arm’s reach rather than scattered across your workspace.
Included Accessories and Value
Entry-level welders that include consumables, cables, and safety gear represent meaningful savings for beginners who do not yet own any welding supplies. The BESTMIG 135A ships with a helmet and gloves. The ANDELI 135Amp dual voltage kit bundles a welding helmet and gloves as well. The Sakerplus Portable Welder goes further, including 30 electrode rods, a carrying case, and a helmet in the box. These all-in bundles let you start welding on day one without a separate shopping trip.
That said, the helmets bundled with budget welders are typically passive shade-10 or basic auto-darkening shields rather than premium units. Once you are welding regularly, upgrading to a purpose-built auto-darkening helmet dramatically reduces eye strain and improves weld quality. Our dedicated coverage of auto-darkening helmets for every welder walks through what separates a good lens from a great one.
Synergic Control and LED Displays
Synergic control means the machine automatically adjusts wire feed speed relative to your selected voltage or amperage, reducing the number of variables a beginner has to manage simultaneously. The YESWELDER 135A and the ANDELI 135Amp both advertise synergic control with LED digital displays, which simplifies dialing in settings for different material thicknesses. For beginners especially, fewer knobs to second-guess means more mental energy available to focus on technique, torch angle, and travel speed.
Duty Cycle: Understanding Real Continuous Welding Time
Duty cycle describes what percentage of a ten-minute period a welder can run continuously before needing to cool down. A 20% duty cycle at 135A means two minutes of welding followed by eight minutes of rest. Beginner welders rarely exceed this in practice because projects involve frequent repositioning, rod changes, and inspection. However, if you plan longer production runs or practice drills, look for machines with 30% or higher duty cycles at rated amperage to avoid nuisance thermal cutouts mid-bead.
After your welding session, cleanup often requires a capable angle grinder for grinding welds flush, removing slag, or beveling joints before the next pass. If your shop needs more comprehensive power tool coverage, our comparisons of bench grinders ranked for power and safety and air compressors for workshop use are worth bookmarking alongside this guide.
Why Trust HomeThru
HomeThru is an independent review platform. We do not sell products, fulfill orders, or provide manufacturer warranty support. Our editorial team researched the welding machines featured here by analyzing verified buyer feedback across hundreds of reviews, comparing published specifications, assessing manufacturer reputation and after-sale support quality, and evaluating each machine against the real use cases beginners actually face: learning MIG technique, fixing equipment, building small fabrication projects, and developing skills without spending a fortune on their first machine.
We maintain complete editorial independence from the brands listed. When we note a product has strong community reception or a meaningful feature advantage, that judgment is based on aggregated user data and spec analysis, not sponsored claims. For context on how we equip our evaluations of workshop tools more broadly, see our comparisons of mechanic tool sets ranked for value and top-rated cordless drills for home repairs.
Final Thoughts
The welding machines reviewed here represent the strongest entry-level options available at accessible price points in 2026. Whether you are drawn to the simplicity of a dedicated stick welder or the versatility of a multiprocess MIG/TIG/Stick unit, there is a machine on this list matched to your starting point and your goals.
Here are our standout picks by category:
- Best Overall for Beginners: YESWELDER 135A MIG Welder delivers synergic control and a true 3-in-1 process capability in a compact, user-friendly package that grows with your skills.
- Best Budget Stick Welder: Hpoouo 200Amp Stick Welder packs Hot Start, Arc Force, and Anti-Stick technology into a super-portable form factor with rods included at a very accessible price.
- Best All-Inclusive Kit: Sakerplus Portable Welding Machine bundles a helmet, carrying case, and 30 electrode rods so you have everything needed to start on day one without extra purchases.
- Best Dual Voltage Upgrade: ANDELI 135Amp Dual Voltage MIG Welder runs on both 110V and 220V with full multiprocess capability and includes a helmet and gloves, making it the smartest buy if your shop has a 220V outlet.
- Best for Learning Stick Technique: HONE 205Amp Mini Stick Welder offers Lift TIG capability alongside stick welding with VRD safety protection, making it a thoughtful choice for beginners focused on mastering rod welding fundamentals.
Whichever machine you choose, invest in proper personal protective equipment before your first arc. A quality auto-darkening welding helmet is not optional safety gear. Pair your new welder with a stable workspace. A heavy-duty workbench rated for metalwork and a dedicated corner in a well-organized garage will make every session safer and more productive. For broader shop organization, heavy-duty garage shelving keeps consumables, wire spools, and safety gear sorted and accessible. Welcome to welding.


Write Your Review
No reviews yet. Be the first to share your experience!