

A table saw is the tool that transforms a home workshop from a hobby space into a real production environment. Whether you are ripping plywood for cabinet carcasses, breaking down dimensional lumber for framing, or making precise bevel cuts for trim work, a capable table saw makes every task faster and more accurate than any other saw in the shop. The challenge is finding the right model for a home setting, where space, power supply, and budget all create real constraints that a professional cabinet shop never has to consider.
Our editorial team at HomeThru independently researched and analyzed dozens of table saw models currently available, focusing on the categories that matter most to home workshop users: portability, rip capacity, motor power, fence quality, and dust management. We cross-referenced hands-on user feedback from thousands of verified purchasers, evaluated manufacturer specifications against real-world performance data, and compared how each saw handles the most common home workshop tasks, from ripping full 4×8 sheets of plywood to making repeatable crosscuts in hardwood. Below you will find our top picks across every category, followed by a detailed buying guide that cuts through the marketing noise.
If you are also building out your shop toolkit, a quality set of circular saws pairs well with any table saw for breaking down large sheet goods before they hit the table. And when fine finishing work follows your cuts, belt sanders for woodworking help you achieve smooth, professional results on every surface.
Our Top Picks for Home Workshop Table Saws

Pros
- Multi-material capability eliminates the need for separate saws for wood, metal, and composite cutting
- Included accessories (zero-clearance plate, cross-cut sled, dado plate) add significant value and functionality out of the box
- Precision fence and geared bevel adjustment deliver consistent, repeatable cuts across different materials and applications
- Portable jobsite design with carry handles and outfeed support bar makes transport and setup straightforward
- Strong safety package with electronic blade brake and quick-release riving knife provides peace of mind
Cons
- New unit with no customer reviews yet, so long-term durability and real-world performance feedback is not yet available
- Jobsite-class saw may lack the refinement and dust collection integration of larger cabinet table saws for dedicated shop use
The Evolution R10TS stands out as a genuinely versatile jobsite table saw designed for professionals and dedicated DIYers who work across multiple materials. The 15-amp motor with soft-start technology delivers consistent power whether you're crosscutting framing lumber, ripping aluminum trim, or making precision dado joints in hardwood. The inclusion of a zero-clearance throat plate and cross-cut sled right out of the box shows Evolution understands that cleaner cuts and reduced tear-out matter to serious woodworkers, not just casual users.
What makes this saw particularly valuable is the dado plate included in the package. Many jobsite saws relegate dado capability to an optional add-on, but Evolution includes it here, immediately expanding your cutting options for cabinet work, shelving, and advanced joinery. The precision rack-and-pinion fence system with geared bevel adjustment (0-45 degrees) ensures that whether you're making your first cut or your hundredth, you get repeatable accuracy. The 26-inch rip capacity and 3-3/8-inch maximum cut depth handle both trim work and full-thickness stock without compromise.
Portability and jobsite durability are engineered into the design with a lightweight steel frame, carry handles, and an outfeed support bar for stability when processing longer materials. The safety package is comprehensive, including an electronic blade brake for quick stops, anti-kickback pawls to prevent dangerous binding, and a quick-release riving knife that doesn't slow down your workflow. The 3-year warranty reflects Evolution's confidence in this saw's build quality and longevity on active jobsites.
| Specification | Details |
|---|---|
| Motor | 15-amp with soft start |
| Blade Size | 10-inch TCT (tungsten carbide tipped) |
| Rip Capacity | 26 inches |
| Maximum Cut Depth | 3-3/8 inches |
| Bevel Range | 0-45 degrees with geared adjustment |
| Fence System | Rack and pinion with precision tracking |
| Included Accessories | Zero-clearance throat plate, cross-cut sled, dado plate, premium TCT blade |
| Safety Features | Electronic blade brake, anti-kickback pawls, quick-release riving knife, height-adjustable blade throat |
| Construction | Lightweight steel frame with carry handles |
| Material Compatibility | Wood, mild steel, aluminum, composites |
| Warranty | 3 years |
| Design Type | Portable jobsite saw with outfeed support bar |
Setup and Fence Adjustment: Begin by assembling the saw on a stable, level work surface. Attach the outfeed support bar to prevent tipping when processing longer materials. Adjust the precision fence using the rack-and-pinion system, which allows smooth, repeatable positioning. Always verify fence alignment with a measuring tape before making your first cut.
Crosscutting: Use the included cross-cut sled for straight, tear-free crosscuts. Place your workpiece against the sled's stop block, ensure it's secure, and feed smoothly through the blade. The zero-clearance throat plate minimizes splinter-out on the bottom surface of your cut.
Rip Cuts: For ripping, position the fence to your desired width using the precision scale. Keep your hands and body to the side of the blade path, never directly behind it. Feed the workpiece steadily without forcing it; the 15-amp motor has enough power to cut through the material smoothly.
Dado and Groove Cuts: Install the dado plate when making groove or dado cuts. Make multiple shallow passes rather than one deep pass for better control and cleaner results. Always wear safety glasses and hearing protection, and ensure the blade has come to a complete stop before making any adjustments.
Blade Angle Adjustments: Use the geared bevel adjustment to tilt the blade from 0 to 45 degrees. This mechanism provides fine control for bevel cuts and angled crosscuts. Test your angle on scrap material before committing to your workpiece.
Before You Start: Always inspect the blade for damage or dull teeth before cutting. Ensure the zero-clearance throat plate is properly installed and the riving knife is positioned correctly (about 1/8 inch from the blade). Check that all guards are in place and functioning. Never operate the saw with the blade guard removed.
During Operation: Wear safety glasses and hearing protection at all times. Keep your hands at least 6 inches from the blade path. Use push sticks or push blocks when ripping narrow stock to keep your hands safely away from the blade. Never reach over or around a spinning blade. If the blade binds, immediately release the paddle switch and allow the electronic blade brake to stop the saw before investigating.
Kickback Prevention: The anti-kickback pawls are your first line of defense against dangerous binding. Ensure they're properly positioned and move freely. Feed workpieces smoothly and steadily without forcing them through the blade. For rip cuts, always position yourself to the side of the blade's path, never directly behind it where kickback could propel the workpiece toward you.
After Cutting: Always allow the blade to come to a complete stop before making any adjustments, changing blades, or removing your workpiece. Use the quick-release riving knife to remove it safely when switching between blade types. Store the dado plate and other accessories securely to prevent accidental contact with the blade.
Maintenance and Storage: Keep the work area clear of debris and sawdust to maintain visibility and prevent tripping hazards. Periodically inspect the fence system for alignment and the blade for damage. Store the saw in a dry location, and keep the power cord in good condition.
Maximize the Zero-Clearance Throat Plate: The zero-clearance throat plate is one of your best tools for reducing tear-out. It supports the wood fibers right up to the blade, preventing the grain from splintering on the underside. Keep a sharp blade installed for best results; a dull blade causes more tear-out than a sharp one.
Master the Cross-Cut Sled: The included cross-cut sled is more accurate than freehand crosscutting. Build a reference mark on the sled's fence at the blade location, and use it consistently for repeatable cuts. You can also clamp a stop block to the sled to cut multiple pieces to identical length without measuring each one.
Leverage Multi-Material Capability: This saw's ability to cut mild steel and aluminum opens up possibilities beyond traditional woodworking. When cutting metal, use a metal-cutting blade (not the included wood blade), feed slowly, and allow the saw to do the work. Metal chips are sharp; wear gloves and clean up immediately.
Fine-Tune Bevel Cuts: The geared bevel adjustment allows precise angle setting. For critical bevel cuts, make a test cut on scrap material first. Mark your angle setting on the saw's body so you can quickly return to it if needed.
Optimize Dado Cuts: When making dadoes, make multiple shallow passes rather than one deep cut. This reduces strain on the motor, improves cut quality, and gives you better control. Always test your setup on scrap wood before committing to your final piece.
Portable Setup Strategy: Use the carry handles and outfeed support bar to create a stable setup quickly on any jobsite. Position the saw so the outfeed is clear of obstructions, allowing you to process longer materials safely without binding.
Pros
- Excellent rip capacity for a portable saw makes it versatile for larger projects
- Rack-and-pinion fence system is smooth and repeatable, reducing setup time
- Sturdy rolling stand provides genuine portability without sacrificing stability
- Comprehensive accessory package eliminates immediate additional purchases
- Solid 15-amp motor cuts through hardwoods and dense materials efficiently
Cons
- Limited crosscut capacity compared to larger stationary saws may require alternate methods for wide boards
- Dust collection efficiency depends on vacuum quality; fine dust management requires a quality shop vac
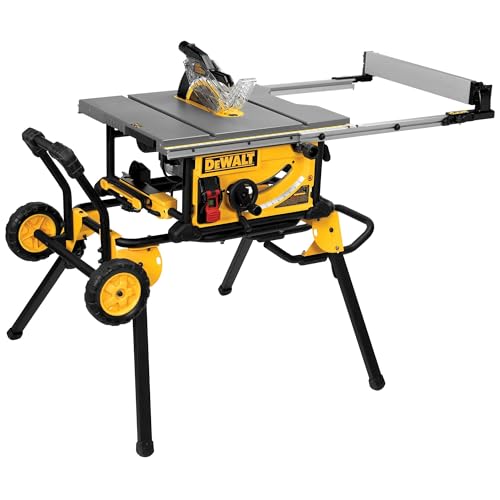
The DeWalt DWE7491RS strikes an impressive balance between power and portability. The 15-amp motor delivers consistent cutting performance through hardwoods and dense materials, while the included rolling stand makes it genuinely portable for job sites and smaller workshops. The telescoping fence system is particularly well-designed, allowing for quick setup and precise adjustments without the frustration of binding or slop that plagues cheaper models.
What sets this saw apart is its thoughtful engineering for real-world use. The 32.5-inch rip capacity handles full-width shelving and trim work without repositioning stock, while the flip-over ripping fence accommodates narrow cuts. The onboard storage system keeps accessories organized and accessible, and the 2.5-inch dust port accepts standard shop vacuums for reasonably efficient cleanup. The table dimensions provide solid material support without excessive footprint.
For DIYers tackling renovation projects, furniture building, or contractors moving between job sites, this saw delivers the ripping performance of larger stationary models with genuine mobility. The included accessories eliminate hidden costs, and the three-year warranty backs the investment. It's not designed for production work or precision crosscutting on wide materials, but for general-purpose ripping and moderate-volume cutting, it's a capable, dependable choice.
| Specification | Details |
|---|---|
| Motor | 15 Amp |
| Blade Size | 10 Inch |
| Speed | 4,800 RPM |
| Rip Capacity | 32.5 Inches |
| Depth of Cut at 90 Degrees | 3.125 Inches |
| Depth of Cut at 45 Degrees | 2.25 Inches |
| Table Dimensions | 21.875 x 26.375 Inches |
| Dust Collection Port | 2.5 Inches |
| Fence System | Rack & Pinion Telescoping |
| Stand | Rolling Stand Included |
| Warranty | 3 Year Limited |
| Included Accessories | Rolling Stand, Push Stick, Miter Gauge, Rip Fence, 2 Blade Wrenches, Blade Guard Assembly, 10-Inch 24-Tooth Carbide Blade |
Setup and Assembly: The rolling stand requires minimal assembly. Unfold the stand, secure the saw base, and lock the wheels in place for stability. Attach the fence rails and verify they retract smoothly before your first cut.
Making Rip Cuts: Measure your desired rip width using the fence scale or a measuring tape. Loosen the fence lock, slide the fence to your mark, and tighten securely. Always use the push stick for narrow cuts and keep hands clear of the blade path. Feed material steadily without forcing it through the blade.
Adjusting Blade Angle: For bevel cuts, loosen the tilt lever beneath the table and rotate the motor unit to your desired angle. Tighten securely before cutting. Use the angle scale as a guide, but verify with a protractor for precise angles.
Dust Collection: Connect a shop vacuum hose to the 2.5-inch dust port before starting. Ensure your vacuum is on and has adequate capacity for the volume of dust your project will generate.
Storage and Transport: Retract the telescoping fence rails to minimize width. Engage the rolling stand brakes and secure the saw for transport. Store the blade guard assembly, miter gauge, and wrenches in the onboard storage compartments.
Before Every Use: Inspect the blade for damage, cracks, or dull teeth. Verify the blade guard moves freely and the riving knife is properly positioned. Ensure the fence is secure and the table is clear of debris.
Personal Protective Equipment: Wear safety glasses to protect against flying debris and dust. Use hearing protection when operating the 15-amp motor for extended periods. Consider a dust mask or respirator when cutting without dust collection.
Proper Technique: Never reach over or behind the blade while it's running. Always use the provided push stick for rips narrower than 4 inches. Stand to the side of the blade path to avoid kickback. Never remove the blade guard while the saw is operating.
Kickback Prevention: Keep the riving knife positioned just behind the blade to prevent stock from binding. Feed material steadily and straight through the blade without twisting or forcing. Never reach for falling stock; stop the saw and wait for the blade to stop completely.
Electrical Safety: Use a properly grounded outlet and avoid operating in wet conditions. Keep the power cord clear of the blade path and away from hot surfaces. Unplug the saw before adjusting the blade, changing accessories, or performing maintenance.
Who Should Buy This Saw: This model is ideal for homeowners tackling renovation projects, DIYers building furniture or shelving, and contractors who move between job sites. If your primary need is ripping lumber and sheet goods to width, this saw delivers excellent value and performance.
Who Might Want to Look Elsewhere: If you primarily make crosscuts on wide materials, a miter saw or track saw may be more efficient. Production shops requiring high-volume cutting or precision joinery work should consider larger stationary models. Woodworkers focused on fine furniture may prefer cabinet saws with more refined fence systems.
Key Considerations: The rolling stand adds significant value and genuine portability, but verify your storage space can accommodate the footprint even when retracted. The 32.5-inch rip capacity is excellent for most residential projects but falls short for full 4x8 plywood ripping. Dust collection depends on having or purchasing a quality shop vacuum. The included 24-tooth carbide blade is serviceable but consider upgrading to a 40-tooth blade for smoother crosscuts.
Value Assessment: This saw delivers the ripping performance and precision fence system of models costing significantly more, with the added benefit of genuine portability. The comprehensive accessory package eliminates hidden startup costs. The three-year warranty provides confidence in the investment.
Fence Calibration: After assembly, verify your fence is perfectly parallel to the blade by measuring the distance at both the front and back of the blade. Even slight misalignment causes binding and rough cuts. Use a straightedge or precision ruler to check, and adjust the fence rails if needed.
Blade Selection: The included 24-tooth blade is optimized for ripping. For crosscutting or mixed work, invest in a 40-tooth combination blade or 60-tooth crosscut blade. Keep multiple blades on hand to avoid downtime when changing between tasks.
Dust Collection Optimization: Use a high-efficiency shop vacuum with adequate CFM rating (at least 100 CFM for this saw). Position the vacuum hose to avoid kinks and maintain a clear path. Empty the vacuum frequently to maintain suction and prevent dust from settling on the work surface.
Fence Speed Trick: The rack-and-pinion system is fast, but for repeated cuts at the same width, use a stop block clamped to the outfeed table instead of adjusting the fence each time. This saves setup time and ensures consistency.
Stability Enhancement: If you use this saw in a permanent location, consider building a plywood outfeed table that extends 18-24 inches behind the saw. This dramatically improves material support for longer pieces and reduces strain on the motor.
Maintenance Schedule: Clean the table surface monthly with a soft brush and light oil to prevent rust and reduce friction. Check the fence rails quarterly for debris or corrosion. Sharpen or replace the blade every 40-50 hours of use or when you notice rougher cuts or increased motor strain.
Pros
- Worm drive mechanism is proven technology known for reliability and consistent power delivery
- Precision rack and pinion fence makes accurate rip cuts repeatable and effortless
- Rolling stand with large wheels moves smoothly across uneven ground and job sites
- Support extensions allow solo operators to safely handle full-length cuts
- Substantial rip capacity and depth of cut handle most residential and light commercial projects
Cons
- 10-inch blade limits crosscut capacity compared to larger contractor saws, requiring more setups for certain materials
- Worm drive saws are heavier than direct-drive models, making transport more physically demanding despite the wheeled stand
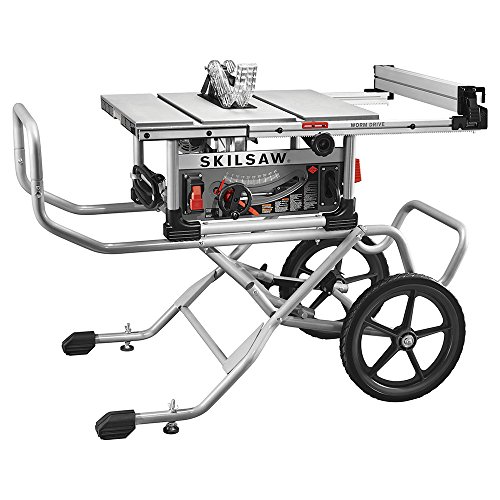
The SKIL SPT99-11 brings proven worm drive engineering to a portable table saw platform, making it a solid choice for homeowners and serious DIYers who want professional capabilities without a massive footprint. The worm drive mechanism is legendary in the construction world for its durability and consistent cutting power, and this model delivers that reliability at a more accessible price point than many contractor-grade alternatives. The 3-5/8 inch depth of cut and 30-1/2 inch rip capacity cover the vast majority of residential projects, from framing and decking to cabinetry work.
What sets this saw apart is its thoughtful design for solo operation. The outfeed and left support extensions mean you can safely handle full-length cuts without a helper, and the rolling stand with 16-inch wheels makes moving the saw between locations surprisingly manageable. The precision rack and pinion fence system is a major advantage, allowing you to dial in accurate rip cuts quickly and maintain consistency throughout your project. This isn't a feature you'll appreciate until you've struggled with less refined fence systems.
The integrated dust port does a respectable job of containing debris in one area, reducing the mess that typically accompanies table saw work. While the 10-inch blade limits your crosscut capacity compared to larger contractor saws, most homeowners find this is a reasonable trade-off for the improved mobility and storage footprint. This saw rewards users who take time to maintain proper blade alignment and fence calibration, delivering years of reliable performance on demanding projects.
| Specification | Details |
|---|---|
| Blade Size | 10 inches |
| Depth of Cut | 3-5/8 inches |
| Rip Capacity | 30-1/2 inches |
| Fence System | Precision rack and pinion |
| Drive Type | Worm drive gearing |
| Stand Type | Rugged rolling stand |
| Wheel Size | 16 inches |
| Dust Management | Dust port elbow with containment |
| Outfeed Support | Included extensions for full-length cuts |
| Left Support | Included for single-operator use |
| Model Number | SPT99-11 |
| Brand | SKILSAW |
Setup and Assembly: Assemble the rolling stand according to included instructions, ensuring all wheels lock securely. Mount the saw to the stand and verify that the blade is parallel to the fence using a straightedge. Plug the unit into a properly grounded outlet and test the blade rotation without load before your first cut.
Making Rip Cuts: Measure your desired width and use the precision fence system to position the blade. Unlock the fence, slide it to your mark, and lock it firmly. Feed material slowly and steadily, keeping your hands well away from the blade. Let the saw do the work rather than forcing material through.
Making Crosscuts: Use the miter gauge for crosscuts, positioning your material firmly against it. Make sure the outfeed support extensions are in place for longer pieces. Always wear safety glasses and hearing protection, and never reach over or near the blade while it's spinning.
Mobility: The rolling stand is designed for easy transport. Ensure all wheels are unlocked before moving, and lock them securely once the saw is positioned at your work location. The easy-load handles provide leverage for positioning the saw on uneven ground.
Personal Protective Equipment: Always wear ANSI-approved safety glasses to protect against flying debris. Hearing protection is essential, as table saws produce noise levels that can damage hearing over time. Consider wearing a dust mask when making many cuts, especially in enclosed spaces.
Blade and Guard Safety: Keep the blade guard in place during all operations. Never remove or disable safety features. Inspect the blade before each use for cracks, missing teeth, or damage. Replace dull blades promptly, as they require more force and are more likely to bind or kick back.
Hand and Body Position: Keep your hands at least 6 inches away from the blade path. Never reach over the blade while it's running, and never attempt to retrieve cutoffs or scrap while the blade is spinning. Wait for the blade to come to a complete stop before touching any material on the saw.
Material Handling: Secure longer pieces using the outfeed support extensions. Never feed material freehand without proper support. Remove loose clothing, jewelry, and tie back long hair before operating. Keep the work area clear of clutter and ensure adequate lighting.
Maintenance Safety: Unplug the saw before performing any maintenance, blade changes, or adjustments. Allow the blade to stop completely before touching it. Check all bolts and fasteners regularly to ensure nothing is loose.
Fence Calibration: Spend time getting your fence perfectly parallel to the blade. Use a reliable straightedge or a quality combination square to verify alignment. A well-calibrated fence is the foundation of accurate, repeatable cuts and will save you time and materials in the long run.
Blade Selection: Invest in quality blades matched to your material. A 40-tooth general-purpose blade works for most projects, but 60-tooth blades produce cleaner crosscuts and 24-tooth blades excel at ripping. Keeping 2-3 different blades on hand eliminates the need to compromise on blade choice.
Dust Management: Connect a shop vacuum to the dust port for better debris containment and cleaner air. Even a small portable vacuum makes a significant difference in workshop cleanliness and visibility while cutting.
Support Strategy: Set up your outfeed support extensions at the exact height of your blade before starting work. This prevents binding and ensures smooth material flow. For sheet goods, consider building a simple outfeed table that attaches to the saw's stand.
Maintenance Schedule: Check fence alignment monthly if you're a regular user. Keep the worm drive clean and free of sawdust. Inspect wheels and locking mechanisms every few months, especially if you move the saw frequently between locations.

Pros
- Generous 32.5-inch rip capacity cuts full-width shelving and trim materials without repositioning
- Precision fence system with rack-and-pinion design minimizes drift and ensures repeatable accuracy
- Dual-position fence design eliminates the need for a separate narrow-rip jig
- Efficient dust collection system reduces cleanup time and airborne particles
- Included scissor stand makes the saw transportable between job sites
Cons
- Scissor stand is lighter-duty than a full cabinet base, limiting stability on uneven surfaces
- No onboard storage for accessories, requiring separate organization solutions for blades and guides
The DEWALT DWE7491X is engineered for homeowners and serious DIYers who regularly work with larger materials. The standout feature is its 32.5-inch rip capacity, which lets you crosscut full-width plywood sheets and rip long trim boards without awkward repositioning. The rack-and-pinion fence system is the real workhorse here: it glides smoothly, locks down firmly, and maintains accuracy across repeated cuts, which matters when you're building multiple cabinets or shelving units.
The two-position flip-over rip fence is a practical design choice that eliminates the need for a separate narrow-rip fence or jig. You get flexibility without extra clutter or setup time. The 15-amp motor delivers consistent power through hardwood and composite materials, and the 2.5-inch dust collection port actually works well when paired with a shop vacuum, keeping your workspace cleaner and reducing fine dust that can settle on nearby surfaces.
The included scissor stand makes this saw genuinely portable compared to cabinet-base alternatives, so you can move it between a garage workshop and job sites. The Site-Pro modular guarding system is straightforward to adjust without tools, though the stand itself is lighter-duty than heavier professional models. For the homeowner or contractor who values precision, rip capacity, and portability, this saw delivers solid value.
| Specification | Detail |
|---|---|
| Blade Size | 10 inches |
| Motor | 15 amps |
| Rip Capacity | 32.5 inches |
| Dust Collection Port | 2.5 inches |
| Fence System | Rack and pinion telescoping |
| Rip Fence | Two-position flip-over design |
| Guarding System | Site-Pro modular (tool-free adjustment) |
| Stand | Scissor stand included |
| Brand | DEWALT |
| Model | DWE7491X |
Setup and Fence Adjustment: Place the saw on a level surface using the scissor stand. Ensure the blade is properly installed and the arbor nut is tight. To adjust the rip fence, loosen the locking handle, slide the fence using the rack-and-pinion system to your desired measurement, and lock it firmly. Always double-check your measurement before cutting.
Making Rip Cuts: Position your workpiece against the rip fence with the blade running. Feed the material smoothly and steadily into the blade without forcing it. For narrow rips, flip the fence to the narrow-rip position. Always keep your hands clear of the blade path and use push sticks or featherboards for small pieces.
Dust Management: Connect a shop vacuum to the 2.5-inch dust collection port before starting. This significantly improves visibility and reduces airborne dust. Clear any debris from the table between cuts to prevent it from interfering with your workpiece.
Before Every Use: Inspect the blade for damage, cracks, or dull teeth. Ensure the guarding system is properly positioned and not obstructed. Check that the rip fence is securely locked. Always wear safety glasses and hearing protection.
During Operation: Never reach over or behind the blade while it is spinning. Use push sticks or featherboards to guide small pieces. Keep your hands at least 6 inches away from the blade. Do not make adjustments or remove offcuts while the blade is running. Allow the blade to come to a complete stop before touching it.
Workspace Setup: Maintain a clear, well-lit work area. Ensure adequate space on both sides of the saw for feeding and removing material. Keep the scissor stand on level ground to prevent tipping. Use the dust collection system to reduce slip hazards from sawdust accumulation.
Is This the Right Saw for You? This model is ideal if you regularly cut full-width plywood, build shelving or cabinets, or work with long trim materials. The 32.5-inch rip capacity is the key differentiator. If your projects are mostly small pieces or you have limited shop space, a compact 8-inch or smaller saw may be more practical.
Consider Your Power Source: The 15-amp motor requires a dedicated 20-amp circuit. If your workshop has limited electrical capacity, verify that your setup can handle this requirement before purchasing.
Portability vs. Stability: The scissor stand offers genuine portability but is lighter-duty than a cabinet base. If you move your saw frequently, this is a major advantage. If you want maximum stability for long production runs, consider upgrading to an optional cabinet stand.
Dust Collection: The 2.5-inch port is standard and works well with most shop vacuums. Budget for a quality vacuum if you don't already own one; effective dust collection extends the life of your motor and keeps your workspace healthier.
Maximize Fence Accuracy: The rack-and-pinion system is smooth, but take time to dial in your first cut on scrap material. This ensures your measurement is accurate before committing to your actual workpiece. For repetitive cuts, consider marking reference points on the fence with a marker for quick setup.
Optimize Dust Collection: Use a hose that is as short as possible between the saw and your vacuum to maximize suction. A clogged or undersized hose will reduce collection efficiency. Clean the vacuum filter regularly to maintain consistent airflow.
Blade Selection Matters: Invest in quality blades matched to your material. A 60-tooth carbide blade excels on plywood and trim; a 40-tooth blade is better for ripping solid wood. Dull blades work harder and produce less accurate cuts.
Use Featherboards and Push Sticks: These simple jigs improve safety and cut quality, especially for narrow rips or small pieces. They keep your hands away from the blade while maintaining consistent pressure against the fence.

Pros
- Exceptional rip capacity gives you flexibility to handle wider stock and various project types
- Fold-and-roll stand design makes setup, breakdown, and transport manageable for one person
- Front-located controls reduce frustration and speed up blade adjustments during work
- Solid construction and powerful motor handle demanding cuts without bogging down
- Excellent value for a contractor-grade saw with professional features
Cons
- No reviews available yet, so real-world durability and long-term reliability remain unverified by users
- Heavier weight and larger footprint require adequate workshop space and may challenge portability for frequent relocation
The Metabo HPT C10RJS brings professional-grade cutting power to workshops and job sites at a price point that won't break the budget. Its 15-amp motor running at 4,500 RPM generates enough force to cut through hardwoods, softwoods, and composites with impressive smoothness and accuracy. The 28.75 x 22-inch table is substantially larger than entry-level models, giving you the support and stability needed for precision work on everything from crosscuts to rips.
What sets this saw apart is its rip capacity. At 35 inches to the right of the blade and 22 inches to the left, you get genuine versatility for handling wider boards and sheet goods. The front-mounted controls for blade height and angle adjustments eliminate the frustration of reaching around the saw, and the included miter gauge and fence deliver the precision you'd expect from a contractor-grade tool. The fold-and-roll stand strikes a practical balance between portability and rigidity, making it realistic for one person to move between locations without specialized equipment.
This saw targets serious DIYers and professional woodworkers who prioritize performance and reliability. The 2-year warranty reflects Metabo HPT's confidence in their Japanese engineering, and the brand's reputation for durability suggests you're investing in a tool built to last through years of regular use. If you need a table saw that handles heavy-duty work without requiring a commercial-sized footprint, this model delivers strong value.
| Specification | Detail |
|---|---|
| Motor | 15-amp induction motor |
| Speed | 4,500 RPM |
| Blade Size | 10-inch |
| Max Rip Capacity (Right) | 35 inches |
| Max Rip Capacity (Left) | 22 inches |
| Table Dimensions | 28.75 x 22 inches |
| Max Cut Depth (90 degrees) | 3-1/8 inches |
| Max Cut Depth (45 degrees) | 2-1/4 inches |
| Stand Type | Fold and roll stand |
| Included Accessories | Miter gauge, fence, adjustable foot |
| Warranty | 2 years |
| Brand | Metabo HPT |
| Model | C10RJS |
Setup and Safety First: Place the saw on a level, stable surface. Ensure the fold-and-roll stand is fully locked and the adjustable foot is set for stability. Check that the blade guard is in place and the power cord is within reach of a grounded outlet. Always wear safety glasses and hearing protection.
Making Rip Cuts: Loosen the fence and position it to your desired width using the rip capacity measurement. Tighten the fence securely. Feed the workpiece against the fence and through the blade, keeping your hands clear of the blade path. Never reach over or under the blade while it's running.
Making Crosscuts: Use the miter gauge for accurate crosscuts. Set the gauge to your desired angle (0 degrees for straight cuts, up to 45 degrees for bevels). Slide the gauge along the table slot and feed the workpiece smoothly through the blade. For wider crosscuts, position the workpiece to use the full table support.
Adjusting Blade Height and Angle: Use the front-mounted controls to raise or lower the blade and adjust the angle. Always make these adjustments with the saw powered off and the blade completely stopped. Check your settings with a test cut on scrap material before proceeding with your project.
Essential Precautions: Never operate this saw without the blade guard in place. Keep your hands at least 6 inches away from the blade at all times. Use push sticks or featherboards for narrow rips to maintain safe distance. Never reach across the blade while it's running, and never remove cut-off pieces until the blade has completely stopped.
Workpiece Handling: Always inspect your material for nails, knots, or defects before cutting. Secure large or unwieldy workpieces with clamps if needed. Feed material smoothly and steadily without forcing it through the blade. If the blade binds, release the power switch immediately and wait for the blade to stop before removing the workpiece.
Maintenance and Storage: Unplug the saw before performing any maintenance or adjustments. Keep the table clean and free of dust and debris. Check that all bolts and fasteners remain tight before each use. Store the saw in a dry location, and ensure the fold-and-roll stand is properly locked when in use and fully collapsed when stored.
Personal Protective Equipment: Wear safety glasses to protect against flying debris. Use hearing protection, as table saws generate significant noise. Consider wearing a dust mask or using a dust collection system to minimize inhalation of wood particles. Avoid loose clothing or jewelry that could catch on the blade.
Maximize Rip Capacity: This saw's 35-inch rip capacity to the right is exceptional. Use this advantage to handle wider boards and sheet goods without making multiple passes. For cuts beyond the table width, carefully position your workpiece and use the full length of the table for support and control.
Fine-Tune Your Fence: Spend time ensuring your fence is perfectly parallel to the blade. A misaligned fence causes binding and dangerous kickback. Check alignment regularly, especially after moving the saw or making significant adjustments.
Invest in Quality Blades: The included blade gets the job done, but upgrading to a premium blade designed for your specific material (hardwood, softwood, or composites) dramatically improves cut quality and reduces strain on the motor.
Use Outfeed Support: The large table provides excellent support, but adding an outfeed table or support stand for longer workpieces prevents binding and gives you better control on rip cuts. This is especially valuable when working with sheet goods or long boards.
Keep Dust Collection Handy: Connect a dust collector or shop vacuum to improve visibility and reduce cleanup. Less dust around the blade area also means better visibility for more accurate cuts and safer operation overall.
Pros
- Extremely portable at 24 pounds, making it ideal for homeowners and job site contractors
- Shadow line guide eliminates guesswork and improves cutting accuracy
- Large table provides excellent material support and stability during cuts
- Dual miter range and bevel capability handle most residential trim and framing applications
- Japanese-engineered durability with a comprehensive 5-year warranty
Cons
- Single bevel design limits cutting angles compared to dual-bevel models, requiring workpiece flipping for some cuts
- No reviews available yet, so real-world user feedback and long-term reliability data are not yet documented
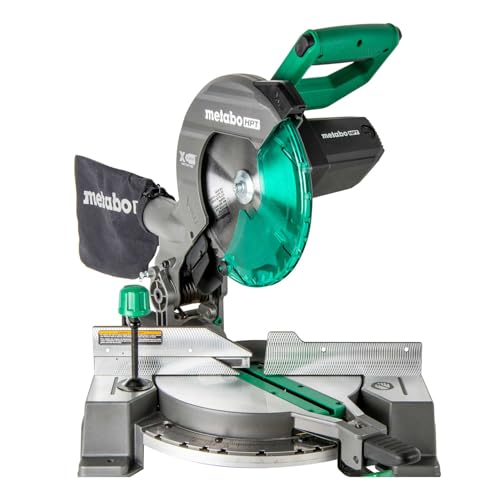
The Metabo HPT C10FCG2 compound miter saw strikes an impressive balance between power and portability. At just 24 pounds, this saw is substantially lighter than most 10-inch competitors, making it an excellent option for homeowners, remodelers, and DIYers who frequently move between projects. The 15-amp motor spins the blade at up to 5,000 RPM, delivering the cutting force needed for dense hardwoods, softwoods, and composite materials without bogging down or producing tear-out.
Precision is built into the design through several thoughtful features. The Xact Cut shadow line projects the blade path onto your workpiece before the cut begins, eliminating the guesswork and improving accuracy. The miter scale offers clear angle markings, and the vice clamping system securely holds material in place, reducing vibration and ensuring repeatable results. The 0-52 degree miter range in both directions handles crown molding, baseboards, and architectural trim cuts that are common in home improvement projects.
The single bevel design (0-45 degrees on the left) covers the vast majority of residential cutting needs, though it does require flipping the workpiece for certain compound angles. The compact footprint and lightweight construction make this saw practical for smaller shops, job site trailers, and homeowners with limited storage space. Backed by a 5-year Metabo HPT warranty, this tool represents a solid investment for anyone serious about precision cutting work.
| Specification | Detail |
|---|---|
| Blade Size | 10 inches |
| Motor | 15 amps |
| No-Load Speed | 5,000 RPM |
| Bevel Range | 0-45 degrees (single bevel, left) |
| Miter Range | 0-52 degrees (left and right) |
| Included Blade | 40-tooth TCT miter saw blade |
| Weight | 24.2 pounds |
| Dimensions | 23.6 x 18.3 x 21.8 inches |
| Color | Green |
| Warranty | 5 years |
| Clamping System | Vice clamping for workpiece security |
Setup and Positioning: Place the miter saw on a stable, level work surface. Ensure the table is clear of debris and the blade spins freely without obstruction. Plug the saw into a grounded outlet and allow the motor to reach full speed before making your first cut.
Making a Crosscut: Align your workpiece against the fence, using the shadow line guide to position the blade exactly where you want to cut. Secure the material with the vice clamping system. Lower the blade smoothly through the material using steady, even pressure. Never force the blade; let the motor do the work.
Adjusting Miter and Bevel Angles: Loosen the miter lock handle and rotate the base to your desired angle (0-52 degrees left or right). Tighten securely before cutting. For bevel cuts, loosen the bevel lock and tilt the blade assembly to your desired angle (0-45 degrees), then tighten. Always verify your angle setting with a test cut on scrap material before cutting your final piece.
Maintenance: Keep the table and fence clean and free of sawdust buildup. Check blade sharpness regularly and replace the blade when it becomes dull. Never operate the saw with a damaged or warped blade. Store in a dry location and cover to protect from dust.
Personal Protective Equipment: Always wear safety glasses to protect your eyes from flying debris. Use hearing protection when operating the saw for extended periods, as the 15-amp motor generates significant noise. Consider wearing a dust mask or using a dust collection system to avoid inhaling fine particles.
Blade and Motor Safety: Never reach toward the blade while it is spinning. Always allow the blade to come to a complete stop before removing or adjusting materials. Keep hands at least 12 inches away from the blade path. Never operate the saw with a cracked, bent, or loose blade.
Workpiece Security: Always use the vice clamping system to secure your workpiece before cutting. Never hold material by hand while the blade is in motion. Do not attempt to cut pieces that are too small to clamp safely; use a scrap piece or sacrificial block to support small cutoffs.
Electrical Safety: Inspect the power cord for damage before each use. Use a grounded outlet and never operate the saw with wet hands or on wet surfaces. Keep the power cord away from the blade and away from heat sources. Unplug the saw before making any adjustments or changing the blade.
Maximize Accuracy: The shadow line guide is your best friend for precision work. Use it every time to verify blade position before lowering the blade. For repetitive cuts at the same length, create a stop block and clamp it to the fence. This ensures identical lengths without measuring each piece individually.
Extend Blade Life: A sharp blade produces cleaner cuts with less tear-out and puts less strain on the motor. Invest in a quality 40-tooth or 60-tooth blade for your most important projects. Clean the blade regularly to remove pitch and resin buildup, which dulls the teeth faster.
Reduce Tear-Out: When cutting expensive hardwoods or veneered materials, place a piece of masking tape along the cut line on the visible side of the workpiece. This reduces splintering and tear-out. For crown molding, cut with the decorative side facing down to minimize visible damage.
Compound Angle Cuts: For crown molding that requires both miter and bevel cuts, mark your workpiece clearly before cutting. Make one adjustment at a time and verify with a test cut on scrap material. This prevents costly mistakes on expensive trim pieces.
Pros
- Worm drive gearing provides exceptional torque for ripping and heavy-duty cutting tasks
- Portable footprint and lightweight construction reduce fatigue and setup time on the job
- Precision rack-and-pinion fence delivers repeatable, accurate cuts without binding
- All-metal build quality withstands jobsite conditions and heavy use
- Adequate 25-inch rip capacity and 2-5/8-inch depth handles most residential and professional applications
Cons
- 8-1/4 inch blade size limits maximum crosscut width compared to full-size 10-inch table saws
- Limited online user feedback available, making it harder to assess long-term durability and real-world performance
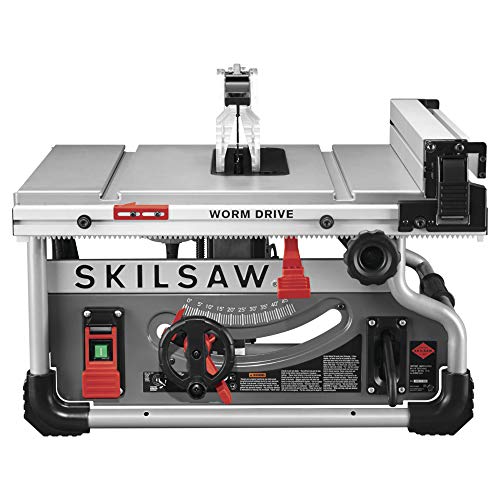
The SKIL SPT99T-01 represents a solid option for jobsite professionals who prioritize portability without completely sacrificing cutting power. The worm drive gearing is the standout feature here, delivering the torque needed to rip through dense hardwoods and thick plywood without bogging down. This design philosophy appeals to contractors moving between job sites who can't justify hauling a full-size contractor saw.
The precision rack-and-pinion fence system is a practical advantage that shouldn't be overlooked. Fence adjustments remain smooth and repeatable, which directly translates to fewer measurement errors and straighter cuts. Combined with the 25-inch rip capacity and 2-5/8-inch depth of cut, this saw handles standard 4x8 sheet goods and 3x lumber efficiently. The all-metal construction throughout suggests this tool is built to endure repeated transport and jobsite conditions.
Where the SPT99T-01 shows its limitations is in overall blade size. The 8-1/4-inch blade restricts maximum crosscut width compared to traditional 10-inch contractor saws, so users working with very wide boards or doing extensive crosscutting may find the constraint frustrating. Still, for ripping operations and typical DIY or professional jobsite work, this portable worm drive saw delivers legitimate cutting power in a genuinely movable package.
| Specification | Details |
|---|---|
| Brand | SKIL |
| Model | SPT99T-01 |
| Blade Size | 8-1/4 inches |
| Drive Type | Worm Drive |
| Depth of Cut | 2-5/8 inches |
| Rip Capacity | 25 inches |
| Fence System | Precision Rack and Pinion |
| Construction | All-Metal |
| Primary Use | Ripping, Crosscutting, Sheet Goods |
| Portability | Lightweight and Compact |
Setup and Fence Adjustment: Position the saw on a stable, level surface. Use the precision rack-and-pinion fence to set your desired rip width. The smooth adjustment mechanism allows you to dial in exact measurements without forcing or binding. Always double-check fence alignment before making your first cut.
Ripping Operations: Feed material slowly and steadily through the blade, allowing the worm drive gearing to do the work. Don't force thick lumber; let the saw's torque handle the resistance. For 3x lumber and dense hardwoods, this worm drive design shines.
Crosscutting and Sheet Goods: Use the miter gauge or crosscut fence for perpendicular cuts. The 2-5/8-inch depth of cut easily handles standard plywood and sheet goods. Keep both hands clear of the blade path and use push sticks for narrow pieces.
Jobsite Transport: The lightweight, compact design makes moving between locations manageable. Secure the saw during transport and check that the fence and blade are properly positioned before setup at your next location.
Before Every Use: Inspect the blade for cracks or damage. Verify that the fence is secure and properly aligned. Ensure the power cord is in good condition and the work area is clear of obstacles and bystanders.
During Operation: Always wear safety glasses and a dust mask to protect against debris. Keep your hands at least 6 inches from the blade, and never reach across an active blade. Use push sticks or push blocks for ripping narrow pieces. Maintain firm footing and a stable stance to control the tool.
Blade and Maintenance: Allow the blade to come to a complete stop before making any adjustments. Use only sharp, carbide-tipped blades rated for your specific cutting applications. Keep the blade clean and free of resin buildup to maintain cutting efficiency and reduce heat stress.
Power and Storage: Unplug the saw before making any adjustments, changing blades, or performing maintenance. Store the tool in a dry location protected from moisture and temperature extremes. Keep children and unauthorized users away from the saw at all times.
Maximize Ripping Power: The worm drive gearing excels at ripping, so take advantage of this strength for your most demanding cuts. Feed material at a controlled pace and let the torque work for you. Avoid forcing the saw through thick or difficult wood, which can strain the motor.
Fence Precision: The rack-and-pinion fence is a precision tool. Invest time in learning how it responds to your adjustments. Make small incremental changes and verify with a measuring tape before cutting expensive material. This attention to setup pays dividends in accuracy.
Blade Selection Matters: Choose the right blade for your material. A 40-tooth blade works well for general ripping, while 60 or 80-tooth blades produce cleaner crosscuts in plywood. Quality blades reduce strain on the motor and improve cut quality.
Jobsite Organization: The portability is genuinely useful, but establish a consistent setup routine. Use a mobile base or cart to reduce handling, and organize your workspace so you're not constantly adjusting the saw's position. Consistent setup leads to more reliable, repeatable cuts.

Pros
- Exceptional cutting capacity rivals many corded table saws, ideal for serious DIY projects and professional work
- Stacked lithium battery technology provides significantly longer runtime and faster charging than competing cordless models
- Integrated LED fence light and rechargeable work light improve visibility and jobsite versatility
- Rack and pinion fence delivers repeatable accuracy for rip cuts and crosscuts
- FLEX 24V ecosystem compatibility means one battery system works across multiple tools
Cons
- No reviews available yet, so real-world user feedback on durability and long-term performance is limited
- Cordless operation means runtime is ultimately dependent on battery charge, which may require planning for extended cutting sessions
FLEX's 24V brushless cordless table saw represents a significant leap forward for DIYers seeking portability without compromising on cutting capacity. The stacked lithium battery technology is the standout feature here, delivering 200% more power and 300% longer runtime compared to standard cordless saws. This translates to genuine, sustained performance for ripping lumber, crosscutting sheet goods, and handling the kinds of jobs that traditionally required a corded tool.
The 8-1/4-inch blade with 20.5-inch left clearance and 25-inch right clearance puts this saw in legitimate competition with full-size benchtop models. The rack and pinion fence system ensures your cuts stay straight and repeatable, which matters whether you're building a deck, framing a wall, or breaking down plywood. The included rechargeable LED fence light is genuinely useful for seeing your cut line clearly, and the fact that it detaches and recharges via USB-C means you get bonus jobsite lighting flexibility.
The complete kit approach is smart value. You get the saw, 6.0Ah battery, 280W rapid charger, and accessories all together, plus full compatibility with FLEX's growing 24V tool lineup. If you already own FLEX 24V tools, this saw slots seamlessly into your existing battery and charger infrastructure. The 5-year limited warranty (with registration) provides solid long-term protection for a tool at this performance level.
| Specification | Details |
|---|---|
| Blade Size | 8-1/4 inch |
| Blade Type | 24-tooth carbide |
| Voltage | 24V Stacked Lithium |
| Left Rip Capacity | 20.5 inches |
| Right Rip Capacity | 25 inches |
| Fence System | Rack and Pinion |
| Battery Included | 6.0Ah Stacked Lithium |
| Charger Included | 280W Rapid Charger |
| Work Light | Rechargeable LED (USB-C) |
| Accessories Included | Miter gauge, push stick |
| Power Adapter Compatible | Yes (FX0511, sold separately) |
| Battery Cross-Compatibility | All FLEX 24V batteries and chargers |
| Warranty | 5-year limited (with registration); 3-year without |
Setup and Assembly: Assemble the fence and miter gauge according to included instructions. Install the 24T blade, ensuring the arrow on the blade points in the direction of rotation. Charge the 6.0Ah battery using the 280W rapid charger before your first use.
Making Rip Cuts: Set your desired width using the fence, which features a rack and pinion system for quick, precise adjustment. Feed material steadily through the blade, keeping hands clear of the cutting path. Use the included push stick for narrow pieces.
Crosscutting: Use the miter gauge for crosscuts at various angles. The LED fence light illuminates your cut line automatically when powered. For longer work sessions, have a charged backup battery ready or connect the optional FX0511 Power Adapter for continuous AC operation.
LED Work Light: The rechargeable LED fence light charges via USB-C and can be removed and repositioned for additional jobsite lighting. Charge regularly to maintain brightness and runtime.
Before Operation: Always inspect the blade for damage or dull teeth. Ensure the blade is properly installed and tightened. Check that the fence is secure and aligned. Verify the battery is fully charged and seated properly.
During Operation: Wear safety glasses and hearing protection. Keep hands at least 6 inches away from the blade. Never reach over or under a moving blade. Use the push stick provided for ripping narrow pieces. Do not force material through the blade; let the tool do the work. Keep the work area clear of bystanders.
After Operation: Allow the blade to stop completely before removing material. Unplug or remove the battery before making adjustments, changing blades, or performing maintenance. Store the battery in a cool, dry location. Keep the blade guard in place when not in use.
Is This Saw Right for You? This FLEX model suits DIYers and contractors who value portability and don't want to be tethered to a power outlet. It's ideal if you already own FLEX 24V tools, since batteries and chargers are cross-compatible, lowering your total investment. If you primarily work indoors or in tight spaces where cord management is difficult, cordless operation is a major advantage.
When to Choose a Corded Saw Instead: If you plan to rip hundreds of linear feet of hardwood in a single session, a corded table saw eliminates battery management concerns. If your budget is extremely tight, some entry-level corded saws cost less upfront, though you sacrifice portability and jobsite flexibility.
Key Considerations: The 6.0Ah battery provides solid runtime, but heavy cutting will deplete it faster. The optional FX0511 Power Adapter (sold separately) lets you run indefinitely on AC power when available. The 8-1/4-inch blade is smaller than a full 10-inch saw, so it cuts slightly less deep, but rip capacity remains excellent. Confirm you have a stable work surface or mobile base for safe operation.
Pros
- LED shadow line technology delivers excellent accuracy and is easier to see in varying light than laser systems
- Dual bevel capability eliminates the need to flip boards for angled cuts, saving time on trim and molding work
- Strong motor power handles dense hardwoods and thick stock without bogging down
- Multiple positive angle stops reduce setup time and ensure consistent results on production-style cuts
- Compact footprint and moderate weight make it practical for DIYers with limited workshop space
Cons
- No customer reviews available yet, so real-world durability and long-term reliability remain unverified
- Sliding compound saws require more bench space than standard miter saws and demand careful setup for optimal accuracy
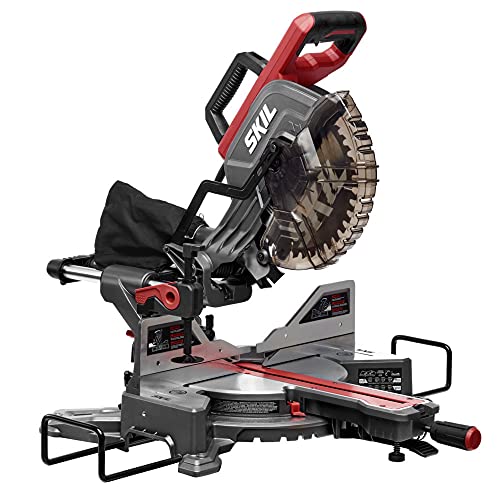
The SKIL MS6305-00 brings professional-grade cutting capability to the homeowner and serious DIYer workshop. With a robust 15-amp motor spinning at 4,800 RPM, this dual bevel sliding compound saw handles demanding cuts through dense lumber without hesitation. The dual bevel design with four positive stop positions at 48 degrees and 45 degrees left, 0 degrees, and 45 degrees right means you can tackle angled cuts in both directions without repositioning your workpiece, a genuine time-saver when installing crown molding, baseboards, or roof trusses.
What sets this saw apart is its LED shadow line system, which many users prefer over laser guides because it provides clearer visibility in different lighting conditions and doesn't require calibration. The sliding compound mechanism extends your crosscut capacity to 2x12 lumber at 90 degrees and 2x8 at 45 degrees, making it suitable for framing, deck building, and general carpentry. The 11 positive angle stops at frequently used angles mean less fumbling with angle adjustment and more confidence in consistent, repeatable cuts.
At 39.4 pounds, this saw strikes a balance between stability and portability. The 35.43-by-22.44-by-14.17-inch footprint fits most workshop benches without dominating the space. For homeowners and DIYers who need accuracy, power, and versatility without stepping into contractor-grade pricing, the SKIL MS6305-00 delivers solid value and capability for a wide range of cutting tasks.
| Specification | Detail |
|---|---|
| Brand | SKIL |
| Model | MS6305-00 |
| Blade Size | 10 inches |
| Motor | 15 amp |
| Speed | 4,800 RPM |
| Bevel Type | Dual bevel |
| Bevel Stops | 4 positive stops at 48 degrees and 45 degrees left, 0 degrees, and 45 degrees right |
| Bevel Range | Up to 50 degrees left and right |
| Angle Stops | 11 positive stops at most-used angles |
| Crosscut Capacity (90 degrees) | 2x12 lumber |
| Crosscut Capacity (45 degrees) | 2x8 lumber |
| Cutting Guide | LED shadow line |
| Type | Sliding compound miter saw |
| Dimensions | 35.43 x 22.44 x 14.17 inches |
| Weight | 39.4 pounds |
| Color | Multi |
Setup and Safety: Place the saw on a sturdy, level work surface. Ensure the blade guard moves freely and the power cord is clear of the blade path. Always wear safety glasses and hearing protection. Secure your workpiece firmly against the fence using the clamp or by hand, keeping fingers well away from the blade path.
Making Straight Cuts: Align your cut mark with the LED shadow line. Lower the blade slowly into the material using steady downward pressure. Let the blade do the work without forcing it. Once the cut is complete, release the trigger and wait for the blade to stop before raising the arm.
Making Angled Cuts: Loosen the bevel adjustment knob and rotate the saw head to your desired angle. Use the positive angle stops for quick setup at common angles like 22.5, 30, 45, and 90 degrees. Tighten the knob securely before cutting. For dual bevel cuts, you can rotate left or right without flipping the board.
Using the Sliding Feature: The sliding rails allow the blade to move forward and backward. Pull the saw arm toward you slightly before lowering it into the cut for maximum reach. This feature is especially useful for wider boards and crown molding work.
Before Every Use: Inspect the blade for cracks, missing teeth, or damage. Check that the blade guard springs back freely after being lifted. Ensure the fence is straight and secure. Verify that all adjustment knobs are tight and the saw is stable on its base.
During Operation: Always keep both hands on the workpiece or the saw body, never near the blade path. Never reach under the blade or try to remove cut pieces while the blade is running. Keep the work area clear of clutter and bystanders. Wear eye protection and hearing protection on every use.
Blade and Motor Care: Allow the blade to come to a complete stop before raising the arm or removing the workpiece. Do not force the blade through material; if it binds, release the trigger and let it stop naturally. Use the correct blade for your material type. Keep the motor vents clear of sawdust buildup by using a shop vacuum or brush.
Electrical Safety: Use a properly grounded outlet and extension cord rated for the tool's amperage. Never use the saw in wet conditions. If the saw produces unusual sounds or vibrations, stop immediately and inspect for damage before resuming.
Maximize the LED Shadow Line: The LED shadow line is your most accurate guide. Position your eye directly above the blade to see the shadow line clearly. In bright sunlight, you may want to shade the blade area with your body or a piece of cardboard to improve visibility. The shadow line method often yields better accuracy than trying to align a physical laser dot.
Master the Positive Stops: Spend time memorizing where each positive angle stop is positioned. This muscle memory will speed up your workflow significantly. If you find yourself using a custom angle repeatedly, consider marking the fence with a pencil line to make future setups even faster.
Optimize the Sliding Mechanism: The sliding feature works best when you pull the saw arm smoothly toward you before lowering the blade. This two-step motion prevents binding and produces cleaner cuts. Practice on scrap material first to develop a smooth rhythm.
Blade Selection Matters: Use a fine-toothed blade for trim and finish work, and a coarser blade for rough framing cuts. A quality blade will outperform a dull blade every time. Keep a dedicated blade for crosscutting hardwoods and another for softwoods or construction lumber.
Clamp Your Workpiece: Even though the saw has a fence, using a quick clamp on longer pieces prevents creep and ensures repeatable cuts. This is especially important when making multiple identical cuts for framing or trim projects.
Table Saw Buying Guide for Home Workshops
Choosing the right table saw for a home workshop is not simply a matter of picking the most powerful or most affordable option. Your garage or dedicated shop space imposes real limits on what will actually work day to day. The sections below explain every factor worth weighing before you make a purchase decision.
Table Saw Types: Which Style Fits Your Shop
Home workshop users typically choose between three main categories. Jobsite table saws (also called portable or benchtop saws) are the most popular for home use because they are compact, light enough to move, and run on standard 15-amp, 120-volt household circuits. Models like the DEWALT DWE7491RS and the SKIL SPT99-11 fall into this category. They sacrifice some fence precision and table mass compared to cabinet saws, but they deliver more than enough capability for the vast majority of home woodworking projects.
Hybrid table saws sit between jobsite and cabinet models. They use heavier cast-iron tables and better fences while still running on standard household power. If you have a dedicated, permanent workshop space and want cabinet-saw accuracy without a 240-volt circuit, a hybrid is worth considering. Cabinet saws, meanwhile, are the professional standard but require 240-volt power, weigh several hundred pounds, and demand permanent floor space. They are generally overkill for home workshops unless you are doing production-level cabinetry.
For users who need to carry their saw to job sites or move it around the shop frequently, a cordless option like the FLEX FX7211-1H offers genuine freedom from power outlets, though runtime considerations apply. If portability without a power cord is a priority for straight, tearout-free cuts on panels, track saw systems are worth adding to your research list as a complementary tool.
Blade Size and Motor Power
Most home workshop table saws use a 10-inch blade, which provides a maximum cut depth around 3-1/8 to 3-1/2 inches at 90 degrees. This is sufficient for ripping 3/4-inch plywood and cutting through standard dimensional lumber including 4×4 posts. The SKIL SPT99T-01 uses an 8-1/4-inch blade, which limits cut depth slightly but keeps the saw more compact and lighter. The 8-1/4-inch format works well for trim work, sheet goods, and general DIY without needing to rip through thick hardwood.
Motor power on standard jobsite saws ranges from 13 to 15 amps. A 15-amp motor is the practical maximum for a 120-volt circuit and provides enough torque to push hardwood through cleanly without bogging down. Worm drive motors, used in the SKIL SPT99-11 and SPT99T-01, produce high torque at lower RPM compared to direct-drive motors. This makes them excellent at pushing through dense material without stalling. The DEWALT models in this roundup use direct-drive 15-amp motors running at 4800 RPM, delivering smooth cuts across a wide range of materials.
Rip Capacity: Why It Matters for Sheet Goods
Rip capacity is the maximum distance from the blade to the fence when the fence is fully extended to the right. For a home workshop that regularly processes plywood or MDF sheet goods, you need at least 24 inches of rip capacity to rip a 4×8 sheet in half. A 30-inch or greater capacity is far more useful, allowing you to rip panels for cabinet sides and drawer boxes without repositioning. The DEWALT DWE7491RS and DWE7491X both offer 32-1/2 inches of rip capacity, which is excellent for jobsite-class saws and one of the main reasons they appear at the top of most serious home workshop shortlists. The Metabo HPT C10RJS also competes strongly in this area.
Fence Quality and Accuracy
The rip fence is arguably the most important component on a table saw. A fence that deflects under pressure or drifts out of parallel with the blade will ruin cuts no matter how good the motor is. Look for fences with at least two locking points, a solid rack-and-pinion or cam-over locking mechanism, and a scale that reads clearly from your standing position. The SKIL SPT99-11 features a self-aligning rip fence that many users cite as one of its strongest selling points. DEWALT fences on the DWE7491 series use a telescoping design that locks firmly and stays parallel across the full range of adjustment.
When evaluating fence quality, also check whether the fence body is tall enough to support vertical cutting of thick stock and whether it can be removed quickly for narrow rip operations. A fence that doubles as a guide for a featherboard or other safety accessory adds practical value in everyday use.
Bevel Capacity and Dado Compatibility
All of the table saws in this roundup offer a 45-degree bevel capacity, which is the minimum needed for standard miter joints and angled cuts. The Evolution R10TS explicitly includes a dado plate, making it one of the more versatile options for users who want to cut rabbets and dadoes for shelving and joinery. Before purchasing any jobsite table saw for dado work, confirm that the blade arbor and motor design are compatible with dado stack sets, as some compact models do not provide enough arbor length to accommodate a standard dado blade stack.
If your projects frequently involve angled crosscuts on molding and framing lumber, a quality miter saw complements your table saw by handling those cuts more safely and efficiently. The two tools together cover virtually every cut a home woodworker encounters.
Stand Design and Portability
For most home workshops, a folding rolling stand is the best compromise between stability and convenience. The DEWALT DWE7491RS comes with a foldable rolling stand that one person can deploy and collapse in under a minute. This matters enormously in a one-car garage where the saw needs to move aside when not in use. The Metabo HPT C10RJS similarly includes a fold-and-roll stand with an adjustable foot for leveling on uneven garage floors. The SKIL SPT99-11 stand provides solid, stable support for a heavier worm drive saw but is bulkier to store.
Cordless models like the FLEX FX7211-1H eliminate the stand question entirely by allowing placement on any stable work surface or existing stand. However, battery runtime needs to be factored into any workflow that involves extended ripping sessions. For longer shop sessions, having a reliable cordless drill and compatible battery ecosystem alongside your cordless saw simplifies charging logistics considerably.
Dust Collection and Workspace Health
Table saws produce a significant volume of fine sawdust, and in an enclosed home workshop, dust management is a genuine health concern, not just a cleanliness issue. Fine wood dust is a known respiratory hazard and the primary fuel source for shop fires. Look for saws with a dedicated dust port, ideally 2-1/2 inches or larger, that connects directly to a shop vacuum or dust collector. The DEWALT DWE7491X includes an integrated dust collector with an on-board bag, which captures a reasonable percentage of below-table dust and reduces cleanup time significantly.
No jobsite table saw will capture 100 percent of the dust it generates. Above-blade guards with integrated dust ports help significantly with the dust that rises during a cut. Pairing your saw with a dedicated shop vacuum and a good above-table blade guard covers most of the remaining airborne particles.
Safety Features Worth Prioritizing
Every table saw sold in the United States is required to include a blade guard, riving knife, and anti-kickback pawls. In practice, many experienced woodworkers remove the blade guard for certain operations, which increases risk. Look for saws where the riving knife remains in place even when the guard is removed, as this significantly reduces the chance of kickback, which is the primary cause of serious table saw injuries. The Evolution R10TS includes a zero-clearance throat plate, which reduces tear-out on the bottom face of cuts and also limits the gap around the blade where thin pieces can catch.
Always use a push stick when ripping narrow stock, and keep your fence parallel to the blade. Blade alignment and table flatness are the two setup variables that most directly affect both cut quality and safety. If your home workshop toolkit is still coming together, jigsaws for curved and detail cuts and a solid reciprocating saw for rough demolition work round out the core cutting capabilities you need.
Power Requirements and Home Electrical Considerations
All corded table saws in this roundup run on standard 120-volt, 15-amp household circuits. However, running a 15-amp motor on a 15-amp circuit leaves no headroom for other loads on the same circuit. Ideally, plug your table saw into a dedicated 20-amp circuit to avoid tripped breakers during heavy cuts. Avoid using extension cords with table saws whenever possible. If an extension cord is necessary, use a heavy-gauge cord rated for the motor’s amperage and keep it as short as practical to minimize voltage drop under load.
Why Trust HomeThru
HomeThru is an independent editorial publication. We do not sell any of the products we review, and we are not affiliated with any manufacturer or retailer. Our recommendations are based on independent research, detailed specification analysis, verified user feedback from thousands of purchasers, and structured comparative evaluation of features against real home workshop use cases. We apply the same evaluation criteria to every product category we cover, from power tools to home appliances, so our readers can make confident purchase decisions without wading through sponsored content or manufacturer marketing materials.
For this roundup, we analyzed products across a range of price points and use cases, giving particular weight to fence accuracy, rip capacity, motor reliability, stand design, and long-term owner satisfaction data. We also incorporated feedback patterns from owners who specifically use these saws in home workshops rather than on job sites, since the priorities differ in meaningful ways. Our angle grinder reviews and our evaluations of random orbital sanders follow the same independent methodology.
Final Thoughts
The table saws in this roundup cover every meaningful home workshop scenario, from a compact garage setup with minimal dedicated space to a serious woodworking shop where sheet goods processing happens on a regular basis. Below is a summary of our top category awards based on the products evaluated in this guide.
- Best Overall: DEWALT DWE7491RS 10-Inch Table Saw with Rolling Stand earns this position through its combination of a high rip capacity, a reliable 15-amp direct-drive motor, an accurate telescoping fence, and a one-person deployable rolling stand that makes it genuinely practical in a home garage workshop.
- Best Worm Drive Performance: SKIL SPT99-11 10-Inch Heavy Duty Worm Drive Table Saw delivers exceptional torque for pushing through dense hardwood and pressure-treated lumber, with a self-aligning fence that reduces setup time on every job.
- Best Compact Portable Pick: SKIL SPT99T-01 8-1/4-Inch Portable Worm Drive Table Saw offers the worm drive torque advantage in a lighter, more maneuverable package that fits workshops where floor space is at a premium.
- Best Cordless Option: FLEX FX7211-1H 24V Brushless Cordless Table Saw Kit stands out as the most capable battery-powered entry in this roundup, arriving with a high-capacity battery and rapid charger so it is ready to work from day one.
- Best for Dado and Joinery Work: Evolution R10TS 10-Inch Jobsite Table Saw includes a zero-clearance throat plate and dado plate as standard equipment, making it the most joinery-ready saw in this group for users who regularly cut rabbets and dadoes.
Whichever model you choose, pair it with a quality blade appropriate for your primary material, a reliable push stick and featherboard setup, and at least a basic dust collection solution. A well-equipped home workshop also benefits from track saws and guide rail systems for breaking down large panels before they reach the table, cordless circular saws for site work and rough cutting, and a good set of chisels for cleaning up joints and mortises after the saw does its part. Building a cohesive tool ecosystem around your table saw pays dividends on every project you tackle.
Frequently Asked Questions
Do I need a special electrical circuit for a home workshop table saw?
Most jobsite table saws draw 15 amps at full load. Running one on a shared 15-amp household circuit will trip the breaker during heavy cuts. A dedicated 20-amp circuit is strongly recommended. Keep the saw plugged directly into the wall outlet rather than using an extension cord whenever possible.
What rip capacity do I actually need for home woodworking?
If you ever rip plywood or MDF sheet goods, you want at least 24 inches of rip capacity to cut a 48-inch-wide panel in half. A 30-inch or greater capacity is more versatile and covers the majority of cabinet and furniture panel work without repositioning or pre-cutting.
Is a worm drive table saw better than a direct-drive model?
Worm drive motors deliver more torque, making them better at pushing through dense or wet lumber without bogging down. Direct-drive motors spin at higher RPM and tend to produce cleaner cuts in engineered sheet goods. For a general home workshop, either design works well, and the fence quality and rip capacity of a given saw matter more than motor type for most users.
Can I use a dado blade set on these home workshop table saws?
Several saws in this roundup are dado-compatible, but always verify the arbor length before purchasing a dado stack. Some compact or cordless models have shorter arbors that will not accommodate a standard dado blade set. The Evolution R10TS includes a dedicated dado plate and is among the most dado-friendly portable saws in this group.
How do I reduce sawdust in a home garage workshop?
Connect your table saw’s dust port to a shop vacuum rated for fine dust. Use a blade guard with an integrated above-table dust port when your operation allows it. Seal the bottom of the saw cabinet with a simple shroud and run a HEPA-filtered air filtration unit at ceiling level to catch airborne particles that escape collection. These steps together reduce airborne dust significantly without requiring an industrial dust collector. You might also consider safety gear appropriate for your workshop when working with materials that produce fine particulate.
What is the difference between a jobsite table saw and a cabinet saw for home use?
A jobsite saw runs on standard household power, weighs between 50 and 100 pounds, folds for storage, and costs considerably less. A cabinet saw uses a larger motor requiring a 240-volt circuit, weighs 400 to 600 pounds, and stays in one place permanently. For the vast majority of home workshops, a jobsite saw provides sufficient power and far greater practicality. Cabinet saws make sense only if you have permanent dedicated shop space, the right electrical infrastructure, and production-level woodworking demands. If you are outfitting a home shop on a practical budget, impact drivers and hammer drills round out the core power tool lineup alongside your table saw.






Write Your Review
No reviews yet. Be the first to share your experience!