

A tile project can look professional or amateurish depending almost entirely on the quality of the cuts. Chipped edges, wandering lines, and uneven depths all trace back to one cause: the wrong saw for the job. Whether you’re retiling a bathroom, laying a kitchen backsplash, or tackling a full-floor renovation, choosing the right tile saw makes the difference between a clean, satisfying result and a pile of wasted material. Our editorial team at HomeThru spent time researching, comparing, and evaluating the top-rated tile saws available today, drawing on verified buyer feedback, spec sheets, and hands-on usage reports from professional tile setters and experienced DIYers. Below you’ll find our ranked picks alongside a thorough buying guide to help you match the right machine to your project.
Top Tile Saws We Recommend
Our lineup covers the full spectrum of tile cutting needs, from compact handheld models to heavy-duty 10-inch benchtop saws built for contractors. Each pick was selected based on motor power, cutting capacity, blade size, build quality, and real-world user satisfaction. Prices range from budget-friendly to professional-grade, so there’s a strong option no matter your budget or skill level.
Pros
- Exceptional accuracy with precision cutline indicator for professional-quality results
- Comprehensive package includes blade, pump, and all necessary accessories to start immediately
- Portable design weighs under 70 pounds, making it practical for job-site work or storage
- Stainless steel components resist corrosion from constant water exposure
- Generous cutting capacity handles large format tiles and complex angled cuts
Cons
- Requires 120V power source and water supply access, limiting portability to areas with utilities
- No cordless option available, so cord management and outlet proximity affect setup flexibility
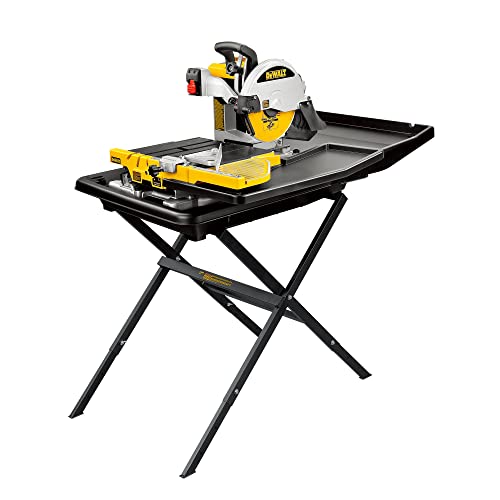
The DEWALT D24000S wet tile saw is purpose-built for homeowners and DIYers who need reliable precision when cutting tile. With a 1.5 HP motor and 10-inch XP4 porcelain blade, it delivers clean, accurate cuts on ceramic, porcelain, and stone tiles up to 18 inches diagonally. The integrated water system keeps dust minimal and extends blade life, making it a practical choice for indoor renovation work and reducing cleanup time.
What sets this saw apart is its accuracy and completeness. The stainless steel rollers and cutline indicator keep cuts within 1/32 inch tolerance over 18-inch cuts, which matters when you're fitting tiles in visible spaces like backsplashes or shower walls. The package includes everything needed to get started: the XP4 blade, submersible pump, water pans, cutting cart with side extension, and adjustment guides. This eliminates the frustration of buying accessories separately.
The compact frame and 69-pound weight make transportation realistic for DIYers. It fits in most vehicles and doesn't require permanent installation space. The 28-inch rip capacity and 45-degree bevel capability give you flexibility for various tile layouts and design options. For homeowners tackling medium to large tile projects, this saw balances power, precision, and practicality without the industrial footprint of larger models.
| Specification | Value |
|---|---|
| Motor Power | 1.5 HP |
| Voltage | 120V (Corded) |
| Blade Diameter | 10 inches |
| Arbor Size | 5/8 inch |
| Diagonal Cut Capacity | 18 x 18 inches |
| Maximum Depth Cut | 3 1/8 inches |
| Maximum Rip Capacity | 28 inches (with plunge) |
| Bevel Capacity | 45 degrees |
| Dimensions | 36 x 29 x 24 inches |
| Weight | 69 pounds |
| Included Accessories | XP4 Porcelain Blade, Submersible Pump, Water Pan, Side Water Tray, Rear Water Tray, Cutting Cart Side Extension, Angle/Rip Guide, Blade Wrench, Hex Wrench |
Setup: Assemble the stand and secure the saw base. Connect the submersible pump to the water pan and fill with water. Ensure the saw is on a stable, level surface and the power cord reaches a grounded outlet.
Cutting: Mark your cut line on the tile. Use the cutline indicator to align your tile with the blade. Slowly push the tile forward into the blade using the water tray guide. Let the blade do the work; don't force the tile. The water system will activate as you cut, cooling the blade and controlling dust.
Bevel and Rip Cuts: For angled cuts, adjust the bevel guide to your desired angle (up to 45 degrees). For longer rip cuts, use the plunge feature and angle guide to extend capacity up to 28 inches. Always wear safety glasses and keep hands clear of the blade path.
Maintenance: After each use, empty the water pan and allow the pump to run briefly to clear the lines. Clean debris from the rollers and blade. Check water levels before starting work to ensure proper cooling and dust control.
Personal Protection: Always wear ANSI-approved safety glasses and a dust mask when operating the saw. Consider hearing protection if running the saw for extended periods. Avoid loose clothing or jewelry that could catch on the blade.
Blade and Power Safety: Never reach over or under the blade while it's running. Wait for the blade to come to a complete stop before removing cut tiles. Keep the power cord away from water and ensure the outlet is properly grounded. Unplug the saw before making any adjustments or changing the blade.
Water System Safety: Check that the submersible pump is functioning before each use. Ensure water doesn't splash onto electrical components or the power cord. Keep the water pan filled to prevent the pump from running dry. Allow the saw to cool before draining water or performing maintenance.
Workspace: Set up the saw on a stable, level surface away from foot traffic. Ensure adequate lighting so you can see your cut line clearly. Keep bystanders at least 10 feet away during operation. Never operate the saw if you're fatigued or under the influence of medication that impairs judgment.
Cutting Strategy: Score the top surface lightly first, then make a full cut. This reduces chipping on the visible face of finished tiles. For porcelain, cut slightly slower than ceramic to prevent thermal shock and cracking. Keep the blade wet throughout the cut by ensuring water flow is consistent.
Blade Care: A dull blade creates heat and increases chipping. Replace the blade when you notice slower cutting or more dust. Clean the blade regularly by running it through water without a tile to flush debris. The included XP4 blade is optimized for porcelain, so use it for harder materials and reserve standard blades for softer ceramics.
Precision Cuts: Use the cutline indicator as your reference, but also mark tiles with a pencil or grease pen for visibility. For notches or L-shaped cuts, make multiple passes rather than forcing a complex angle in one cut. Measure twice, cut once; tile is expensive and mistakes are costly.
Water Management: Add a small amount of cutting fluid or tile-cutting additive to the water to improve cooling and reduce dust further. Empty the water pan at the end of each day to prevent stagnation and pump damage. In cold climates, drain the system completely if storing outdoors to prevent freeze damage.

Pros
- Produces clean, chip-free cuts on ceramic and stone tile with minimal binding
- Lightweight and portable enough to move between rooms or transport to job sites
- Water cooling system keeps dust down and extends blade life during extended use
- Intuitive controls and setup require minimal learning curve for new users
- Dependable performance over time with minimal maintenance needs
Cons
- Blade size limits rip-cutting capacity, so very large tiles may require careful planning or multiple cuts
- Water spray can be messy indoors, making it better suited for outdoor or well-ventilated work areas
The SKIL 7-Inch Wet Tile Saw is purpose-built for homeowners and DIYers who need reliable tile-cutting performance without the bulk of industrial equipment. The 3540-02 model combines a robust motor with a precision diamond blade and integrated water cooling system, allowing you to cut through ceramic, porcelain, and stone tile with clean, accurate results. Whether you're installing a new backsplash, laying bathroom tile, or tackling a kitchen renovation, this saw delivers the precision cuts that professional-looking results demand.
The compact 7-inch blade design makes this saw genuinely portable, fitting easily into car trunks and navigating tight spaces where larger saws simply won't work. The water cooling system is a practical feature that reduces dust exposure during operation and helps the blade stay cool, which extends its working life and improves cut quality. The adjustable fence and miter guide give you flexibility for both straight crosscuts and angled cuts, while the straightforward controls mean you can get started quickly without a steep learning curve.
User feedback consistently highlights the saw's reliability and ease of use across a range of DIY projects. The build quality feels solid, and the saw maintains its cutting performance over time with minimal maintenance. For homeowners planning tile projects of modest to moderate scope, this SKIL model offers a practical balance of power, precision, and affordability that makes professional-quality tile work achievable without requiring contractor-grade equipment.
| Specification | Detail |
|---|---|
| Model Number | 3540-02 |
| Blade Size | 7 inches |
| Blade Type | Diamond wet-cutting blade |
| Motor Power | Corded electric |
| Cooling System | Integrated water circulation |
| Fence Type | Adjustable with miter guide |
| Cutting Capacity | Ceramic, porcelain, stone tile |
| Portability | Compact, lightweight design |
| Power Cord | Standard household outlet compatible |
Setup and Preparation: Place the saw on a stable, level surface outdoors or in a well-ventilated area. Fill the water reservoir according to the manual, ensuring the cooling system is primed before starting. Secure your tile firmly against the fence using the clamps or guides provided.
Making Cuts: Start the motor and allow the blade to reach full speed before bringing the tile into contact with the blade. Use steady, even pressure and let the blade do the work rather than forcing the tile. For crosscuts, slide the tile smoothly across the fence. For angled cuts, adjust the miter guide to your desired angle before cutting.
Safety and Maintenance: Always wear safety glasses and work gloves. Keep hands clear of the blade and never reach over or under it while running. After use, allow the blade to stop completely before removing the tile. Drain and refill the water system regularly to maintain cooling efficiency and prevent algae buildup.
Before You Start: Read the manufacturer's manual thoroughly and familiarize yourself with all controls. Inspect the blade for cracks or damage before each use. Ensure the work area is clear of obstructions and that you have stable footing.
During Operation: Always wear safety glasses, hearing protection, and work gloves. Keep long hair tied back and avoid loose clothing that could catch on the blade. Never remove tiles or reach near the blade while the motor is running. Maintain firm control of the tile at all times and use the fence and guides as intended.
Water and Electrical Safety: Keep the power cord away from water and the work area. Use a properly grounded outlet, and consider a GFCI-protected circuit for added safety. Allow water to drain properly and prevent puddles around the base of the saw. Never operate the saw in wet conditions or with wet hands.
Blade Care and Longevity: The water cooling system is your blade's best friend. Keep the water circulating and maintain adequate water flow throughout your cutting session. Check water levels frequently, especially during extended use. A well-cooled blade cuts cleaner, lasts longer, and produces less dust. Replace the blade when you notice slower cutting or increased chipping.
Cutting Technique: Let the blade speed and water cooling do the work. Forcing the tile into the blade generates excessive heat and can damage both the blade and the tile. Use smooth, consistent pressure and allow the blade to cut at its natural pace. For delicate or expensive tile, practice on scrap pieces first to dial in your technique.
Setup for Success: Invest time in securing your tile properly. A well-clamped tile produces straighter cuts and safer operation. Mark your cut lines clearly before starting. For multiple cuts of the same size, set up a stop block on the fence to ensure consistency. Keep the work area organized and free of clutter to maintain focus and control.

Pros
- Exceptional cutting accuracy and precision for professional-quality results on large tiles
- Enclosed water containment system reduces mess and cleanup time on indoor projects
- Heavy-duty construction with rigid frame and quality components ensures long-term durability
- Portable design at 91 pounds makes transport between job sites practical
- Integrated storage compartments keep all accessories organized and accessible
Cons
- No customer reviews available to assess real-world performance and long-term reliability
- Requires dedicated space and connection to water source, limiting portability compared to dry-cut saws
The DEWALT D36000S wet tile saw combines professional engineering with practical jobsite design. The rigid frame paired with stainless-steel rollers and a cutline indicator delivers cutting accuracy within 1/32 inch over 30-inch cuts, which is critical when fitting tiles with minimal grout lines. The 15-amp motor produces 1,220 MWO, providing sufficient power to handle dense ceramic, porcelain, and natural stone without bogging down or producing chatter marks.
What sets this saw apart for homeowners and contractors is its thoughtful design for both precision and practicality. The 37-inch rip capacity (extending to 41 inches with plunge) and 18-inch crosscut capacity mean you can rip large 36x36 inch tiles in half or crosscut standard sill pieces without repositioning. The fully enclosed water tray system contains splashing effectively, keeping your work area and surrounding floors dry, which matters when working indoors or in finished spaces. Integrated storage compartments keep the miter guide, cart extension, and wrenches organized during transport.
At 91 pounds with a footprint of 28.875 inches wide, this saw balances capability with portability. It fits through standard 30-inch doorways, making it practical for interior renovations. The saw is compatible with the optional D240001 tile saw stand for additional height adjustment and workspace organization. For serious tile work requiring both precision and clean execution, this DEWALT model delivers professional results in a package designed for jobsite reality.
| Specification | Detail |
|---|---|
| Brand | DEWALT |
| Model | D36000S |
| Blade Size | 10 Inch |
| Motor | 15 Amp |
| Motor Output | 1,220 MWO |
| Rip Cut Capacity | 37 Inches (41 Inches with Plunge) |
| Crosscut Capacity | 8.5 Inches |
| Cutting Clearance | 18 Inches Left of Blade |
| Cutting Accuracy | Within 1/32 Inch over 30 Inches |
| Water Tray Capacity | Accommodates 18x36 and 24x24 Inch Tiles |
| Weight | 91 Pounds |
| Dimensions | 31 x 30 x 21 Inches |
| Width (Column to Cart Edge) | 28.875 Inches |
| Power Type | Corded Electric |
| Included Accessories | Cart, Miter Guide, Wrenches, Storage Compartments |
Setup and Water System: Position the saw on a level surface near a water source. Fill the water tray to the recommended level before operation. The enclosed tray system automatically circulates water to the blade during cutting, keeping dust down and the blade cool. Always allow the motor to reach full speed before making cuts.
Making Rip Cuts: For cutting tiles lengthwise (rip cuts), position the tile against the rip fence and push it smoothly toward the blade. Use steady, even pressure without forcing. The saw handles tiles up to 37 inches wide, or 41 inches with the plunge feature. The cutline indicator helps you align the tile before engaging the blade.
Making Crosscuts: For crosscuts (cutting across the width), place the tile on the crosscut table and use the miter guide for angled cuts up to 30 degrees offset. The 8.5-inch crosscut capacity is ideal for sills and planks. Always keep hands clear of the blade path and maintain firm control of the workpiece.
Maintenance Tips: After each use, drain the water tray and allow the saw to dry. Check the blade for debris or buildup weekly. Keep the stainless-steel rollers clean and free from mineral deposits by wiping with a damp cloth. Store all accessories in the integrated compartments to keep them organized and protected.
Personal Protective Equipment: Always wear safety glasses to protect from water splash and tile fragments. Wear work gloves when handling cut tiles, which have sharp edges. Use a dust mask when cutting in enclosed spaces, even with the water system running. Hearing protection is recommended during extended use.
Blade and Motor Safety: Never reach over or behind the blade while it's running. Always allow the motor to come to a complete stop before removing cut pieces or adjusting the saw. Keep the blade guard in place at all times. Check the blade regularly for cracks or damage and replace if needed.
Water and Electrical Safety: Ensure the saw is plugged into a properly grounded outlet with a ground fault circuit interrupter (GFCI). Keep water away from the electrical components and motor. Never operate with wet hands or in standing water. Inspect the power cord regularly for damage before use.
Workpiece Control: Secure the tile firmly against the fence or guide before cutting. Never freehand cut tiles on this saw. Use steady, controlled pressure and avoid sudden movements. Keep the work area clear of debris that could cause slipping or loss of control.
Maximize Cutting Accuracy: Use the cutline indicator as a reference point, but always make a test cut on scrap material first to verify alignment. This accounts for any minor blade drift and ensures your production cuts are perfect. The rigid frame holds tolerances well, but blade wear over time may require occasional adjustment.
Extend Blade Life: Keep the water system filled and running smoothly. A dry blade heats up quickly and dulls faster. Use a blade appropriate for your material: carbide-tipped blades for porcelain, diamond blades for natural stone. Replace blades when you notice increased chipping or slower cutting rather than waiting for complete failure.
Optimize for Large Tiles: The plunge feature is invaluable for large format tiles. Position the tile under the blade, plunge down to start the cut, then pull the tile toward you in one smooth motion. This technique prevents binding and produces cleaner edges than pushing tiles sideways.
Jobsite Efficiency: Set up near your work area to minimize tile transport. The integrated storage keeps accessories ready, and the compact footprint fits in tight spaces. The water tray system means you can work indoors without damaging floors, making this saw ideal for kitchen and bathroom renovations where cleanup matters.

Pros
- Excellent for detail work and smaller tile projects with precise, clean cuts
- Water cooling system effectively minimizes dust and keeps the work area cleaner
- Portable size and weight make it practical for homeowners with limited storage
- Reliable performance across ceramic, porcelain, and stone materials
- Good value for DIYers who need occasional tile-cutting capability
Cons
- Small blade size limits its ability to handle large-format tiles or high-volume production work
- May require longer cutting times for thicker materials compared to larger professional-grade saws
The DeWalt DWC860W wet tile saw delivers solid performance for homeowners and DIYers tackling tile and masonry projects around the house. Its 4-3/8-inch diamond blade is sized perfectly for precision cutting on ceramic, porcelain, and stone materials, making it especially useful for bathroom renovations, kitchen backsplashes, and decorative tilework. The integrated water pump keeps the blade cool during operation, which not only extends blade life but also significantly reduces airborne dust, making the work environment much more comfortable and cleaner.
Setup and operation are straightforward, with an intuitive fence system and miter gauge that allow you to make accurate, repeatable cuts without extensive learning curve. The compact, lightweight design is a major advantage if you're working in tight spaces or need to transport the saw between multiple rooms or job sites. Users consistently report that the saw produces clean cuts with minimal chipping, which is critical when working with expensive tile materials where waste adds up quickly.
This saw is best suited for detailed and moderate-volume tile work rather than high-production environments. While it excels at smaller projects and intricate cuts, the smaller blade does mean longer cutting times for thicker materials, and it's not the ideal choice if you're planning a large-scale tile installation. For the typical homeowner or DIYer doing occasional tile work, the DWC860W offers excellent reliability and value without the bulk or expense of larger professional equipment.
| Specification | Details |
|---|---|
| Blade Size | 4-3/8 inches |
| Blade Type | Diamond wet saw blade |
| Motor | 1.3 HP electric motor |
| Water System | Integrated pump with recirculating water cooling |
| Cutting Depth | Up to 1-1/2 inches at 90 degrees |
| Bevel Capacity | 0 to 45 degrees |
| Fence System | Precision adjustable fence with miter gauge |
| Weight | Approximately 20 lbs |
| Power Cord | Corded electric (110V) |
| Materials | Cuts ceramic, porcelain, stone, and masonry |
| Water Capacity | Built-in recirculating tank |
Setup: Assemble the fence and miter gauge according to the manual. Fill the water tank with clean water until it reaches the marked line. Plug in the saw and ensure the water pump primes before making your first cut.
Basic Cutting: Measure and mark your tile clearly. Position the tile against the fence for straight cuts or use the miter gauge for angled cuts. Turn on the saw and allow the blade to reach full speed. Push the tile slowly and steadily toward the blade, letting the water and blade do the work. Never force the material through.
Angled Cuts: Adjust the miter gauge to your desired angle (up to 45 degrees). Keep firm pressure on the tile to prevent slipping, and feed it through at a controlled pace. For bevel cuts, tilt the blade head to the desired angle before cutting.
Maintenance: After each use, empty the water tank and rinse it out to prevent sediment buildup. Check the blade for debris and clean as needed. Inspect the fence and miter gauge for proper alignment before each project.
Before Operation: Always wear safety glasses to protect against flying debris and water spray. Use hearing protection if operating for extended periods. Tie back long hair and avoid loose clothing that could catch on the blade. Ensure the saw is on a stable, level work surface.
During Cutting: Keep your hands and fingers at least 3 inches away from the blade at all times. Never reach over or under the blade while it's running. Use the fence and miter gauge for all cuts to keep your hands at a safe distance. Allow the blade to reach full speed before beginning to cut.
Water and Electrical Safety: Keep the water tank filled to prevent the blade from overheating and cracking. Check the power cord regularly for damage before each use. Keep the work area dry around the electrical outlet and motor. Never operate the saw with wet hands or in wet conditions.
Post-Cutting: Always allow the blade to come to a complete stop before removing material or adjusting the fence. Unplug the saw before performing any maintenance or blade changes. Let the blade cool slightly before handling if you've been cutting for an extended period.
Maximize Blade Life: Keep the water tank filled throughout operation to maintain consistent cooling. Use a diamond blade appropriate for your material type for faster, cleaner cuts. Avoid forcing the tile through the blade, which causes unnecessary wear and generates excess heat.
Achieve Cleaner Cuts: Mark your cut line clearly with a pencil or marker. Feed the tile slowly and steadily for the smoothest cut. For intricate cuts or notches, make multiple passes rather than trying to force a single cut. Let the blade do the work instead of applying excessive pressure.
Minimize Chipping: Cut with the finished side of the tile facing down on the table. This reduces chipping on the visible surface. For glazed tiles, score the line first with a light pass before making the full cut. Consider using painter's tape along the cut line to help prevent chipping.
Efficient Work Flow: Prepare all your tiles and mark cut lines before beginning. Group similar cuts together to minimize setup changes. Keep a bucket of water nearby to rinse tiles and keep the blade clean during operation. Empty and refill the tank periodically to remove sediment and keep the water clear.

Pros
- Produces clean, dust-free cuts with integrated water circulation system
- Built-in cutting guide removes guesswork and improves accuracy for straight edges
- Lightweight and portable enough for job-site work or DIY home projects
- Reliable performance across ceramic, porcelain, and natural stone tiles
- Good value for homeowners and occasional DIYers who need professional-quality results
Cons
- 7-inch blade limits cutting capacity compared to larger contractor-grade saws
- Water spray and splashing require careful workspace setup and cleanup
The Porter-Cable PCE980 is a solid choice for homeowners and DIYers who need reliable tile-cutting performance without the bulk of professional-grade equipment. This wet saw excels at producing clean, straight cuts on ceramic and porcelain tiles thanks to its integrated water circulation system and on-board cutting guide. The 7-inch blade capacity covers most standard residential tile sizes, making it practical for kitchen backsplashes, bathroom renovations, and outdoor patio projects.
What sets this model apart is its balance of precision and ease of use. The cutting guide takes the guesswork out of angled and straight cuts, which is especially valuable if you're new to tile work. The wet-cutting design minimizes dust and keeps the blade cool, extending its lifespan and making the work environment more pleasant. The motor delivers consistent power through various tile materials without bogging down, and the compact footprint means you can transport it between rooms or store it without dedicating significant space.
Users consistently praise the PCE980 for reliability and straightforward operation. While it's not designed for high-volume professional use or oversized tiles, it punches well above its price point for homeowner-level projects. If you're planning a modest tile installation or renovation, this saw will deliver professional-quality results with minimal frustration.
| Specification | Details |
|---|---|
| Blade Size | 7 inches |
| Cutting Capacity | 7 inches |
| Cutting System | Wet saw with water circulation |
| Cutting Guide | On-board integrated guide |
| Material Compatibility | Ceramic, porcelain, stone tile |
| Motor Type | Electric induction motor |
| Power | 120V household outlet |
| Portability | Lightweight, compact design |
| Water System | Pump-fed circulation with drain |
| Model Number | PCE980 |
Setup and Preparation
Fill the water reservoir with clean water before each use. Position the saw on a stable, level surface near a drain or collection area to manage water runoff. Plug the unit into a standard 120V outlet and allow the pump to circulate water for a few seconds before making your first cut.
Making Cuts
Align your tile against the on-board cutting guide. For straight cuts, push the tile slowly and steadily toward the blade, letting the saw do the work without forcing. For angled cuts, adjust the guide to your desired angle and follow the same smooth, steady motion. Always wear safety glasses and keep hands clear of the blade.
Maintenance
Empty the water reservoir after each use to prevent algae growth and mineral buildup. Rinse the blade and cutting surface with fresh water. Check the blade for chips or damage before each session, and replace it if needed for optimal cutting quality.
Personal Protective Equipment
Always wear ANSI-rated safety glasses to protect against tile fragments and water splash. Consider wearing work gloves for better grip and a dust mask if working in enclosed spaces, even though wet cutting minimizes airborne particles.
Operating Safely
Never reach under or near the blade while it's running. Keep the cutting guide in place and use it to control tile movement. Allow the blade to reach full speed before cutting, and never force a tile through the blade. Turn off the unit and wait for the blade to stop completely before adjusting the work area or changing the blade.
Workspace Hazards
Water and electricity require careful management. Keep the power cord away from water spray and puddles. Ensure the work area has proper drainage to prevent water accumulation. Use a GFCI-protected outlet for added electrical safety, and never operate the saw in wet conditions or with wet hands.
Is This Saw Right for You?
The Porter-Cable PCE980 is ideal if you're planning a one-time tile project or occasional DIY renovations. It works well for standard tile sizes up to 7 inches and handles ceramic, porcelain, and natural stone. If you're tackling a large-scale installation, cutting oversized tiles regularly, or running a contracting business, you may need a larger contractor-grade saw instead.
Project Suitability
This model excels at kitchen backsplashes, bathroom tile work, shower enclosures, and small patio projects. It's less suitable for large-format tiles, thick stone slabs, or high-volume production work. If your project involves mostly straight cuts with occasional angles, the integrated cutting guide will save you time and improve accuracy.
Budget Considerations
The PCE980 offers strong value for homeowners seeking professional results without professional-grade pricing. Compare it against other 7-inch wet saws in its category, and consider the cost of replacement blades and water maintenance. For most residential projects, the total cost of ownership remains reasonable over several years of occasional use.

Pros
- Powerful 12-amp motor cuts through tough materials cleanly and consistently
- Water circulation keeps the blade cool, producing cleaner cuts and reducing tile chipping
- Lightweight and portable enough for DIY homeowners to move between rooms or job sites
- Straightforward setup and operation require minimal learning curve
- Durable construction holds up well with regular maintenance
Cons
- Water spray can be messy indoors; best used in well-ventilated areas or outdoors
- Blade size limits cutting capacity for very large format tiles or thick stone materials
This 12-amp wet tile saw is built for homeowners and DIYers tackling bathroom renovations, kitchen backsplashes, or outdoor patio projects. The corded motor delivers consistent power without the limitations of battery charge, making it ideal for extended cutting sessions. The 4-inch blade size strikes a practical balance, handling standard ceramic and porcelain tiles with ease while remaining maneuverable for precision work.
The water cooling system is one of the standout features. As the blade spins, water circulates across the cutting surface, dramatically reducing airborne dust and minimizing tile chipping. This not only creates cleaner cuts but also extends blade life significantly compared to dry cutting. For homeowners concerned about dust in their homes, this wet-cutting capability is a major advantage.
Based on aggregated user feedback, owners appreciate the reliable performance and straightforward operation. The main trade-off is that water spray requires proper ventilation or outdoor use, and the 4-inch blade won't handle oversized format tiles or extremely thick stone. For standard residential tile projects, however, this saw delivers solid value and dependable results.
| Specification | Details |
|---|---|
| Motor Power | 12 Amps |
| Blade Size | 4 Inches |
| Power Type | Corded Electric |
| Cutting System | Wet Saw with Water Circulation |
| Best For | Ceramic, Porcelain, and Stone Tiles |
| Blade Type | Diamond Blade |
| Water Cooling | Yes |
| Portability | Compact and Lightweight Design |
Setup: Place the saw on a stable, level work surface with access to a water source and electrical outlet. Fill the water reservoir and ensure the pump circulates water across the blade before cutting.
Cutting: Mark your tile with a pencil, align it with the blade guide, and feed the tile slowly toward the spinning blade. Let the saw do the work; avoid forcing the tile through, which can chip edges or damage the blade.
Maintenance: After each use, drain the water reservoir and clean debris from the blade and cutting area. Check the blade for buildup and replace it when cutting becomes slow or rough. Keep the motor vents clear of dust for optimal performance.
Before You Start: Always wear safety glasses and a dust mask. Tie back long hair and avoid loose clothing that could catch on the blade. Ensure the work area is well-ventilated to manage water spray and dust.
During Operation: Keep hands away from the blade and never reach under the cutting table while the saw is running. Use the blade guard at all times and maintain firm control of the tile. Never force a cut; if the blade binds, stop immediately and check for obstructions.
After Cutting: Allow the blade to come to a complete stop before removing tiles or adjusting the work surface. Unplug the saw before cleaning, changing the blade, or performing maintenance. Keep the power cord away from water puddles and inspect it regularly for damage.
Cut Quality: For the cleanest cuts with minimal chipping, use a fresh diamond blade and maintain steady water flow. Support the tile firmly on both sides of the cut line, and move it slowly and smoothly through the blade.
Efficiency: Mark multiple tiles before cutting to batch similar cuts together. This saves time and helps you establish a consistent cutting rhythm. Keep extra blades on hand so you're never delayed by a dull blade.
Durability: Protect the blade and motor by avoiding wet hands when handling the power cord. Store the saw indoors in a dry location, and drain the water system completely if you won't be using it for several weeks. Inspect the blade bearing regularly and replace it if you notice vibration or wobbling during operation.

Pros
- Cordless design eliminates extension cords and provides genuine job site mobility
- Wet cutting option dramatically reduces airborne dust and improves visibility
- Brushless motor runs cooler and quieter than traditional brushed alternatives
- Compatible with Makita's extensive 18V LXT battery ecosystem for cost savings
- Solid build quality with strong user satisfaction ratings
Cons
- Battery and charger sold separately, requiring additional investment if you don't own Makita 18V tools
- Wet cutting requires water supply access and creates wet slurry cleanup on the work surface
The Makita XCC01Z brings cordless convenience to masonry cutting, a task traditionally dominated by corded saws and gas-powered alternatives. The brushless motor delivers reliable power for cutting through brick, tile, stone, and concrete block, while the 5-inch blade provides the precision needed for both rough demolition work and finished detail cuts. Users consistently praise its ability to handle demanding masonry applications without the hassle of managing power cords on the job site.
What truly sets this saw apart is its wet/dry versatility. Wet cutting mode uses water to suppress dust and keep the blade cool, which is especially valuable for indoor renovations or situations where dust control matters. Dry cutting mode offers maximum portability when water access isn't available. The 18V LXT battery compatibility means homeowners and contractors who've invested in Makita's cordless ecosystem can leverage existing batteries, reducing the overall cost of ownership compared to buying a complete new system.
The tool-only configuration requires purchasing compatible batteries and a charger separately, which is worth considering in your budget. However, this approach appeals to users who already own Makita 18V tools or prefer selecting their own battery capacity based on their typical job duration. Build quality is solid throughout, with a design that balances power and maneuverability for both overhead cuts and ground-level work.
| Specification | Detail |
|---|---|
| Model | XCC01Z |
| Voltage | 18V LXT Lithium-Ion |
| Blade Diameter | 5 inches |
| Motor Type | Brushless |
| Cutting Capability | Wet and Dry |
| Materials | Brick, Tile, Stone, Masonry, Concrete |
| Smart Features | AWS Capable |
| Package Contents | Tool Only (Battery and Charger Not Included) |
Setup and Safety: Before operating, ensure the blade is properly installed and secured. Always wear safety glasses, a dust mask (especially when dry cutting), and hearing protection. For wet cutting, connect a water supply to the saw's inlet and ensure proper drainage at the work site.
Dry Cutting: Position the saw firmly on the work surface with both hands gripping the handles. Guide the blade through the material at a steady pace, allowing the motor to do the work. Don't force the blade or apply excessive downward pressure, as this can slow the motor and reduce battery life.
Wet Cutting: Attach the water supply line and activate water flow before starting the blade. The water stream should flow directly onto the blade to suppress dust and cool the cutting surface. Work at a similar pace as dry cutting, but take advantage of the improved visibility to make more precise cuts. After finishing, allow the saw to run briefly to expel water from the system before storage.
Personal Protective Equipment: Always wear ANSI-certified safety glasses to protect against flying debris. Use a dust mask or respirator when dry cutting, especially indoors. Hearing protection is recommended, as masonry saws generate significant noise. Wear work gloves to protect your hands during setup and material handling.
Operational Safety: Keep hands and loose clothing away from the rotating blade at all times. Never reach under the blade or attempt to clear debris while the motor is running. Ensure the work surface is stable and secure before starting. Allow the blade to reach full speed before beginning your cut, and never jam or bind the blade intentionally.
Battery and Maintenance: Use only genuine Makita 18V LXT batteries and chargers to ensure safe operation. Inspect the blade regularly for damage or dullness, and replace it if needed. Store the tool in a dry location and keep the battery contacts clean. Never leave the tool running unattended, and always disconnect the battery when performing maintenance or storage.
Maximize Battery Life: Wet cutting is gentler on your battery than dry cutting because the water helps cool the blade and reduces motor strain. If runtime is a concern, consider having a second 18V LXT battery charged and ready for longer jobs. Avoid running the battery completely dead, as this can reduce overall lifespan.
Blade Selection: The 5-inch blade size is optimized for specific materials. Ensure you're using the correct blade type for your application: segmented blades for rough cutting, continuous rim blades for clean cuts in tile, and diamond blades for hard masonry. A sharper blade requires less pressure and preserves battery charge.
Work Surface Setup: For wet cutting, use a shop vac with a wet/dry attachment to manage water and slurry runoff. For dry cutting indoors, position a shop vac near the exhaust to capture dust at the source. Always support your work material securely to prevent binding and ensure consistent, clean cuts.
Pros
- Lightweight and portable design reduces fatigue during extended use
- Aluminum fence construction provides durability and precision alignment
- Convenient miter detents eliminate need for manual angle adjustment
- Versatile enough for multiple flooring types and cut angles
Cons
- No reviews available to confirm real-world durability and performance
- Limited to flooring and similar materials; not suitable for masonry or tile
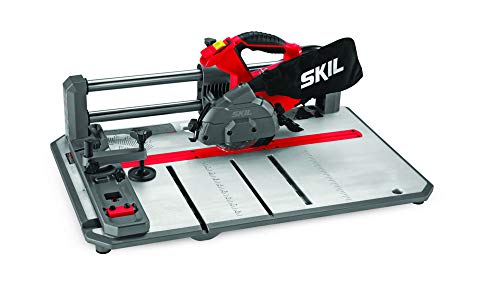
The SKIL 3601-02 Flooring Saw is purpose-built for homeowners and contractors who install or replace flooring regularly. Its lightweight aluminum construction makes it genuinely portable, and the die-cast aluminum fence system is designed to maintain accuracy across multiple cuts without drifting or requiring constant readjustment. The 36-tooth contractor blade comes ready to use, eliminating the need to source the right blade separately.
The miter detent system is a practical feature that saves time on common angles. Instead of measuring and guessing, you simply snap the fence into position at 0, 22.5, or 45 degrees. This is especially valuable when you're cutting dozens of planks at the same angle during a flooring installation. The saw handles solid hardwood, engineered wood, and laminate flooring without issues, making it adaptable to different project types.
At 30 pounds and 28.9 x 20.1 x 13 inches, this saw fits comfortably in a truck bed or job site trailer without consuming excessive space. The crosscut, miter, and rip cut capabilities mean you won't need multiple saws for typical flooring work. If you're planning a DIY flooring project or doing regular installations, this saw delivers solid functionality without the bulk and cost of larger stationary equipment.
| Specification | Detail |
|---|---|
| Brand | SKIL |
| Model | 3601-02 |
| Blade Teeth | 36T Contractor Blade |
| Dimensions | 28.9 x 20.1 x 13 inches |
| Weight | 30 pounds |
| Color | Red and Black |
| Miter Detents | 0, 22.5, and 45 degrees |
| Fence Type | Die-cast Aluminum |
| Compatible Materials | Solid, Engineered, and Laminate Flooring |
| Cut Types | Crosscut, Miter, Rip |
Setup: Position the saw on a stable, flat work surface. Secure the fence in your desired angle using the miter detents or manual adjustment. Ensure the blade is properly installed and the 36T blade is appropriate for your material.
Making Cuts: Place your flooring piece against the fence, aligning your cut mark with the blade. Hold the material firmly and feed it smoothly through the blade. Use the crosscut mode for perpendicular cuts, the miter setting for angled cuts, and the rip fence for lengthwise cuts along the plank.
Angle Adjustments: For common angles, simply rotate the miter fence until it clicks into the 0, 22.5, or 45-degree detent. For custom angles, loosen the detent mechanism and adjust manually, then tighten securely before cutting. Always verify your angle setting before making your first cut on each new angle.
Before Operation: Inspect the blade for damage and ensure it spins freely. Keep hands and fingers at least 3 inches away from the blade at all times. Never reach over or under a spinning blade. Wear safety glasses to protect against dust and debris.
During Cutting: Maintain a firm grip on the material being cut and keep it pressed against the fence. Never force a cut; let the blade do the work at its own pace. Do not wear loose clothing or jewelry that could catch on the blade. Keep the work area clear of obstacles and bystanders.
After Cutting: Allow the blade to come to a complete stop before removing the workpiece. Unplug the saw before changing the blade or performing maintenance. Store the saw in a dry location away from moisture, and keep the blade guard in place when not in use.
Flooring Installation: Pre-cut all pieces before beginning installation to save time and reduce dust at the job site. Organize cut pieces by length and angle to streamline the laying process. Make a test cut on scrap material first to verify your angle and blade depth.
Blade Maintenance: Keep the 36T blade clean by removing sawdust buildup between cuts. A clean blade cuts more smoothly and reduces binding. Replace the blade when it becomes dull to maintain cut quality and reduce strain on the motor.
Fence Accuracy: Check the fence alignment regularly, especially after transport or storage. A misaligned fence will throw off your measurements and angles. The die-cast aluminum construction is durable, but verify it hasn't shifted before starting a new project.
Buying Guide: What to Look for in Tile Saws
Choosing among the best tile saws requires a clear understanding of your project scope, the tile materials involved, and how often you plan to use the tool. A saw that’s ideal for a weekend DIYer handling ceramic bathroom tiles will fall short for a contractor cutting thick porcelain slabs on a daily basis. Use the sections below to match your priorities to the right features before you buy.
Blade Size and Cutting Capacity
Blade size directly determines how large a tile you can cut in a single pass. Smaller blades in the 4-inch to 5-inch range are found on handheld and compact models, making them ideal for portability and tight spaces but limiting you to narrower tiles. Seven-inch blades are the most common in mid-range benchtop saws and handle the majority of residential tile sizes comfortably. Ten-inch blades, like those on the DEWALT D24000S, open up rip cuts exceeding 24 inches, which is essential for large-format floor tiles or exterior work. Match your blade size to the largest tile you expect to cut, with a little overhead room to spare. If you regularly work with reciprocating saws and other cutting tools, you’ll already appreciate why blade size and material compatibility matter so much.
Motor Power and Blade Speed
Motor amperage and blade RPM determine how cleanly and consistently a tile saw cuts, especially through hard materials like porcelain, travertine, or natural stone. Underpowered motors slow under load, causing blade drag that chips tile edges and creates uneven cuts. For occasional home use and ceramic tile, a 7-amp to 9-amp motor is typically sufficient. For porcelain and natural stone, or for extended professional use, look for 12-amp or 15-amp motors. The DEWALT D36000S, for example, runs a 15-amp motor rated at 1,220 MWO, placing it firmly in the professional tier. Higher RPM also helps maintain cut quality, so pay attention to blade speed in the product specs. Investing in a capable motor now saves you from stalled cuts and wasted tile later, much like choosing the right drill press for precision workshop work.
Wet vs. Dry Cutting
Nearly all benchtop tile saws use a water-cooling system to keep the diamond blade cool during cutting and to suppress silica dust. Wet cutting extends blade life significantly, reduces heat-related chipping, and keeps the work area far safer from airborne particles. Some compact and handheld models, like the Makita XCC01Z, offer both wet and dry modes, giving you flexibility when a water source isn’t available. When working in enclosed spaces, wet cutting is strongly preferred both for blade longevity and for health reasons. Make sure the water tray on any benchtop model is easy to remove and clean, since stagnant water and tile slurry will degrade the tray over time if neglected.
Cutting Versatility: Rip Cuts, Miter Cuts, and Plunge Cuts
The types of cuts a saw can make matter enormously depending on your tile layout. Straight rip cuts are the baseline requirement. Miter cuts, typically up to 45 degrees, allow you to handle corner transitions and decorative angles. Plunge cuts let you cut openings in the center of a tile for outlets, pipes, or drains without starting from the edge. Not all tile saws offer all three. Handheld models like the DEWALT DWC860W excel at plunge cuts and unlimited rip length, while benchtop saws offer more stable miter setups. The PORTER-CABLE PCE980, rated at 4.4 stars by over 1,500 buyers, includes an on-board cutting guide that improves miter accuracy on a 7-inch platform, making it a strong all-around choice for homeowners who need versatility without a heavy machine. A well-organized set of precision tools alongside your tile saw goes a long way on complex installations.
Portability and Jobsite Footprint
Weight and setup complexity matter if you’re moving the saw between rooms or transporting it to different job locations. Lightweight 7-inch benchtop saws in the 18-pound to 27-pound range are genuinely portable and set up quickly on any flat surface. Larger 10-inch contractor saws with integrated stands, like the DEWALT D24000S and D36000S, weigh significantly more but provide a stable, ergonomic working height that reduces fatigue during long sessions. Cordless options like the Makita XCC01Z 18V eliminate the need for a power outlet entirely, which is a major advantage on remote jobsites or during multi-room renovations. If jobsite organization matters to you, pairing your tile saw with sturdy garage shelving for blade and accessory storage keeps everything accessible and protected.
Build Quality and Table Surface
The quality of the table surface affects both accuracy and durability. Stainless steel tops resist corrosion from constant water exposure, a critical feature given the wet cutting environment. Aluminum extrusion tables are lightweight but can flex under heavy tile. Look for a flat, stable surface with smooth-sliding extension wings if you’re cutting large-format tiles. The rail system on high-end models like the DEWALT D24000S uses a stainless steel sliding system that stays true even after years of daily use, which is why it consistently earns top ratings among professional tile setters. A wobbly table or loose rail introduces cumulative error with every cut, which compounds quickly on complex floor layouts. The same attention to quality you’d bring to choosing top-rated circular saws applies here: a well-built tool pays for itself in accuracy and longevity.
Corded vs. Cordless Power
Most tile saws are corded for a simple reason: cutting dense materials like porcelain demands sustained, consistent power that battery packs historically struggled to deliver. Corded models guarantee full motor output throughout the entire job. That said, cordless technology has advanced dramatically, and the Makita XCC01Z on 18V LXT lithium-ion platform with a brushless motor brings genuine jobsite flexibility without meaningful power compromise for mid-scale cuts. If you already own Makita 18V batteries from other tools, the XCC01Z becomes an especially cost-effective addition. For heavy daily use or thick stone tiles, corded saws remain the safer choice. The same principle applies across cordless power tools broadly: battery platforms reward brand loyalty.
Safety Features
Tile cutting generates silica dust, which poses serious respiratory risks with prolonged exposure. Wet cutting mitigates this substantially, but you should still wear appropriate PPE regardless of saw type. Look for saws with blade guards, splash shields, and clear sight lines to the cut line to reduce the chance of misfires. Some models include integrated dust collection ports compatible with a shop vac, which further controls debris in enclosed spaces. The Makita XCC01Z’s AWS (Auto-Start Wireless System) capability is a premium safety and convenience feature that automatically activates dust extraction when the blade spins. Always ensure the power switch is in a position you can reach quickly, and never reach over an active blade to reposition tile.
Why Trust HomeThru
HomeThru is an independent editorial platform with no brand affiliations, sponsored placements, or manufacturer relationships that influence our recommendations. Our editors research each product category by analyzing verified purchase reviews, comparing manufacturer specifications, consulting published trade guidelines, and synthesizing real-world usage reports from professional contractors and experienced homeowners. We do not accept payment for product placement. Every pick in this roundup was selected because the evidence supports it, not because of a commercial arrangement. The same independent approach informs every guide we publish, whether we’re evaluating air compressors for workshop use or ranking the best smart home devices for security. Our goal is simple: give you reliable information so you can buy with confidence and get on with your project.
Final Thoughts
After thoroughly researching and comparing this lineup of tile saws, a few standout performers deserve special recognition based on their specs, user satisfaction, and overall value proposition.
- Best Overall: DEWALT Wet Tile Saw with Stand, 10-Inch (D24000S) earns the top spot for its stainless steel rail system, 25-inch rip capacity, plunge-cut capability, and the consistent precision that both contractors and serious DIYers demand.
- Best Professional Upgrade: DEWALT Wet Tile Saw with Stand, 10-Inch, 15-Amp (D36000S) steps up with a 15-amp, 1,220 MWO motor built for heavy daily use on porcelain, natural stone, and large-format tile without compromise.
- Best Mid-Range Value: PORTER-CABLE Tile Saw with 7-Inch Cutting Capacity (PCE980) delivers a 7-inch platform with an on-board cutting guide, earning a 4.4-star rating from over 1,500 verified buyers at a mid-range price that suits most homeowners well.
- Best Budget Pick: SKIL 7-Inch Wet Tile Saw (3540-02) is the most-reviewed saw in our lineup with over 8,000 buyer ratings at a 4.4-star average, making it the most proven entry-level option for light residential work and first-time tile projects.
- Best Cordless Option: Makita XCC01Z 18V LXT Brushless Cordless 5-Inch Wet/Dry Masonry Saw stands apart for its battery-powered flexibility, brushless motor efficiency, and AWS dust-extraction compatibility, ideal for multi-room projects or remote jobsites.
No matter where you land in this lineup, the right tile saw transforms a frustrating task into a satisfying one. Take time to match the blade size and motor power to your specific tile material, and factor in how often you’ll use the tool when deciding how much to invest. For related tool research, our coverage of top reciprocating saws and circular saws can help you round out your project toolkit.
Frequently Asked Questions
What Is the Difference Between a Wet Tile Saw and a Dry Tile Saw?
A wet tile saw circulates water over the blade during cutting to cool the diamond edge and suppress silica dust. Dry saws cut without water, generating more heat and airborne particles. Wet saws produce cleaner cuts with longer blade life and are strongly preferred for porcelain, natural stone, and any indoor tile work. Dry cutting is occasionally used on exterior jobsites where water setup is impractical, but it demands proper respiratory protection and faster blade replacement cycles.
Can I Cut Porcelain Tile with a 7-Inch Tile Saw?
Yes, but motor power and blade quality matter significantly. Porcelain is denser and harder than ceramic, so a 7-inch saw needs at least a 10-amp to 12-amp motor and a high-quality continuous-rim diamond blade to cut cleanly without chipping. Running an underpowered motor through thick porcelain causes drag, blade deflection, and tile breakage. For heavy porcelain work or large-format slabs, upgrading to a 10-inch saw with a 12-amp or 15-amp motor is a worthwhile investment. Keeping your tape measures and layout tools accurate is equally important when working with expensive porcelain.
How Do I Maintain a Tile Saw Between Uses?
After each session, drain and rinse the water tray to remove tile slurry before it hardens. Wipe down the table surface and blade guard. Inspect the blade for segment wear or cracks. Check the water pump inlet for clogs, since fine tile dust accumulates quickly and reduces water flow. Store the saw in a dry location to prevent rust on the table surface and rail components. A clean saw not only lasts longer but also maintains the cutting accuracy you relied on when you first bought it. If your workshop space is limited, consider a dedicated garage shelving solution to keep the saw covered and off the floor when not in use.
Is a Cordless Tile Saw Powerful Enough for Real Jobs?
Modern brushless cordless tile saws like the Makita XCC01Z deliver enough power for ceramic, glass, and moderate porcelain cuts on an 18V lithium-ion platform. They excel on jobsites without convenient outlet access and in multi-room renovations where running extension cords becomes cumbersome. For sustained heavy-duty cutting through thick natural stone or full-day contractor work, a corded saw remains the more reliable choice. If you already use an 18V battery platform across other tools, adding a cordless drill and a cordless tile saw to that same system maximizes battery investment.
What Safety Gear Do I Need When Using a Tile Saw?
At minimum, wear safety glasses and hearing protection whenever the blade is running. Even with wet cutting, fine mist carries tile particulates, so a dust mask rated N95 or higher is advisable, especially indoors. Non-slip footwear protects against dropped tiles and wet floors. Keep loose clothing and hair away from the blade area, and never bypass the blade guard. For extended indoor sessions in bathrooms or kitchens with limited airflow, connecting a shop vac to a compatible dust port improves air quality significantly and keeps cleanup time short.





Write Your Review
No reviews yet. Be the first to share your experience!