

Finding wall studs is one of those deceptively simple tasks that goes wrong fast without the right tool. Whether you are hanging a heavy mirror, mounting a flat-screen TV, or installing floating shelves, hitting a stud means the difference between a secure anchor and a hole in your drywall. A quality stud finder saves time, prevents costly mistakes, and keeps you from accidentally drilling into live wiring or plumbing. Our editorial team independently researched and evaluated the top options on the market, comparing sensor count, detection accuracy, ease of use, and value to surface the picks most worth your attention. Below you will find our curated shortlist of the best stud finders available right now, followed by a detailed buying guide to help you choose with confidence.
Top Stud Finders We Recommend
Pros
- 13 sensors provide reliable, consistent stud detection across different wall types
- Live wire meter adds genuine safety value for electrical peace of mind
- Full-width LED display eliminates guesswork about stud edges and center
- Proven durability and consumer trust backed by professional endorsement
- Deep scan automatically adapts to wall composition without manual adjustments
Cons
- No customer reviews available to verify real-world performance and reliability
- Premium pricing may be steep for occasional homeowners who only need basic stud finding
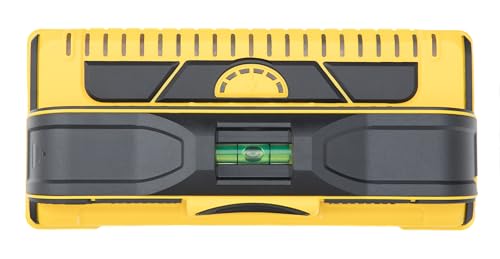
The Franklin Sensors ProSensor M210 stands out in the stud finder market by combining 13 patented sensors with a live wire detection feature that addresses one of the biggest safety concerns for DIYers. Whether you're hanging shelves, mounting a TV, or installing fixtures, knowing the exact location of studs and avoiding live electrical wires makes this tool an investment in both accuracy and safety.
What sets the M210 apart is its wide LED display that shows stud center and edges simultaneously, eliminating the guesswork that comes with single-point detection. The auto-adjusting deep scan technology penetrates up to 1.7 inches, automatically compensating for different materials and wall textures without requiring manual mode switches. This means whether you're dealing with drywall, plaster, tile, or textured surfaces, the device adapts on its own.
Built in the USA with a reputation for durability among both professionals and serious homeowners, the ProSensor M210 delivers the precision and reliability you need for projects where accuracy matters. The lightweight design and compact form factor make it easy to handle, and the combination of stud, metal, and live wire detection addresses the complete safety picture before you drill.
| Specification | Details |
|---|---|
| Brand | Franklin Sensors |
| Model | ProSensor M210 |
| Number of Sensors | 13 patented sensors |
| Detection Capabilities | Wood studs, metal studs, live wires |
| Scan Depth | Up to 1.7 inches |
| Color | Yellow |
| Dimensions | 7.5 x 3.35 x 3.33 inches |
| Weight | 0.71 pounds |
| Display | Wide LED display showing stud center and edges |
| Key Features | Auto-adjusting deep scan, live wire meter, made in USA |
Getting Started: Before your first use, place the stud finder on a wall section with no studs and press the power button. The device will calibrate to your wall surface automatically. This baseline calibration ensures accurate detection.
Finding Studs: Starting from the left side of your target area, slowly drag the M210 horizontally across the wall. When the LED display lights up and shows the stud edges, you've found your target. Mark the center line indicated on the display, then verify by scanning from the opposite direction to confirm the stud location.
Checking for Live Wires: Before drilling, use the live wire detection feature by placing the device near your drilling point. The device will alert you if electrical current is present, preventing dangerous accidents. Always check for wires before drilling, especially near outlets, switches, and along baseboards.
Tips for Best Results: Keep the device flat against the wall and move it slowly for accurate readings. The auto-adjusting technology handles different wall types, but consistent pressure and speed improve reliability. If you get inconsistent results, recalibrate by placing the finder on an unstudded wall section again.
Live Wire Detection: The ProSensor M210's live wire meter is a critical safety feature. Always use it before drilling, especially in kitchens, bathrooms, and near electrical outlets where wires are commonly run. This feature alone can prevent serious electrical shock or damage to your home's electrical system.
Wall Composition Awareness: Know what's behind your walls. In older homes, electrical wiring and plumbing may not follow standard patterns. Use the live wire detection in combination with stud detection for maximum safety. If you're unsure about wall composition, consider consulting a professional before major drilling projects.
Proper Calibration: Always calibrate the device on a stud-free wall section before each use session. This ensures the sensors are properly adjusted to your specific wall conditions and improves detection accuracy, reducing the chance of missed studs or false positives.
Cordless Operation Safety: The device operates on batteries. Keep fresh batteries on hand and check battery level before starting projects. Low battery power can reduce sensor sensitivity and detection accuracy, compromising both your safety and project quality.
Double-Check Your Work: Professional installers always verify stud locations from multiple directions. Scan from left to right, then right to left, and mark where the edges align. This cross-verification method catches any calibration issues and ensures you're drilling exactly where studs are located.
Mark Studs Before Major Projects: If you're planning multiple installations (shelves, cabinets, TV mount), use the M210 to locate and mark all studs in the project area first. A light pencil line down the center of each stud prevents mistakes and saves time during installation.
Account for Stud Spacing: Once you find one stud, studs are typically spaced 16 or 24 inches apart. Use this knowledge to predict stud locations before scanning, then verify with the M210. This technique speeds up larger projects and helps you identify any unusual framing.
Battery Management: Keep the device off between uses to preserve battery life. For frequent DIYers, consider rechargeable batteries to reduce costs and environmental impact while maintaining consistent power for reliable detection.
Maintain the Sensors: Keep the bottom sensor surface clean and free from dust or debris. A quick wipe with a dry cloth before each use ensures optimal sensor contact with the wall and prevents false readings.

Pros
- Multi-sensor design eliminates false positives and missed studs that plague single-sensor models
- Live wire detection protects you from accidental contact with electrical lines during installation
- No calibration means faster scanning and fewer user errors on the job
- Clear LED indicators show complete stud boundaries, making marking and drilling precise
- Compact, lightweight construction makes it easy to handle during extended wall scanning sessions
Cons
- Requires two AAA batteries that are not included, and the device is not compatible with rechargeable batteries
- No reviews currently available, so real-world user feedback on long-term durability is limited
The Franklin Sensors ProSensor M150 stands out in the crowded stud finder market by incorporating nine individual sensors instead of the one or two found in most competitors. This multi-sensor approach significantly reduces false readings and missed studs, giving you confidence that the wall location you've identified is genuinely solid enough to support your shelf, TV mount, or cabinet. Whether you're working with standard drywall, textured surfaces, or varying wall depths, the device adapts automatically without requiring manual calibration.
Beyond basic stud detection, the M150 includes live wire detection capability, a safety feature that alerts you to electrical lines running through your walls. This is particularly valuable when you're drilling or fastening near outlets and switches, helping you avoid potentially dangerous situations. The LED display shows not just the presence of a stud, but its full width and any double-stud configurations, giving you the complete picture needed for precise marking and drilling.
Designed and manufactured in the USA, the ProSensor M150 offers solid build quality in a compact, lightweight package that won't fatigue your hand during extended scanning sessions. The straightforward operation - simply press and hold to scan - makes it accessible to first-time DIYers while delivering the accuracy that professionals expect. Keep in mind you'll need to supply two AAA batteries to get started, and standard alkaline batteries are required since the device doesn't work with rechargeable types.
| Specification | Details |
|---|---|
| Brand | Franklin Sensors |
| Model | ProSensor M150/X990 |
| Color | Yellow |
| Sensor Count | 9 sensors |
| Detection Depth | Up to 1.5 inches through drywall |
| Detection Types | Wood studs, metal studs, live wires |
| Power Source | 2 AAA batteries (not included) |
| Battery Compatibility | Alkaline only - not compatible with rechargeable batteries |
| Dimensions | 5.51 x 2.99 x 2.01 inches |
| Weight | 0.32 pounds |
| Calibration | Not required |
| Made In | USA |
Getting Started: Install two AAA alkaline batteries into the device. No calibration is needed, so you can begin immediately.
Basic Scanning: Press and hold the power button to activate the scanner. Slowly move the device horizontally across the wall surface. The LED lights will illuminate to show stud location and width. You can start scanning anywhere on the wall, even directly over a stud - the multi-sensor design will still detect it accurately.
Reading the Display: The LED indicators show the complete width of the stud you've found. When you reach the edge of the stud, the lights will change, allowing you to mark both edges for precise drilling or fastening. If you encounter double studs (common at corners and openings), the display will show both locations.
Live Wire Detection: The device will alert you if it detects an active electrical line. Proceed with extra caution in these areas, and consider calling a professional if you're unsure about electrical routing.
Wall Preparation: For best results, scan walls that are clean and free of thick paint buildup or wallpaper. If you have heavily textured walls, the auto-adjustment feature will compensate, but scanning over a smoother area first can help you understand the device's response pattern.
Scanning Technique: Move slowly and steadily across the wall. Rushing can cause you to miss stud edges. Make multiple passes to confirm stud location before marking or drilling. Always mark both edges of the stud for accuracy.
Battery Management: Keep fresh alkaline batteries on hand. Weak batteries can reduce detection depth and accuracy. Check battery level regularly, especially before starting a major project.
Verification: For critical installations like TV mounts or heavy shelving, use the stud finder to locate studs, then verify with a small finishing nail or by knocking to listen for the solid sound of wood behind drywall.
Electrical Safety: Always respect the live wire detection alerts. If the device detects electrical lines, do not drill in that area without professional assessment. Electrical lines are often run vertically down walls near outlets and switches - exercise extra caution in these zones.
Proper Fastening: Locate studs before hanging heavy items like TVs, shelves, or cabinets. Fastening to drywall alone will not safely support significant weight. Always use appropriate anchors or fasteners rated for your load.
Tool Safety: When drilling after locating studs, wear safety glasses and ensure the drill is secure before starting. Use appropriate drill bits for your fastener type and wall material.
Battery Disposal: Dispose of used batteries according to local regulations. Many retailers accept used batteries for recycling.

Pros
- Two essential tools in one device saves money and storage space
- Automatic edge detection with audio and visual feedback makes stud marking faster and more accurate
- AC wire detection feature adds an important safety layer when drilling or fastening
- Rechargeable battery eliminates the need for constant battery replacements
- 360-degree rotating wall mount enables hands-free operation for marking
Cons
- Manual-leveling laser requires careful bubble alignment and isn't self-leveling, which takes extra setup time
- Not designed for lath and plaster walls; works best on drywall and wood surfaces only
The Prexiso 2-in-1 Stud Finder with Laser Level delivers genuine dual functionality for homeowners and DIYers tackling common projects like hanging shelves, mounting TVs, and installing picture frames. The stud detection side automatically projects a vertical laser line and triggers audio and visual alerts when it locates stud edges, making it simple to mark exact positions without guesswork. The built-in laser level features manual alignment with LED-illuminated bubble vials, allowing you to establish horizontal, vertical, or cross-line references up to 30 feet indoors.
What sets this tool apart is its safety-conscious design. The AC wire detection capability alerts you to the presence of live electrical wiring up to 1.5 inches deep, helping prevent dangerous drilling mistakes. The device detects wood and metal studs through drywall up to three-quarters of an inch deep, covering the majority of residential framing scenarios. Rechargeable via USB Type-C, it eliminates battery waste and provides cordless convenience. The included 360-degree rotating wall mount, adhesive strips, and pin options give you flexibility for mounting on different surface types.
Realistic expectations matter: this is a manual-leveling laser, not self-leveling, so you'll need to use the bubble vials to achieve proper alignment before marking. The self-adhesive strips work best on smooth, clean surfaces and aren't suitable for textured drywall, wallpaper, or dusty finishes. The device is optimized for drywall and wood walls rather than older lath-and-plaster construction. For DIYers who understand these limitations and need a reliable 2-in-1 tool for standard home projects, this delivers solid value and practical functionality.
| Specification | Details |
|---|---|
| Brand | Prexiso |
| Color | Yellow and Black |
| Product Type | 2-in-1 Stud Finder and Laser Level |
| Power | Rechargeable (USB Type-C) |
| Stud Detection Depth | Up to 3/4 inch through drywall |
| Metal and AC Wire Detection Depth | Up to 1.5 inches |
| Laser Range | Up to 10 meters (30 feet) indoor |
| Laser Class | Class II (output less than 1mW) |
| Leveling Type | Manual with LED bubble vials |
| Mounting Options | 2 pins, 6 self-adhesive strips, top pin hole |
| Wall Mount | 360-degree rotating mount included |
| Best Surface Types | Drywall and wood walls |
| Not Recommended For | Lath and plaster walls |
| Included Accessories | Type-C charging cable, wall mount, adhesive strips, storage bag, user manual |
Stud Detection Mode
Before your first use, calibrate the stud finder on an open wall area with no studs. Place the device flat against the wall and press the detection button until you get a baseline reading. To locate studs, slowly move the device horizontally across the wall. When the upper edge of a stud is detected, a vertical laser line automatically projects, the top LED turns red, and an audio alert sounds. Mark this edge, then repeat from the opposite side to find the opposite edge and determine the stud's exact width and position.
Laser Level Mode
Activate laser mode and place the device flat against your wall or floor. Use the two LED bubble vials on the back to align the device: center the bubbles for accurate horizontal, vertical, or cross-line projection. The laser will project the alignment line up to 30 feet. This manual-leveling approach requires a few seconds of setup but provides reliable reference lines for hanging shelves, frames, and other level-dependent tasks.
Mounting the Device
Use the included 360-degree rotating wall mount for hands-free operation. Attach it using the 2 pins for rough surfaces, the 6 self-adhesive strips for smooth surfaces, or the top pin hole for hard surfaces. Ensure the mounting surface is clean and dry before applying adhesive strips for best adhesion.
AC Wire Detection
The Prexiso's AC wire detection feature alerts you when live electrical wiring is present up to 1.5 inches deep. Always heed these alerts and avoid drilling or fastening in detected areas. This feature is a critical safety tool that helps prevent electrical shock and damage to your home's wiring.
Laser Safety
This device is a Class II laser product with output less than 1 milliwatt. Never point the laser directly at eyes or reflective surfaces. Keep the device away from children during use. The laser is safe for indoor home use when operated according to the manufacturer's instructions.
Surface Preparation
Self-adhesive strips lose effectiveness on dusty, coarse, or wallpapered surfaces. Clean the mounting surface thoroughly before applying strips, or replace strips if they become dirty or lose stickiness. For maximum safety and stability, use the pin mounting option on rough or textured surfaces.
Wall Type Compatibility
This tool is optimized for drywall and wood walls. It is not designed for lath and plaster walls, which are common in older homes. Using it on incompatible wall types may produce inaccurate results.
Calibrate Before Each Session: Run a quick calibration on open wall space before starting your project. This ensures the stud finder accounts for the specific drywall and environmental conditions in your home.
Mark Both Stud Edges: For the most accurate stud location, detect and mark both the left and right edges. This reveals the stud's exact width and center point, which is crucial for secure fastening and weight distribution.
Use the Rotating Mount for Efficiency: The 360-degree wall mount allows you to leave the device mounted while you mark multiple points or check alignment. This saves time and keeps your hands free for marking or fastening.
Check AC Wires Before Drilling: Always run the AC wire detection across your marking area before drilling holes. Even if you don't expect wiring, unexpected electrical runs exist in many homes.
Clean Adhesive Strips Regularly: Keep the self-adhesive strips clean and replace them if they lose stickiness. Dirty or worn strips won't hold the device securely and can lead to inaccurate measurements.
Combine Both Functions: Use stud detection to find studs, then activate laser mode to establish a level reference line. This two-step approach ensures both accuracy and proper alignment for professional-looking results.

Pros
- Superior sensor count (13) means fewer false positives and more reliable stud location than standard finders
- Shows both stud edges and center simultaneously, eliminating guesswork on wall framing
- Works immediately without calibration, saving time on every job
- Live wire detection provides essential safety feature for electrical awareness
- Proven track record with strong consumer and professional ratings
Cons
- Requires two AA batteries (not included in purchase), adding a small additional cost
- 1.5-inch detection depth limits effectiveness on thicker walls or heavily insulated cavities
The Franklin Sensors ProSensor M210 stands out in a crowded market by packing 13 individual sensors into a handheld scanner. This multi-sensor approach addresses a real frustration with traditional stud finders: false positives and missed studs. By scanning across a wider detection area simultaneously, the M210 identifies not just where studs are located, but also their exact edges and center point, which proves invaluable when you need precision placement for shelving, mounting brackets, or structural work.
What makes this tool genuinely useful for DIYers is its no-calibration design. You don't need to find a blank wall section, press buttons in sequence, or wait for initialization. Simply press and hold the power button and start scanning anywhere, even directly over a stud. The precision LEDs light up to show the center and edges, making it easy to mark your studs accurately. The addition of live wire detection adds a practical safety layer that prevents accidental contact with electrical lines during drilling or cutting operations.
The M210 handles wood studs, metal studs, and works through standard drywall with a maximum detection depth of 1.5 inches. For most residential applications and typical wall construction, this depth is sufficient. The device is compact and lightweight, making it easy to carry between rooms or job sites. Keep in mind you'll need to supply two AA batteries, and the detection capability does have limits with unusually thick or heavily insulated walls.
| Specification | Details |
|---|---|
| Brand | Franklin Sensors |
| Model | ProSensor M210 |
| Color | Green |
| Dimensions | 7.5 x 3.35 x 3.33 inches |
| Weight | 0.71 pounds |
| Sensor Count | 13 sensors |
| Detection Depth | Up to 1.5 inches |
| Detects | Wood studs, metal studs, live wires |
| Calibration | None required |
| Power Source | Two AA batteries (not included) |
| Made In | USA |
Getting Started: Install two AA batteries in the device and ensure the battery compartment is secure. No setup or calibration is needed before use.
Scanning for Studs: Hold the M210 flat against the wall where you want to locate studs. Press and hold the power button to begin scanning. The device can be started anywhere on the wall, even directly over a stud, without giving false readings. Move the scanner slowly across the wall surface.
Reading the Display: The precision LEDs will illuminate to show stud location. The center LED indicates the middle of the stud, while the outer LEDs show the edges. This dual display helps you identify single studs, double studs, and irregular framing patterns. Mark the center and edges with a pencil for accurate mounting or cutting.
Checking for Electrical: The live wire meter will alert you if electrical current is present in the wall. Always check for wires before drilling or cutting into drywall, especially near outlets and switches.
Mark Both Edges: Use the simultaneous center and edge detection to mark both sides of each stud. This helps you understand wall framing and plan projects more accurately.
Scan Multiple Times: Run the scanner over the same area 2-3 times to confirm stud location. Consistency in readings increases confidence in your findings.
Check for Double Studs: The M210 excels at detecting double studs (studs placed side-by-side) that other finders might miss. Look for two closely spaced readings to identify these.
Battery Management: Keep spare AA batteries in your toolbox. Weak batteries can reduce detection accuracy and LED brightness.
Electrical Safety First: Always use the live wire detection feature before drilling near outlets, switches, or areas where electrical lines are likely to run. This simple step prevents dangerous mistakes.
Who Should Buy This? The ProSensor M210 is ideal for homeowners tackling hanging shelves, mounting TVs, installing cabinets, or any project requiring accurate stud location. It's equally valuable for professional contractors and carpenters who need reliable, fast stud detection on job sites.
What Makes It Different? The 13-sensor design is the key differentiator. Most affordable stud finders use 1-2 sensors and require calibration. The M210's multi-sensor approach reduces false positives and provides simultaneous edge and center detection, which is genuinely helpful for precision work.
Limitations to Know: The 1.5-inch detection depth works for standard wall construction but may struggle with thicker walls, extensive insulation, or plaster over brick. If your home has unusual wall construction, verify the M210 meets your needs.
Value Consideration: This is a mid-range stud finder positioned between basic single-sensor models and premium options. The added accuracy from 13 sensors, combined with the no-calibration design and live wire detection, justifies the investment for serious DIYers and professionals who use this tool regularly.

Pros
- 13-sensor array provides the most accurate stud detection on the market, eliminating false positives
- Dual detection modes handle specialty wall types including plaster, lath, OSB, and multi-layer construction
- No calibration needed - simply press and hold the button to start scanning from any position
- Wide LED display shows complete stud width, edges, and center simultaneously for confident drilling
- Built-in bubble level and pencil holder add practical value for wall projects
Cons
- Higher price point compared to basic single-sensor stud finders limits appeal to budget-conscious buyers
- Requires two AA batteries, which are not included in the package
The Franklin Sensors ProSensor MAX represents a significant leap forward in stud-finding technology. With 13 sensors working in tandem, this device delivers accuracy that conventional single or dual-sensor models simply cannot match. Whether you're hanging heavy shelving, mounting a TV, or installing cabinets, the precision and reliability of this tool eliminates the anxiety of drilling into empty space or, worse, hitting a stud unexpectedly.
What sets the ProSensor MAX apart is its versatility and ease of use. The dual detection modes make it equally capable in modern drywall homes and older plaster-and-lath construction, as well as specialty applications like earthquake-resistant walls with OSB layers and multi-layer condo walls. The no-calibration design means you can start scanning immediately without fussing with setup procedures, and the wide LED display shows you the complete stud width, not just a point, giving you full confidence in your drilling location.
Built for both professionals and serious DIYers, the ProSensor MAX combines American manufacturing with thoughtful extras like an integrated bubble level and pencil caddy. The 2.5-inch detection depth handles even thick walls, and the durable construction suggests this is a tool that will serve you reliably across multiple projects for years to come.
| Specification | Details |
|---|---|
| Brand | Franklin Sensors |
| Model | ProSensor MAX |
| Number of Sensors | 13 |
| Color | Yellow |
| Dimensions | 9 x 4.5 x 3.1 inches |
| Weight | 1.1 pounds |
| Detection Depth | Up to 2.5 inches |
| Detection Modes | 2 modes (standard and multi-layer) |
| Battery Requirements | Two AA batteries (not included) |
| Built-in Features | Bubble level, low battery indicator, pencil caddy |
| Category | Tools & Home Improvement |
Getting Started: Insert two AA batteries into the battery compartment on the back of the device. No calibration is needed before use.
Basic Stud Detection (Mode 1): Place the ProSensor MAX flat against the wall at any location. Press and hold the power button. The device will scan and the LED lights will illuminate to show the stud location. The outer LEDs indicate the stud edges while the center LEDs show the stud center. Mark your drilling or mounting points once you've confirmed the stud location.
Multi-Layer Detection (Mode 2): Press the mode button to switch to Mode 2 for detecting studs through multiple drywall layers, plaster and lath, OSB, plywood, or large tile surfaces. Use the same scanning technique as Mode 1. This mode is ideal for condos, townhomes, older homes, and specialty wall constructions.
Pro Tip: Always scan vertically up and down the wall to confirm stud location before drilling. The built-in bubble level helps ensure your shelves or mounts will be perfectly horizontal.
Maximize Accuracy: Scan the same area multiple times from slightly different positions to confirm stud location. The ProSensor MAX's 13-sensor array is so precise that you'll get consistent results, building confidence before you drill.
Work with Specialty Walls: If you live in an older home or a condo with unusual wall construction, Mode 2 is your best friend. Test it on a known stud location first to familiarize yourself with how it responds in your specific wall type.
Battery Management: Keep spare AA batteries on hand. The low battery indicator will alert you when power is running low, but it's better to replace them proactively during a project than to lose accuracy mid-scan.
Mark Carefully: Use the pencil caddy included with the tool to mark both stud edges and center points. This gives you multiple reference lines for safe drilling and mounting, especially important for heavy items like TVs or shelving.
Check Horizontally and Vertically: Studs run vertically, but scanning horizontally across the wall helps you identify the exact top and bottom of the stud cavity, useful for routing wires or planning cabinet placement.
Who Should Buy the ProSensor MAX: This tool is ideal for homeowners and DIYers who hang heavy items regularly, work on multiple wall types, or value accuracy and reliability above all else. Professionals will appreciate its durability and precision. It's also the right choice if you live in an older home with plaster and lath, a condo with multi-layer walls, or any specialty construction.
Key Considerations: The ProSensor MAX is a premium stud finder, priced higher than basic models. However, the 13-sensor accuracy, dual detection modes, and no-calibration convenience justify the investment for anyone who wants to get it right the first time. The tool requires two AA batteries, which you'll need to purchase separately.
Alternatives: If you only need to find studs in standard drywall and want a lower-cost option, basic single-sensor stud finders are available. However, they offer less accuracy and no multi-layer detection capability. For serious home projects and long-term use, the ProSensor MAX delivers superior value.
What's Included: The ProSensor MAX comes ready to use with a built-in bubble level and pencil caddy. You'll need to supply two AA batteries. The tool is designed to last through countless projects with proper care.

Pros
- Multiple detection modes handle different materials and depths effectively
- Backlit LCD screen and audio alerts make it usable in dim lighting conditions
- Compact, lightweight design is convenient for one-handed operation
- Affordable price point for a multi-function detection tool
- Identifies live AC wires, adding a safety layer most basic stud finders lack
Cons
- No customer reviews available yet, so real-world reliability data is limited
- Requires calibration on each wall section, which adds time compared to some premium models
The JAXWQ 5-in-1 stud finder stands out as a multi-purpose wall scanner designed to handle the common detection tasks homeowners and DIYers face. Its intelligent micro-sensor chip evaluates wood studs, metal pipes, joists, and live AC wires behind walls, floors, and ceilings. The backlit LCD display shows center and edge locations with corresponding audio alerts, making it practical for both bright and low-light work environments.
What sets this scanner apart is its three dedicated scan modes. Stud scan mode pinpoints the center of wooden studs, deep scan mode reveals the width of larger objects like pipes and wires, and metal scan mode isolates metallic materials. This flexibility means you're not locked into one detection method, allowing you to adapt the tool to different wall compositions and installation scenarios. The compact 2.8 x 1.8 x 6.8 inch form factor keeps it accessible in a toolbelt or drawer.
The primary value proposition centers on safety and efficiency. Before mounting a TV, hanging heavy shelves, or installing bathroom fixtures, this scanner helps you avoid striking live wires or damaging plumbing, which can result in expensive repairs and dangerous situations. For homeowners tackling wall projects independently, having live wire detection built in provides peace of mind that basic stud finders cannot match.
| Specification | Detail |
|---|---|
| Brand | JAXWQ |
| Color | Yellow Feathers |
| Dimensions | 2.8 x 1.8 x 6.8 inches |
| Detection Modes | Stud, Deep, Metal |
| Detects | Wood studs, metal pipes, joists, live AC wires |
| Display | Backlit LCD with audio alerts |
| Product Type | Wall scanner/stud detector |
Getting Started: Ensure the wall is clean and dry. Press the power button and allow the scanner to calibrate on the wall surface you're scanning. This step is essential for accurate readings.
Scanning for Studs: Activate stud scan mode and slowly move the scanner horizontally across the wall. The LCD display will illuminate when it detects the edge of a stud. Continue moving until the display shows the center location, then mark that spot. Repeat the process a few inches higher or lower to confirm the stud's vertical alignment.
Detecting Wires and Pipes: Switch to metal scan mode or deep scan mode depending on what you're searching for. Move the scanner methodically across the area where you plan to drill or mount hardware. Listen for audio alerts and watch the LCD for visual indicators. Always assume live wires are present until proven otherwise, and consider calling a professional electrician if you're uncertain about wire locations.
Before You Hang Anything: Never rely solely on a stud finder when mounting heavy objects. Always verify stud locations with a second method, such as visual inspection or a small exploratory hole. Use appropriate anchors and fasteners rated for your wall type and load weight.
Live Wire Detection: The built-in AC wire detection is a helpful safety feature, but it is not a substitute for professional electrical inspection. If you suspect live wires in a wall or have any doubts, consult a licensed electrician. Never drill or cut into walls without confirming there are no electrical lines or plumbing in the path.
Proper Calibration: Calibrate the scanner on each new wall section before scanning. Walls with different materials, thickness, or moisture content require fresh calibration to maintain accuracy. Keep the scanner clean and dry, and follow the manufacturer's battery and maintenance guidelines.
Mark Multiple Reference Points: Once you locate a stud, mark both the center and edges with a pencil or painter's tape. This reference helps you visualize the stud's full width and plan your mounting hardware placement more confidently.
Scan Vertically and Horizontally: Studs run vertically, but scanning horizontally across the wall at different heights helps confirm the stud's location and reveals any irregularities. Studs are typically spaced 16 or 24 inches apart, so use this spacing as a secondary verification method.
Use Multiple Scan Modes: If you're unsure what you're detecting, switch between stud and metal scan modes. This comparison helps you distinguish between wooden studs and metal pipes or brackets, reducing the risk of mounting into the wrong object.

Pros
- Dual detection modes (wood and metal) make it versatile for different wall types and fastening projects
- Center-marking channel helps you position fasteners precisely without guesswork
- Auto-calibration saves time and reduces user error compared to manual calibration models
- AC and live wire detection adds peace of mind when working near electrical circuits
- Compact profile and included AAA batteries mean you're ready to use right out of the box
Cons
- Limited to 3/4 inch detection depth, which may not reach studs in walls with thicker drywall or insulation
- Won't work through concrete, tile, brick, or foil-faced materials, restricting use in certain wall types and finished surfaces
The DEWALT DW0100 stud finder delivers solid performance for homeowners and DIYers tackling hanging shelves, mounting TVs, or installing cabinets. Its center-find technology is particularly useful because it identifies the middle of the stud rather than just its edges, giving you the confidence to drive fasteners into the strongest part of the framing. The combination of directional LED arrows and an audible alert means you get both visual and audio confirmation, making it nearly impossible to miss a stud location.
Safety features set this model apart from budget alternatives. The AC and live wire detection capability helps protect you from accidental contact with electrical wiring during installation, which is a genuine concern in older homes or walls with unpredictable layouts. The constant auto-calibration system also reduces the frustration of manual recalibration, letting you move from room to room without pausing to reset the device.
The main limitation is the 3/4 inch detection depth. In walls with thick insulation, multiple layers of drywall, or textured surfaces, this sensor may struggle or fail to locate studs reliably. Additionally, it won't work through finished surfaces like ceramic tile or concrete, so your wall type matters. For standard drywall construction in typical American homes, however, the DW0100 handles everyday fastening tasks efficiently and affordably.
| Specification | Details |
|---|---|
| Brand | DEWALT |
| Model | DW0100 |
| Detection Depth | 3/4 inch (wood and metal) |
| Key Features | Center-find technology, LED directional arrows, audible alert, AC and live wire detection, auto-calibration |
| Dimensions | 5.88 x 1.3 x 9 inches |
| Weight | Approximately 0.6 ounces |
| Power | AAA batteries (included) |
| Color | Multi |
| Category | Tools & Home Improvement |
Getting Started: Insert the included AAA batteries into the device and allow the auto-calibration system to initialize. No manual setup is required.
Scanning Walls: Place the stud finder flat against the wall and press the power button. The device will emit a sound and light up when it detects the edge of a stud. Move it slowly across the wall to find the center marking channel, which shows the exact middle of the stud.
Marking and Fastening: Use the center-marking channel as your guide for drilling pilot holes or driving fasteners. The directional LED arrows help you stay centered as you move vertically along the stud.
Special Surfaces: Avoid using this sensor on concrete, tile, brick, or foil-faced materials. It works best on standard drywall and plaster surfaces over wood or metal framing.
AC and Live Wire Detection: The DW0100 includes AC and live wire detection to alert you to electrical circuits. Always pay attention to these alerts before drilling or fastening, and consider having an electrician mark electrical lines if you're unsure about wall wiring.
Battery Maintenance: Replace batteries promptly if the device stops responding or if the LED indicators dim. Weak batteries can cause false readings.
Calibration on Clear Walls: Always calibrate the stud finder on an open area of wall away from any framing before scanning. This ensures accurate readings throughout your project.
Avoid Problematic Surfaces: Do not attempt to use this sensor on concrete, tile, brick, mortar, or metallic surfaces. These materials will either block detection or produce unreliable results.
Who Should Buy This: The DEWALT DW0100 is ideal for homeowners and casual DIYers who hang shelves, mount TVs, install cabinets, or work on standard wall projects. It's also a good choice for contractors who need a reliable, no-fuss stud finder without premium features.
Wall Type Compatibility: This sensor works best on standard drywall over wood or metal studs. If your home has concrete walls, brick, tile, or unusual construction, you may need a different tool. Check your wall type before purchasing.
Detection Depth Considerations: The 3/4 inch detection depth is sufficient for most residential drywall. However, if you have walls with extra-thick insulation or multiple layers of drywall, you may experience reduced reliability.
Feature Priorities: Choose this model if center-find accuracy and AC/live wire detection matter to you. If you need maximum detection depth or the ability to work on specialty surfaces, you may need to invest in a higher-end stud finder.
Stud Finder Buying Guide
Before you commit to any one model, it helps to understand what separates a reliable stud finder from a frustrating one. The market ranges from stripped-down single-sensor tools to multi-sensor wall scanners loaded with detection modes. Use the sections below to figure out which features actually matter for your specific projects.
Detection Technology: Magnetic vs. Electronic
The two main types of stud finders work on completely different principles. Magnetic models use a magnet to locate the metal screws or nails driven into studs during framing. They require no batteries, never need calibration, and work on any wall surface including old plaster over lath. The tradeoff is that you are finding the fastener, not the stud center, so you have to probe along the wall to map the full stud width.
Electronic models use capacitive or radar sensors to detect density changes behind the wall surface. Entry-level electronic finders use a single sensor and must be swept across the wall to identify edges. Multi-sensor models like the Franklin Sensors ProSensor M150 and the ProSensor M210 light up LEDs simultaneously across the entire stud width, eliminating the sweep-and-guess routine. If you are doing a significant drilling and fastening project, multi-sensor electronic finders are worth the premium. For the occasional picture hook, a basic electronic or magnetic model gets the job done at a budget price point.
Sensor Count and Detection Width
Single-sensor finders detect one point at a time. You must calibrate on a clear section of wall, then slide the tool until it beeps or lights up at a stud edge, then repeat from the other direction to find center. This works, but it demands patience and a steady hand.
Multi-sensor designs change the experience entirely. The Franklin Sensors ProSensor M150 packs nine sensors into its scanning face, while the ProSensor M210 and its green-colored sibling use thirteen sensors spanning roughly three and a half inches. When you press the tool against the wall, every sensor behind the stud lights up instantly. You see the full stud width at a glance, mark both edges, and move on. For trim work, heavy garage shelving installations, or any project involving multiple anchor points in a row, this multi-sensor approach dramatically reduces error.
Live Wire and AC Detection
Knowing where a stud sits is only half the job. Walls also hide electrical cables, and drilling into a live wire is a serious safety hazard. Better stud finders include an AC live wire detection mode that alerts you to energized wiring before your drill bit gets anywhere near it. The Franklin Sensors ProSensor M150, M210, and ProSensor MAX all include live wire detection alongside their multi-sensor stud scanning. The PREXISO 2-in-1 model also incorporates wire detection in addition to its built-in cross-line laser level.
If you are working in an older home with aluminum wiring or knob-and-tube runs, pair your stud finder with a non-contact voltage tester before drilling, regardless of what the scanner shows. AC detection is a helpful first alert, not a substitute for proper electrical safety. Speaking of safety around the home, reliable smart smoke detectors are another low-cost upgrade worth considering for any renovation project.
Wall Surface Compatibility
Standard drywall is the easiest surface to scan. Most electronic stud finders handle it without issue. Problems arise with thicker or denser wall materials: tile over cement board, double-layer drywall, wood paneling over drywall, plaster over lath, and OSB sheathing all challenge basic single-sensor tools. If your home has original plaster walls or you are working in a commercial space with thicker construction, look specifically for a deep-scan or multi-surface capable model. The Franklin Sensors ProSensor MAX is designed for these demanding surfaces, including plaster, OSB, and lath, and represents the premium end of the lineup covered here.
Metal Stud Detection
Residential construction almost always uses wood framing, but commercial buildings, basement finishing projects, and some newer construction use metal studs. Metal studs require anchoring hardware designed specifically for them, since standard wood-screw anchors will not hold. Make sure any electronic finder you consider specifically lists metal stud detection in its feature set, not just metal object detection. There is a meaningful difference between finding a metal stud at regular intervals and picking up a random nail or plumbing run. Most of the Franklin Sensors models and the JAXWQ 5-in-1 finder in this lineup detect both wood and metal studs as labeled modes.
Built-in Laser Level and 2-in-1 Designs
If you frequently hang frames, shelving brackets, or cabinetry, a stud finder with an integrated laser level saves you from juggling two separate tools. The PREXISO model in this roundup combines multi-surface stud and wire detection with a rechargeable cross-line laser, projecting both horizontal and vertical reference lines simultaneously. It is a genuinely useful pairing for tasks where level alignment matters as much as finding the anchor point. That said, it adds size and cost, so if you only need to find studs occasionally, a dedicated compact finder will serve you better. When your project expands to full workshop setups or larger renovations, investing in more versatile combo tools starts making sense.
Display Type and Ease of Use
How a stud finder communicates its readings matters more than most buyers expect. LED arrays like the ones on Franklin Sensors models give an immediate, intuitive picture of stud location with no screen to read. LCD displays, as seen on the JAXWQ 5-in-1 and similar tools, show numerical depth readings and mode labels, which helps when you want to know how deep the stud sits rather than just where it is. Simple beeper-and-LED indicators on budget models like the DEWALT DW0100 are fast and reliable for straightforward scans. Whichever style you pick, make sure the feedback is visible in the lighting conditions where you will actually use it.
Calibration requirements are another usability factor. Edge-scanning electronic tools require you to place the unit flat against a known clear section of wall, hold it still, and wait for calibration before scanning. Multi-sensor array tools like the Franklin ProSensor line skip this entirely since the sensor array detects stud presence instantly on contact. For users who find calibration fussy or unreliable, the instant-on multi-sensor approach is a major quality-of-life improvement. If you already own solid claw hammers and hand tools but keep struggling to find anchoring points, upgrading to a multi-sensor finder is often the single biggest accuracy improvement you can make.
Build Quality and Battery Life
Stud finders get tossed in tool bags, dropped on concrete, and used in dusty environments. A rubberized grip, solid button tactility, and a housing that does not flex under hand pressure are worth paying attention to. Franklin Sensors builds its ProSensor lineup in the USA, which is part of what justifies the price premium. DEWALT’s DW0100 follows the brand’s usual approach of durable, compact construction aimed at trade workers who need a reliable tool that survives a jobsite.
Battery life rarely matters much for occasional home use, but for anyone doing a long day of framing layout or renovation work, it adds up. Most tools in this category run on standard AA or AAA alkaline cells. The PREXISO model is rechargeable via USB, which is convenient if you would rather not stock spare batteries. As with any power tool investment, matching the build quality to your actual usage frequency prevents both overspending and premature wear. A compact shop vac nearby keeps the drywall dust from interfering with scans on freshly cut walls.
Budget Guidance by Use Case
Entry-level stud finders at a budget price point, like the DEWALT DW0100, handle standard drywall reliably and suit homeowners who hang pictures or mount the occasional shelf a few times a year. Mid-range models in the moderate price tier, such as the Franklin Sensors M150 and the JAXWQ 5-in-1, add multi-mode detection and either multi-sensor arrays or HD LCD displays, making them well suited to active DIYers who work on walls regularly. Premium models at a higher price point, including the Franklin Sensors M210 variants and the ProSensor MAX, are designed for frequent use, challenging wall surfaces, and professional tradespeople who need consistent accuracy across a variety of conditions. Pair any of these with quality finishing tools and you have a renovation toolkit that covers most home improvement tasks.
Why Trust HomeThru
HomeThru is an independent editorial platform with no financial ties to manufacturers or retailers. We do not accept free products in exchange for coverage, and our recommendations are never influenced by advertising relationships. Our team researches each category by analyzing verified user feedback at scale, evaluating spec sheets against real-world use cases, cross-referencing independent professional assessments, and applying our own editorial criteria around durability, usability, and long-term value. Every product in this roundup was selected on merit. If a model did not hold up to scrutiny, it did not make the list.
Our focus for stud finders centered on four core criteria: detection accuracy across multiple wall types, clarity of feedback (how easily the user interprets the result), breadth of detection modes (wood, metal, and AC wire), and build quality relative to price. We weighed these factors differently depending on the intended user, which is why our lineup spans from a compact budget pick up to a premium professional-grade multi-surface scanner. For deeper context on adjacent tool categories, see our coverage of jigsaws for cutting curves and trim work and air compressors for the workshop.
Final Thoughts
Stud finders span a wider range of technology and price than most homeowners realize, and the right choice depends heavily on how often you use one, what your walls are made of, and whether you need additional detection modes for safety or precision. Here is a summary of our standout picks from this lineup:
- Best Overall: Franklin Sensors ProSensor M210 (Black) delivers thirteen-sensor simultaneous detection with live wire alerts, covering most home and professional needs in a single well-built tool made in the USA.
- Best for Professional Use: Franklin Sensors ProSensor MAX is the top-tier choice for anyone working with plaster, OSB, or lath walls where standard scanners struggle.
- Best Mid-Range Value: Franklin Sensors ProSensor M150 gives you nine-sensor detection and live wire alerts at a moderate price point, an excellent balance for serious DIYers.
- Best 2-in-1 Pick: PREXISO 2-in-1 Stud Finder with Laser Level is ideal for anyone who regularly hangs art, shelves, or cabinetry and wants a level reference built right into their scanner.
- Best Budget Pick: DEWALT Stud Finder DW0100 covers the basics at an accessible price, making it the right starting point for occasional home use on standard drywall.
Whatever your project scope, having a reliable stud finder in your kit removes one of the most common causes of wasted time and damaged walls. If you are building out a more complete home workshop alongside your new scanner, our guides to bench grinders for power and safety and garage door openers worth upgrading to are worth a look. For home security while renovations are underway, wireless home security systems offer peace of mind at a range of price points.
Frequently Asked Questions
Still have questions about stud finders before you buy? The answers below address the most common points of confusion we hear from homeowners working through this decision.
Do I Need a Stud Finder for Light Hanging Projects?
For lightweight items under about ten pounds, drywall anchors are often sufficient and no stud is required. However, for anything heavier, including large mirrors, shelving units, or wall-mounted electronics, hitting a stud is the only reliable approach. A budget stud finder pays for itself on the first job where it prevents you from pulling a shelf out of the wall. It also doubles as a wire detector, which is a safety bonus regardless of project size. For a broader set of home protection upgrades, small tools like this add up quickly in value.
Why Does My Stud Finder Give False Readings?
False positives usually come from one of three sources: inconsistent wall texture or paint thickness, moisture in the drywall, or metal objects like pipes, ductwork, and conduit running inside the wall. Edge-detection single-sensor tools are especially prone to this because any density change registers as a potential stud. Multi-sensor array models reduce false positives significantly because they require the density change to span a consistent width matching a real stud before triggering a full alert. If false readings persist, check for moisture and try scanning from both directions to confirm.
What Is the Difference Between Edge and Center Detection?
Edge detection means the finder alerts you when it crosses from open wall cavity to the edge of a stud. You have to scan from both directions and mark both edges, then measure the midpoint for center. Center detection mode calculates this midpoint automatically and indicates it with a separate signal or marker. For drilling one anchor at a time, either mode works. For driving multiple fasteners along a stud run, center detection saves several minutes of calculation per stud. Multi-sensor array finders display the entire stud width at once, which visually achieves the same result as center detection instantly.
Can a Stud Finder Work on Tile or Concrete Walls?
Standard capacitive electronic stud finders are calibrated for drywall and do not work reliably on tile, concrete, or masonry. Tile walls typically sit over cement board or mortar bed, which is too dense and too thick for most consumer-grade scanners. For masonry or concrete walls, you need a dedicated masonry anchor system rather than stud-finding equipment. Some professional-grade radar-based scanners can penetrate denser materials, but those are outside the residential price range covered in this guide. For standard tile-over-drywall installations in bathrooms, finding the stud before the tile was hung and marking the stud location externally is the most reliable approach.




Write Your Review
No reviews yet. Be the first to share your experience!