

A roofing nailer is one of those tools you genuinely cannot afford to cut corners on. Whether you are a seasoned contractor laying thousands of shingles a season or a homeowner tackling a weekend repair after a storm, the right pneumatic or cordless roofing nail gun makes the difference between a watertight roof and a callback job. The best roofing nailers drive nails consistently at the correct depth, resist tar buildup, and hold enough nails in the magazine to keep you on the roof longer between reloads. The HomeThru editorial team independently researched, compared, and evaluated the top-rated models on the market, looking at everything from nail capacity and firing mode to weight, ergonomics, and warranty coverage. If you are gearing up for a bigger project and need a reliable air supply, pairing your nailer with a capable shop vac for jobsite cleanup and a properly sized air compressor rounds out your setup nicely.
Top Roofing Nailers We Recommend

Pros
- Lightweight and well-balanced design reduces user fatigue and makes it easier to work on steep pitches and tight angles
- High-capacity 120-nail magazine means fewer reloads and more continuous work without interruption
- Reduced recoil and advanced drive system deliver consistent, accurate nail placement with minimal misfires
- Rugged all-metal body and included spare parts ensure long-term durability and easy maintenance
- Operates reliably at 70-120 PSI, making it compatible with most standard air compressors on job sites
Cons
- No reviews currently available, so real-world user feedback on long-term durability and performance cannot yet be verified
- Requires an air compressor and hose setup, adding to overall equipment cost and limiting portability compared to cordless models
The AeroPro CN45N pneumatic roofing nailer is engineered for professional roofers and experienced DIYers who need speed and reliability on the job. Firing up to 3 nails per second with consistent accuracy, this tool delivers the rapid-fire performance that makes a real difference when you're covering large roof areas with asphalt shingles. Operating at 70-120 PSI, it pairs well with standard jobsite compressors and maintains steady power throughout the day without performance drops.
What sets the CN45N apart is its thoughtful design for all-day comfort and control. At just 5.5 pounds with a well-balanced frame, it significantly reduces hand and arm strain during extended roofing sessions, especially when working on steep pitches or awkward angles. The 120-nail magazine capacity means you spend less time reloading and more time driving nails, which directly translates to faster project completion and higher productivity. The advanced drive system minimizes recoil and kickback, giving you better command over nail placement and reducing the likelihood of jams or misfires.
Built with a rugged all-metal body, the CN45N is designed to handle the demands of professional roofing work in all weather conditions. The tool comes with a helpful spare parts kit including safety glasses, a piston bumper, and multiple feeder springs, which supports easy maintenance and extends service life. For contractors and serious homeowners looking for contractor-grade reliability without the premium price of top-tier brands, this nailer delivers solid performance and durability.
| Specification | Details |
|---|---|
| Brand | AeroPro |
| Model | CN45N |
| Type | Pneumatic Roofing Nailer |
| Nail Type | 15-Degree Coil Nails |
| Nail Length Range | 3/4 inch to 1-3/4 inch |
| Magazine Capacity | 120 Nails |
| Loading Style | Side-Loading |
| Fire Rate | Up to 3 Nails per Second |
| Operating Pressure | 70-120 PSI |
| Weight | 5.5 Pounds |
| Dimensions | 11.13 x 5 x 10.63 inches |
| Color | Black |
| Construction | All-Metal Body |
| Included Accessories | UV Safety Glasses, Clear Safety Glasses, Piston Bumper, Feeder Spring Set (10 Springs) |
Setup and Preparation: Connect the CN45N to a pneumatic compressor using an air hose rated for your PSI range. Ensure the compressor is set to operate between 70 and 120 PSI for optimal performance. Always wear the included safety glasses before beginning work, and inspect the tool for any visible damage or loose parts.
Loading Nails: Open the side-loading magazine and insert a coil of 15-degree roofing nails (3/4 inch to 1-3/4 inch length). The magazine holds up to 120 nails, so you can work longer between reloads. Close the magazine securely and ensure it's properly seated before operating the tool.
Operating the Nailer: Position the nailer at a 90-degree angle to the roof surface, with the tip flush against the shingle or roofing material. Squeeze the trigger smoothly to drive the nail. The tool fires up to 3 nails per second, so maintain steady pressure and control for accurate placement. The reduced recoil design helps keep the nailer stable during rapid firing.
Maintenance: After each use, disconnect the air hose and allow any residual pressure to release. Clean the exterior with a dry cloth and inspect the magazine and feeder mechanism for debris. Periodically oil the tool according to manufacturer guidelines to maintain smooth operation and extend service life.
Always Wear Eye Protection: The CN45N comes with both UV and clear safety glasses. Wear one pair at all times when operating the nailer to protect against nail deflection, debris, and dust. Never operate this tool without proper eye protection.
Secure Your Work Area: Make sure the roof or work surface is stable and secure before beginning. Use proper fall protection equipment if working at heights. Keep bystanders and helpers away from the work area to prevent accidental injury from nail discharge or recoil.
Check Air Pressure: Verify that your compressor is set to the correct operating range of 70-120 PSI before starting work. Pressure outside this range can cause misfires, jams, or inconsistent nail driving, increasing the risk of accidents or damage.
Inspect Before Use: Before each work session, examine the nailer for cracks, loose parts, or damage to the air hose connection. A damaged tool or hose can fail unexpectedly during operation, creating a safety hazard. Replace worn or damaged parts immediately.
Proper Trigger Control: Keep your finger off the trigger when moving between nail locations or adjusting your position. Never point the nailer at yourself or others, and always assume the tool is ready to fire. Treat it with the same respect you would a firearm.
Optimize Your Air Supply: Use a large-capacity compressor (at least 4-6 CFM at 90 PSI) to maintain steady pressure during continuous firing. A smaller compressor may struggle to keep up, causing pressure drops and inconsistent nail driving. Check your compressor manual to confirm it can handle the CN45N's demands before starting a large project.
Maintain Consistent Nail Depth: The CN45N's reduced recoil helps with accuracy, but consistent nail depth depends on proper technique. Keep the nailer perpendicular to the roof surface and apply steady, even pressure. Angled shots or excessive force can result in bent nails or uneven fastening, especially on dense materials.
Load Nails Strategically: The 120-nail magazine is large, but on extended roofing projects, plan your reload breaks during natural transitions (roof sections, material changes). This keeps your workflow smooth and prevents fatigue-related mistakes near the end of a magazine.
Keep the Magazine Clean: Dust and debris can jam the feeder mechanism, causing misfires or slow firing. After each day's work, open the magazine and inspect it for dirt or nail fragments. A quick cleaning with compressed air keeps the tool running at peak efficiency.
Use the Right Nail Coil: Always use 15-degree coil nails within the 3/4 inch to 1-3/4 inch length range specified for the CN45N. Using incorrect nail types or sizes can damage the magazine, feeder springs, or drive mechanism, voiding durability and reliability.

Pros
- Fast firing rate of 10 nails per second dramatically speeds up roofing projects
- Tool-less depth adjustment makes it easy to dial in perfect nail depth without extra tools
- Lightweight and well-balanced design reduces fatigue during overhead or extended work
- Large 120-nail capacity magazine with convenient side-loading minimizes reloading interruptions
- Proven brand reliability with 5-year warranty and consistent pro endorsement
Cons
- Requires air compressor and hose, adding equipment cost if you don't already own one
- No customer reviews available yet, so real-world user feedback is limited
The Metabo HPT NV45AB2 is a purpose-built pneumatic roofing nailer engineered for speed and precision on asphalt shingles and insulation board installation. Operating between 70-120 PSI, it fires up to 10 nails per second, making it ideal for homeowners tackling roof repairs or professionals managing larger roofing projects. The 16-degree magazine holds 120 nails and accepts fasteners from 7/8 inch to 1-3/4 inch, giving you flexibility across different roofing material thicknesses.
What sets this nailer apart is its user-centric design. The tool-less depth of drive adjustment allows you to achieve flush, professional-quality nailing without fumbling for wrenches or additional tools. The side-loading magazine design and quick-return pneumatic system keep you focused on the work rather than fussing with reloading. At just 5.7 lbs with a balanced body, the nailer minimizes hand and arm fatigue during overhead or extended use, which matters tremendously when you're working on a roof all day.
Metabo HPT has earned recognition as the pro-preferred brand of nailers for 12 consecutive years, and this model reflects that heritage. The pneumatic power feed and return system handles harsh conditions reliably, while the 5-year warranty provides confidence in durability. Whether you're a DIYer handling a one-time roof project or a contractor managing multiple jobs, this nailer delivers the speed, accuracy, and reliability you need to get the work done right.
| Specification | Detail |
|---|---|
| Brand | Metabo HPT |
| Model | NV45AB2 |
| Type | Pneumatic Roofing Nailer |
| Color | Green |
| Weight | 5.5 lbs |
| Dimensions | 9 x 4.5 x 10.2 inches |
| Operating Pressure | 70-120 PSI |
| Firing Rate | Up to 10 nails per second |
| Magazine Type | 16-degree, side-loading |
| Magazine Capacity | 120 nails |
| Nail Length Range | 7/8 inch to 1-3/4 inch |
| Warranty | 5 years |
Setup: Connect the nailer to your air compressor using a standard pneumatic hose. Adjust the pressure regulator to between 70-120 PSI for optimal performance. Ensure your compressor has adequate capacity to maintain steady pressure during continuous use.
Loading Nails: Open the side-loading magazine and insert roofing nails (7/8 inch to 1-3/4 inch) into the 16-degree magazine. The magazine holds up to 120 nails, reducing frequent reloading interruptions.
Adjusting Depth: Use the tool-less depth of drive adjustment to set how deep nails sink into your material. Test on scrap material first to ensure flush, professional-quality results without over-driving or under-driving.
Driving Nails: Position the nailer against the roofing material with the nose piece firmly seated. Squeeze the trigger to fire. The quick-return pneumatic system automatically resets the tool for the next nail. Maintain steady pressure and angle for consistent results.
Maintenance: Drain moisture from your air compressor regularly. Periodically check the nailer for debris and apply a light coat of pneumatic tool oil to moving parts to maintain reliability and extend service life.
Before You Start: Always wear safety glasses to protect against flying debris. Use hearing protection, as pneumatic nailers can generate noise above 85 dB. Never point the nailer at yourself, others, or animals, even when not firing.
During Operation: Keep both hands on the nailer to maintain control. Never bypass the trigger safety mechanism. Ensure the nose piece is firmly seated against the material before firing. Keep your fingers and hands clear of the firing path and away from the nose piece.
Air Compressor Safety: Inspect hoses for cracks, leaks, or damage before each use. Secure the hose to prevent tripping hazards. Release air pressure from the compressor before disconnecting the nailer. Never exceed the maximum PSI rating of 120.
Work Environment: Work on stable surfaces and use appropriate fall protection when on roofs or elevated work areas. Secure materials properly to prevent shifting. Keep the work area clear of obstacles and bystanders. Never operate while fatigued or under the influence of substances that impair judgment.
After Use: Always disconnect the air hose and release residual pressure before storing. Store the nailer in a dry location away from moisture and extreme temperatures. Keep out of reach of children.
Pressure Optimization: While the nailer operates between 70-120 PSI, most roofing applications perform best around 90-100 PSI. Too much pressure can damage shingles or over-drive nails; too little won't seat them properly. Dial in the sweet spot on test material first.
Magazine Management: Keep spare nails pre-loaded in the magazine during breaks so you're ready to go immediately when work resumes. The 120-nail capacity means fewer interruptions, but having a backup magazine loaded saves time on larger projects.
Angle and Pressure: Hold the nailer at a slight angle perpendicular to the roof surface for best results. Maintain firm, even pressure against the material throughout the firing motion. Rushing or jerking the trigger can cause inconsistent nail depth.
Material Preparation: Ensure roofing shingles and insulation boards are properly aligned and secured before nailing. Pre-drilling is unnecessary with pneumatic nailers, but proper material positioning prevents crooked nails and wasted fasteners.
Compressor Pairing: Use an air compressor with at least 3-4 CFM at 90 PSI to maintain steady pressure during continuous firing. Undersized compressors struggle to keep up with the 10 nails-per-second firing rate, causing pressure drops and inconsistent results.
Maintenance for Longevity: Add a few drops of pneumatic tool oil to the air inlet weekly during heavy use. This keeps internal components lubricated and extends the nailer's working life. Never use general-purpose machine oil, which can gum up pneumatic tools.

Pros
- Lightweight design (5.7 lbs) reduces fatigue during extended overhead roofing work
- Fast firing rate of 3 nails per second and large 120-nail coil minimize downtime
- Durable aluminum construction with Teflon coating withstands frequent use and harsh weather
- Anti-slip rubber grip and dual-trigger safety system enhance control and prevent misfires
- Backed by a 3-year warranty with video manuals and online support access
Cons
- No customer reviews available yet, so real-world performance feedback from buyers is limited
- Requires a compatible pneumatic compressor with 3/8" air inlet, adding to overall equipment costs
The Toolant roofing nailer is engineered for speed and consistency on the job site. Its ability to fire 3 nails per second while maintaining flush, clean sinks makes it a strong choice for roofers who need to minimize rework and keep projects moving. The 120-nail coil capacity means fewer interruptions to reload, and the 70-120 PSI operating range ensures compatibility with most standard air compressors found on job sites and in home garages.
Durability is a key strength of this tool. The aluminum alloy shell with Teflon coating protects against rust, corrosion, and damage from drops and impacts, which is critical for tools that spend their lives on rooftops and outdoor work environments. The manufacturer's claim of over 500,000 shots lifespan, combined with a 3-year warranty, suggests this nailer is built to handle serious use from both contractors and serious DIYers tackling multiple projects.
Comfort and safety round out the package. At just 5.7 lbs, this nailer won't exhaust your arms during overhead work on sloped surfaces. The anti-slip rubber grip keeps the tool steady in sweaty conditions, while the dual-trigger safety system helps prevent accidental misfires when you're working quickly across a roof. The inclusion of safety glasses, belt hook, and bilingual documentation means you're ready to start working right out of the box.
| Specification | Details |
|---|---|
| Brand | Toolant |
| Nail Size Range | 3/4" to 1-3/4" (15-degree coil) |
| Coil Capacity | 120 nails |
| Operating Pressure | 70-120 PSI |
| Firing Rate | Up to 3 nails per second |
| Weight | 5.7 pounds |
| Dimensions | 11.61 x 10.62 x 4.72 inches |
| Air Inlet | 3/8" universal connection |
| Shell Material | Aluminum alloy with Teflon coating |
| Safety Features | Dual-trigger safety, anti-slip grip |
| Warranty | 3 years |
| Included Accessories | Safety glasses (ANSI Z87.1), belt hook, English-Spanish manual |
Before You Start: Ensure your air compressor is clean and properly maintained. Connect the nailer to your compressor using the 3/8" air inlet. Set the compressor pressure between 70-120 PSI as recommended. Load the 120-nail coil into the magazine by following the directional arrows inside the coil housing. Always wear the included ANSI Z87.1 safety glasses.
Operating the Nailer: Position the nailer perpendicular to your work surface (roofing shingles, siding, fencing, etc.). Press the nose of the nailer firmly against the material. Squeeze the trigger smoothly to fire a nail. The dual-trigger safety system requires proper hand positioning to prevent accidental discharge. Work at a steady pace; the tool is designed to fire up to 3 nails per second, so you don't need to rush.
Maintenance and Safety: After each use, disconnect the air supply and release any remaining pressure. Check the coil magazine regularly for proper nail feeding. Store the nailer in a dry location to protect the aluminum shell. Never point the nailer at people or animals. When moving between work areas, keep your finger off the trigger. If jams occur, disconnect the air supply, clear the jam carefully, and resume work.
Personal Protective Equipment: Always wear the included ANSI Z87.1 safety glasses to protect your eyes from flying debris and nail fragments. Consider wearing hearing protection if working for extended periods, as pneumatic tools can be loud. Wear work gloves to improve grip and protect your hands from sharp nail edges.
Operational Safety: Never aim the nailer at people, animals, or yourself. Keep your hands clear of the firing area and never place your fingers near the nose of the tool while the air supply is connected. Use the dual-trigger safety system as designed; it's your first line of defense against misfires. Disconnect the air supply before clearing jams, loading coils, or performing any maintenance.
Work Environment: Ensure your work area is stable and secure, especially when working on roofs or elevated surfaces. Use proper fall protection equipment if working at heights. Keep your work surface dry to prevent slipping. Never use the nailer while tired, distracted, or under the influence of alcohol or drugs. Store the nailer safely away from children and unauthorized users when not in use.
Pressure Optimization: Start at 70 PSI and gradually increase pressure until nails drive flush and clean without oversinking or undersinking. Different materials (asphalt shingles, wood siding, metal flashing) may require slight pressure adjustments. Keep a pressure gauge on your compressor to maintain consistency throughout your project. This fine-tuning prevents rework and delivers professional-looking results.
Efficiency on the Job: Load your coils before starting work to maximize productivity. The 120-nail capacity reduces downtime, but pre-loading extras keeps you moving fast. Work in a consistent rhythm rather than rushing; the tool is designed for 3 nails per second, so pacing yourself prevents fatigue and improves accuracy. On roofing projects, work from the bottom up to avoid stepping on newly placed shingles.
Maintenance for Longevity: Drain your air compressor's moisture trap before each use to prevent water from entering the nailer, which can cause corrosion and jamming. Keep the air inlet clean and free of debris. After heavy use, disconnect the nailer and fire a few shots into a scrap board to clear any internal moisture. Store the tool in a climate-controlled space to protect the aluminum shell and internal components from rust.

Pros
- Versatile nailer works on asphalt shingles, cedar shingles, siding, underlayment, and sheathing applications
- Tool-free depth adjustment and jam release mechanism make it easy to operate and maintain
- Large 120-piece magazine capacity reduces downtime between reloads on bigger projects
- Well-balanced lightweight design minimizes hand and arm fatigue during extended use
- Adjustable shingle guide takes guesswork out of spacing for professional results
Cons
- No reviews available yet, so real-world durability and long-term reliability remain unverified
- Requires pneumatic compressor setup, which adds cost and setup complexity for those without existing air tools
The DOTOOL CN45C is a 15-degree pneumatic coil roofing nailer engineered for homeowners and contractors tackling shingle replacement, siding installation, and roof underlayment projects. Its 120-piece magazine capacity and side-load design keep you working longer between reloads, while the adjustable shingle guide ensures consistent spacing that makes your roofing look professionally installed.
What sets this nailer apart is its emphasis on user control and convenience. The tool-free depth adjustment lets you fine-tune how deep each nail drives without breaking out wrenches, while the sequential trigger mode gives you precise placement on each shot. The lightweight aluminum body and well-balanced design mean less fatigue during overhead work, and the magnetic nail holder prevents the frustrating jams that slow down projects.
Operating between 70 and 120 PSI, the CN45C integrates easily into existing pneumatic tool setups. The tool-free jam release mechanism keeps you moving when minor hiccups occur, and the straightforward side-load magazine makes reloading quick and intuitive. For DIYers and contractors seeking a capable, user-friendly roofing nailer without unnecessary complexity, this tool delivers solid functionality at a practical price point.
| Specification | Detail |
|---|---|
| Brand | DOTOOL |
| Model | CN45C |
| Type | Pneumatic Coil Roofing Nailer |
| Angle | 15 Degree |
| Nail Length Range | 3/4 inch to 1-3/4 inch |
| Magazine Capacity | 120 pieces |
| Operating Pressure | 70-120 PSI |
| Weight | 5.6 pounds |
| Material | Aluminum (lightweight design) |
| Loading Method | Side-load magazine |
| Depth Adjustment | Tool-free adjustment |
| Trigger Type | Sequential mode |
| Special Features | Magnetic nail holder, adjustable shingle guide, tool-free jam release |
Setup: Connect your pneumatic compressor to the CN45C using the air inlet, ensuring your compressor is set to 70-120 PSI. Load nails into the side-load magazine (capacity: 120 pieces), using the magnetic nail holder to align them properly and prevent jams.
Adjusting Depth: Before your first shot, use the tool-free depth adjustment dial to set how deep nails drive into your material. Test on scrap wood first to dial in the right setting for your specific roofing material (asphalt shingles, cedar shingles, etc.).
Nailing: Position the nailer against your work surface with the shingle guide aligned where you want the nail. Use the sequential trigger (one trigger pull per nail) for precise placement on each shot. For faster work, some users prefer the contact trip mode after gaining experience. Keep the nailer perpendicular to the surface for straight nail entry.
Maintenance: If a jam occurs, use the tool-free jam release mechanism to clear it quickly. Drain your air compressor's moisture trap regularly to prevent water from entering the nailer, which can affect performance. Store the tool in a dry location between uses.
Pressure Safety: Never exceed 120 PSI operating pressure. Check your compressor gauge before each use and ensure the pressure regulator is set correctly. Excessive pressure can cause the nailer to malfunction or drive nails dangerously deep.
Hand and Eye Protection: Always wear safety glasses to protect against flying debris and nail fragments. Use work gloves to maintain grip and protect your hands, especially during overhead roofing work. Consider a dust mask if working in dry, dusty conditions.
Trigger Discipline: Keep your fingers off the trigger until you're ready to drive a nail. Never point the nailer at yourself or others. Use the sequential trigger mode until you're fully comfortable with the tool's operation, as it gives you better control over each shot.
Work Surface Stability: Ensure your ladder, scaffold, or work platform is stable and secure before starting. Never use the nailer while off-balance or reaching awkwardly. Take breaks to avoid fatigue, which increases the risk of accidents during repetitive overhead work.
Compressor Care: Inspect the air hose for cracks or leaks before use. Keep the compressor in good working order and drain moisture regularly. Never leave the nailer connected to a pressurized compressor unattended.
Shingle Spacing: Use the adjustable shingle guide to maintain consistent overlap and spacing across your entire roof. This not only looks professional but also ensures proper water shedding and roof longevity. Mark your guide position on the first row and reference it as you progress.
Material Prep: Before nailing, inspect your shingles or siding for warping or damage. Pre-drill holes in hardwoods like cedar to reduce splitting and nail deflection. On windy days, consider tack-nailing a few shingles by hand first to hold them in place while you drive the rest.
Compressor Sizing: For continuous roofing work, use a compressor with adequate CFM (cubic feet per minute) for your nailer. If your compressor struggles to keep up, you'll experience pressure drops and inconsistent nail depth. A 4-6 gallon tank is typically sufficient for residential roofing projects.
Depth Fine-Tuning: Roofing materials vary in density. Asphalt shingles may require different depth settings than cedar shakes or plywood underlayment. Test your depth adjustment on scrap material of the same type before starting the actual job to avoid over-driving or under-driving nails.
Maintenance Schedule: After each use, disconnect the air hose and clear any remaining pressure from the nailer. Periodically apply a small amount of pneumatic tool oil to the air inlet to keep internal components lubricated and prevent corrosion during storage.
Pros
- Fast firing rate of 10 nails per second dramatically speeds up roofing projects
- Tool-less depth adjustment makes it easy to dial in perfect nail depth without extra tools
- Lightweight and well-balanced design reduces fatigue during overhead or extended work
- Large 120-nail capacity magazine with convenient side-loading minimizes reloading interruptions
- Proven brand reliability with 5-year warranty and consistent pro endorsement
Cons
- Requires air compressor and hose, adding equipment cost if you don't already own one
- No customer reviews available yet, so real-world user feedback is limited
The Metabo HPT NV45AB2 is a purpose-built pneumatic roofing nailer engineered for speed and precision on asphalt shingles and insulation board installation. Operating between 70-120 PSI, it fires up to 10 nails per second, making it ideal for homeowners tackling roof repairs or professionals managing larger roofing projects. The 16-degree magazine holds 120 nails and accepts fasteners from 7/8 inch to 1-3/4 inch, giving you flexibility across different roofing material thicknesses.
What sets this nailer apart is its user-centric design. The tool-less depth of drive adjustment allows you to achieve flush, professional-quality nailing without fumbling for wrenches or additional tools. The side-loading magazine design and quick-return pneumatic system keep you focused on the work rather than fussing with reloading. At just 5.7 lbs with a balanced body, the nailer minimizes hand and arm fatigue during overhead or extended use, which matters tremendously when you're working on a roof all day.
Metabo HPT has earned recognition as the pro-preferred brand of nailers for 12 consecutive years, and this model reflects that heritage. The pneumatic power feed and return system handles harsh conditions reliably, while the 5-year warranty provides confidence in durability. Whether you're a DIYer handling a one-time roof project or a contractor managing multiple jobs, this nailer delivers the speed, accuracy, and reliability you need to get the work done right.
| Specification | Detail |
|---|---|
| Brand | Metabo HPT |
| Model | NV45AB2 |
| Type | Pneumatic Roofing Nailer |
| Color | Green |
| Weight | 5.5 lbs |
| Dimensions | 9 x 4.5 x 10.2 inches |
| Operating Pressure | 70-120 PSI |
| Firing Rate | Up to 10 nails per second |
| Magazine Type | 16-degree, side-loading |
| Magazine Capacity | 120 nails |
| Nail Length Range | 7/8 inch to 1-3/4 inch |
| Warranty | 5 years |
Setup: Connect the nailer to your air compressor using a standard pneumatic hose. Adjust the pressure regulator to between 70-120 PSI for optimal performance. Ensure your compressor has adequate capacity to maintain steady pressure during continuous use.
Loading Nails: Open the side-loading magazine and insert roofing nails (7/8 inch to 1-3/4 inch) into the 16-degree magazine. The magazine holds up to 120 nails, reducing frequent reloading interruptions.
Adjusting Depth: Use the tool-less depth of drive adjustment to set how deep nails sink into your material. Test on scrap material first to ensure flush, professional-quality results without over-driving or under-driving.
Driving Nails: Position the nailer against the roofing material with the nose piece firmly seated. Squeeze the trigger to fire. The quick-return pneumatic system automatically resets the tool for the next nail. Maintain steady pressure and angle for consistent results.
Maintenance: Drain moisture from your air compressor regularly. Periodically check the nailer for debris and apply a light coat of pneumatic tool oil to moving parts to maintain reliability and extend service life.
Before You Start: Always wear safety glasses to protect against flying debris. Use hearing protection, as pneumatic nailers can generate noise above 85 dB. Never point the nailer at yourself, others, or animals, even when not firing.
During Operation: Keep both hands on the nailer to maintain control. Never bypass the trigger safety mechanism. Ensure the nose piece is firmly seated against the material before firing. Keep your fingers and hands clear of the firing path and away from the nose piece.
Air Compressor Safety: Inspect hoses for cracks, leaks, or damage before each use. Secure the hose to prevent tripping hazards. Release air pressure from the compressor before disconnecting the nailer. Never exceed the maximum PSI rating of 120.
Work Environment: Work on stable surfaces and use appropriate fall protection when on roofs or elevated work areas. Secure materials properly to prevent shifting. Keep the work area clear of obstacles and bystanders. Never operate while fatigued or under the influence of substances that impair judgment.
After Use: Always disconnect the air hose and release residual pressure before storing. Store the nailer in a dry location away from moisture and extreme temperatures. Keep out of reach of children.
Pressure Optimization: While the nailer operates between 70-120 PSI, most roofing applications perform best around 90-100 PSI. Too much pressure can damage shingles or over-drive nails; too little won't seat them properly. Dial in the sweet spot on test material first.
Magazine Management: Keep spare nails pre-loaded in the magazine during breaks so you're ready to go immediately when work resumes. The 120-nail capacity means fewer interruptions, but having a backup magazine loaded saves time on larger projects.
Angle and Pressure: Hold the nailer at a slight angle perpendicular to the roof surface for best results. Maintain firm, even pressure against the material throughout the firing motion. Rushing or jerking the trigger can cause inconsistent nail depth.
Material Preparation: Ensure roofing shingles and insulation boards are properly aligned and secured before nailing. Pre-drilling is unnecessary with pneumatic nailers, but proper material positioning prevents crooked nails and wasted fasteners.
Compressor Pairing: Use an air compressor with at least 3-4 CFM at 90 PSI to maintain steady pressure during continuous firing. Undersized compressors struggle to keep up with the 10 nails-per-second firing rate, causing pressure drops and inconsistent results.
Maintenance for Longevity: Add a few drops of pneumatic tool oil to the air inlet weekly during heavy use. This keeps internal components lubricated and extends the nailer's working life. Never use general-purpose machine oil, which can gum up pneumatic tools.

Pros
- Fast, one-step nail loading saves time on the job
- Carbide inserts on nosepiece resist wear from abrasive roofing materials
- Zero nail lockout feature prevents wasted shots and indicates reload timing
- Adjustable depth control and shingle guide improve accuracy and consistency
- Lightweight design reduces hand and arm fatigue during all-day use
Cons
- No customer reviews available to verify long-term durability or real-world performance
- Requires pneumatic compressor and air supply, limiting portability compared to cordless alternatives
The Bostitch RN46 coil roofing nailer is engineered specifically for the demands of roofing work, where speed and consistency matter. The zero nail lockout feature is a practical safety addition that prevents dry firing and gives you a clear indicator when the magazine needs reloading. This small detail reduces wasted shots and keeps your workflow moving without interruption.
Build quality centers on durability in tough conditions. The carbide-tipped nosepiece resists wear from abrasive roofing surfaces, while aggressive wear guards and skid pads protect the tool itself during job site use. At 5.8 pounds with lightweight aluminum housing, the RN46 stays manageable during extended overhead work, and the over-molded grip provides comfortable control even when you're driving dozens of fasteners per hour.
Practical features like the quick-set adjustable depth guide and adjustable shingle guide reflect real job site needs. You can fine-tune nail depth and spacing without fumbling with tools, and the patented single-action side load magazine means you spend less time reloading and more time working. For homeowners and DIYers tackling roof repairs or new installations, this nailer delivers the speed and reliability expected from a Bostitch tool.
| Specification | Detail |
|---|---|
| Brand | Bostitch |
| Model | RN46 |
| Type | Coil Roofing Nailer |
| Nail Length Range | 3/4 inch to 1-3/4 inch |
| Weight | 5.8 pounds |
| Dimensions | 13.38 x 14.38 x 5.12 inches |
| Housing Material | Lightweight aluminum |
| Nosepiece | Carbide inserts for durability |
| Grip Type | Over-molded for comfort |
| Loading System | Patented single-action side load |
| Key Features | Zero nail lockout, adjustable depth guide, adjustable shingle guide, full round driver |
Loading the Magazine: Use the patented single-action side load canister to insert a coil of roofing nails. This one-step process is faster than traditional loading methods and gets you back to work quickly.
Setting Nail Depth: The quick-set adjustable depth guide allows you to customize how deep nails sink into your roofing material. Adjust before you start, and you can maintain consistent depth throughout your project.
Using the Shingle Guide: The adjustable shingle guide helps you maintain even spacing between fasteners. Set it to your desired spacing, and the guide ensures consistent placement without manual measuring.
Recognizing Reload Time: The zero nail lockout feature will alert you when the magazine is empty, preventing dry firing and telling you exactly when to reload.
Pneumatic Setup: This is an air-powered tool. Connect it to a properly sized air compressor via an air hose, and ensure your compressor delivers adequate CFM (cubic feet per minute) for consistent operation.
Always Wear Protection: Use safety glasses and hearing protection when operating any pneumatic nailer. Wear work gloves to protect your hands from fasteners and moving parts.
Keep Hands Clear: Never place your hands in front of the nosepiece or in the path of the fastener. Always keep the tool pointed away from yourself and others.
Inspect Before Use: Check the tool for damage, wear, or loose parts before each use. Examine the carbide nosepiece for cracks or excessive wear that could affect performance.
Secure Your Work: Ensure your roofing material or shingles are properly secured to prevent movement that could cause the fastener to miss its target or cause injury.
Respect Air Pressure: Use only the recommended air pressure for this tool. Excessive pressure can damage the nailer and create safety hazards. Follow the manufacturer's guidelines for compressor CFM requirements.
Disconnect When Not in Use: Always disconnect the air supply when you're finished working or stepping away from the tool, even briefly.
Prepare Your Surface: Before fastening, ensure your roofing material is clean and free of debris. A clean surface helps the tool seat properly and delivers more consistent results.
Match Fastener Length to Material: The RN46 handles nails from 3/4 inch to 1-3/4 inch. Choose the right length for your roofing material thickness. Too short, and fasteners won't hold; too long, and they may bend or penetrate too deeply.
Maintain Your Compressor: Keep your air compressor well-maintained with clean, dry air. Water and debris in the air line can damage the nailer and reduce performance. Drain your compressor tank regularly.
Lubricate Regularly: Pneumatic tools benefit from regular lubrication. Use pneumatic tool oil as recommended by Bostitch to keep internal parts moving smoothly and extend tool life.
Practice Your Technique: Before tackling your main project, practice on scrap material to get comfortable with the tool's weight, trigger response, and the shingle guide settings. This builds confidence and improves accuracy.
Use the Depth Guide: Take time to dial in your depth guide before starting. A few seconds of setup saves you from having to re-drive fasteners or deal with nails that sit too proud or sink too deep.
Pros
- Lightweight design (5.7 lbs) reduces fatigue during extended overhead roofing work
- Fast firing rate of 3 nails per second and large 120-nail coil minimize downtime
- Durable aluminum construction with Teflon coating withstands frequent use and harsh weather
- Anti-slip rubber grip and dual-trigger safety system enhance control and prevent misfires
- Backed by a 3-year warranty with video manuals and online support access
Cons
- No customer reviews available yet, so real-world performance feedback from buyers is limited
- Requires a compatible pneumatic compressor with 3/8" air inlet, adding to overall equipment costs
The Toolant roofing nailer is engineered for speed and consistency on the job site. Its ability to fire 3 nails per second while maintaining flush, clean sinks makes it a strong choice for roofers who need to minimize rework and keep projects moving. The 120-nail coil capacity means fewer interruptions to reload, and the 70-120 PSI operating range ensures compatibility with most standard air compressors found on job sites and in home garages.
Durability is a key strength of this tool. The aluminum alloy shell with Teflon coating protects against rust, corrosion, and damage from drops and impacts, which is critical for tools that spend their lives on rooftops and outdoor work environments. The manufacturer's claim of over 500,000 shots lifespan, combined with a 3-year warranty, suggests this nailer is built to handle serious use from both contractors and serious DIYers tackling multiple projects.
Comfort and safety round out the package. At just 5.7 lbs, this nailer won't exhaust your arms during overhead work on sloped surfaces. The anti-slip rubber grip keeps the tool steady in sweaty conditions, while the dual-trigger safety system helps prevent accidental misfires when you're working quickly across a roof. The inclusion of safety glasses, belt hook, and bilingual documentation means you're ready to start working right out of the box.
| Specification | Details |
|---|---|
| Brand | Toolant |
| Nail Size Range | 3/4" to 1-3/4" (15-degree coil) |
| Coil Capacity | 120 nails |
| Operating Pressure | 70-120 PSI |
| Firing Rate | Up to 3 nails per second |
| Weight | 5.7 pounds |
| Dimensions | 11.61 x 10.62 x 4.72 inches |
| Air Inlet | 3/8" universal connection |
| Shell Material | Aluminum alloy with Teflon coating |
| Safety Features | Dual-trigger safety, anti-slip grip |
| Warranty | 3 years |
| Included Accessories | Safety glasses (ANSI Z87.1), belt hook, English-Spanish manual |
Before You Start: Ensure your air compressor is clean and properly maintained. Connect the nailer to your compressor using the 3/8" air inlet. Set the compressor pressure between 70-120 PSI as recommended. Load the 120-nail coil into the magazine by following the directional arrows inside the coil housing. Always wear the included ANSI Z87.1 safety glasses.
Operating the Nailer: Position the nailer perpendicular to your work surface (roofing shingles, siding, fencing, etc.). Press the nose of the nailer firmly against the material. Squeeze the trigger smoothly to fire a nail. The dual-trigger safety system requires proper hand positioning to prevent accidental discharge. Work at a steady pace; the tool is designed to fire up to 3 nails per second, so you don't need to rush.
Maintenance and Safety: After each use, disconnect the air supply and release any remaining pressure. Check the coil magazine regularly for proper nail feeding. Store the nailer in a dry location to protect the aluminum shell. Never point the nailer at people or animals. When moving between work areas, keep your finger off the trigger. If jams occur, disconnect the air supply, clear the jam carefully, and resume work.
Personal Protective Equipment: Always wear the included ANSI Z87.1 safety glasses to protect your eyes from flying debris and nail fragments. Consider wearing hearing protection if working for extended periods, as pneumatic tools can be loud. Wear work gloves to improve grip and protect your hands from sharp nail edges.
Operational Safety: Never aim the nailer at people, animals, or yourself. Keep your hands clear of the firing area and never place your fingers near the nose of the tool while the air supply is connected. Use the dual-trigger safety system as designed; it's your first line of defense against misfires. Disconnect the air supply before clearing jams, loading coils, or performing any maintenance.
Work Environment: Ensure your work area is stable and secure, especially when working on roofs or elevated surfaces. Use proper fall protection equipment if working at heights. Keep your work surface dry to prevent slipping. Never use the nailer while tired, distracted, or under the influence of alcohol or drugs. Store the nailer safely away from children and unauthorized users when not in use.
Pressure Optimization: Start at 70 PSI and gradually increase pressure until nails drive flush and clean without oversinking or undersinking. Different materials (asphalt shingles, wood siding, metal flashing) may require slight pressure adjustments. Keep a pressure gauge on your compressor to maintain consistency throughout your project. This fine-tuning prevents rework and delivers professional-looking results.
Efficiency on the Job: Load your coils before starting work to maximize productivity. The 120-nail capacity reduces downtime, but pre-loading extras keeps you moving fast. Work in a consistent rhythm rather than rushing; the tool is designed for 3 nails per second, so pacing yourself prevents fatigue and improves accuracy. On roofing projects, work from the bottom up to avoid stepping on newly placed shingles.
Maintenance for Longevity: Drain your air compressor's moisture trap before each use to prevent water from entering the nailer, which can cause corrosion and jamming. Keep the air inlet clean and free of debris. After heavy use, disconnect the nailer and fire a few shots into a scrap board to clear any internal moisture. Store the tool in a climate-controlled space to protect the aluminum shell and internal components from rust.
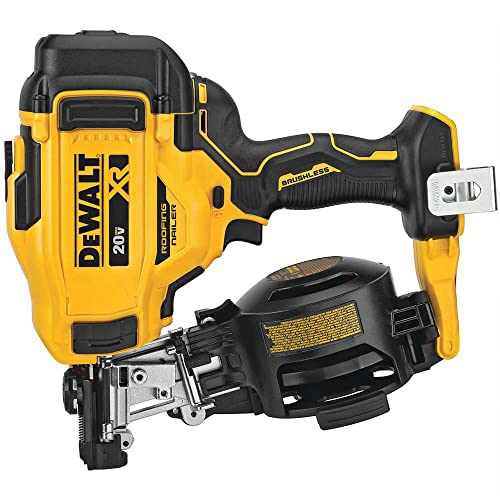
Pros
- Brushless motor delivers consistent power and longer battery life than traditional brushed models
- Bump-fire mode enables fast, efficient work on large roofing projects without finger fatigue
- Tool-free nail tray system saves time and eliminates fumbling with adjustment tools
- Lightweight and well-balanced for reduced user fatigue during overhead applications
- Cordless operation eliminates the hassle of air compressors and hose management on roofs
Cons
- Limited independent user reviews available, making real-world durability feedback difficult to assess
- Battery runtime on extended roofing projects may require carrying multiple 20V MAX batteries
The DeWalt 20V MAX brushless roofing nailer is engineered for homeowners and contractors who need reliable, cordless fastening on residential roofing projects. The brushless motor is the standout feature here, delivering increased runtime and durability compared to brushed alternatives while requiring virtually no maintenance. This translates to longer work sessions and lower long-term operating costs, which matters when you're tackling large shingle installations or roof repairs.
Practical features make this nailer genuinely useful on the job. The tool-free nail tray adjustment system accommodates the full range of roofing nails without requiring a wrench or screwdriver, saving precious time between nail size changes. Bump-fire mode keeps the nailer firing rapidly for repetitive work, reducing hand fatigue and boosting productivity on expansive roof surfaces. At 6.7 pounds, the compact design is manageable for overhead work, and cordless operation means no air compressor, hose, or compressor maintenance to worry about.
The 20V MAX platform integration is valuable if you already own other DeWalt cordless tools, since you can swap batteries across your collection. However, extended roofing projects may require multiple batteries on hand, so factor that into your overall investment. The nailer is built for serious DIYers and professionals who prioritize reliability and efficiency over budget-friendly options.
| Specification | Details |
|---|---|
| Brand | DeWalt |
| Model | 20V MAX Brushless |
| Nailer Type | Cordless Coil Roofing Nailer |
| Nail Angle | 15 Degree |
| Motor Type | Brushless |
| Dimensions | 15 x 14 x 6 inches |
| Weight | 6.7 pounds |
| Voltage | 20V MAX |
| Nail Tray | Tool-Free Adjustment |
| Firing Mode | Bump Fire |
| Category | Tools & Home Improvement |
Setup and Safety: Before operation, ensure the 20V MAX battery is fully charged and inserted securely. Load roofing nails into the coil magazine, then adjust the tool-free nail tray to match your nail size. Always wear safety glasses and work gloves. Keep hands clear of the firing area and never point the nailer at yourself or others.
Basic Operation: Position the nailer at a 90-degree angle to the roofing surface. For single-fire mode, squeeze the trigger once per nail. For bump-fire mode (rapid repetitive nailing), hold the trigger while bumping the nose against the work surface to fire successive nails. Maintain steady pressure and let the nailer do the work. Do not force or over-drive nails.
Maintenance: After each use, remove the battery and inspect the nail magazine for debris or jams. Clean the nose area with a dry cloth. Store in a dry location. Check the nail tray adjustment mechanism periodically to ensure smooth operation. Replace the battery when runtime noticeably decreases.
Personal Protective Equipment: Always wear ANSI-certified safety glasses to protect against debris and ricochet. Wear heavy-duty work gloves to protect your hands during loading and operation. Consider hearing protection if using the nailer for extended periods, as cordless nailers can reach significant noise levels.
Work Area Safety: Ensure your work surface is stable and secure before beginning. Never work at heights without proper fall protection and scaffolding. Keep bystanders at least 10 feet away from the work area. Inspect the roof or surface for hazards, rot, or structural weakness before fastening.
Tool Handling: Never leave the nailer unattended with the battery installed. Remove the battery before adjusting the nail tray, clearing jams, or performing maintenance. Never attempt to fire the nailer with your finger on the trigger while moving between work areas. Keep the nailer pointed downward or away from your body at all times. Do not use the nailer while fatigued or under the influence of substances that impair judgment.
Battery Management: Roofing projects consume significant battery power. Invest in at least two 20V MAX batteries so one charges while you work with the other. Store batteries in a cool, dry location and avoid leaving them in direct sunlight or extreme heat, which reduces lifespan. Rotate batteries regularly to maintain even charge capacity across your collection.
Nail Tray Mastery: Familiarize yourself with the tool-free adjustment system before climbing onto the roof. Practice switching between nail sizes on the ground to build speed and confidence. Keep the nail magazine clean and free of debris, which can cause jams or misfires at height.
Bump-Fire Technique: Bump-fire mode is efficient but requires practice. Start with single-fire mode to establish rhythm and accuracy, then transition to bump-fire for repetitive sections. Maintain consistent pressure against the work surface and use smooth, controlled bumping motions. This technique reduces hand fatigue significantly compared to repeated trigger pulls.
Pros
- Adjustable shingle guide and depth control deliver consistent nail placement and professional results
- Large 120-nail magazine reduces reloading frequency and keeps you working longer
- Compact and lightweight design minimizes user fatigue on ladders and roofs
- Affordable entry point for homeowners and DIYers new to pneumatic roofing tools
- Complete package includes carrying case and maintenance supplies
Cons
- Requires an air compressor with 70-120 PSI capability, adding to overall equipment investment
- No user reviews available to confirm real-world durability and long-term performance
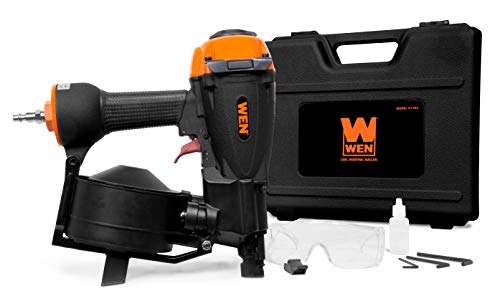
The WEN 61783 pneumatic roofing nailer is designed for homeowners and DIYers who need a dependable tool for shingle installation and roof repairs. This coil nailer fires 11-gauge nails ranging from 3/4 to 1-3/4 inches, making it versatile enough for most residential roofing applications. The pneumatic design operates between 70 and 120 PSI, which means it works with standard air compressors found in many home workshops.
What sets this nailer apart is its attention to detail in user control. The adjustable shingle guide and depth control allow you to maintain consistent nail spacing and penetration depth throughout your project, which is critical for proper shingle seating and roof longevity. The 120-nail coil capacity is generous, reducing the frequency of reloads and keeping you on the roof longer without interruption. When jams do occur, the quick-release magazine makes clearing them straightforward and hassle-free.
The tool weighs just under 6 pounds and comes in a blow-molded carrying case with all the essentials: pneumatic oil, hex wrenches, and everything you need to get started. For homeowners tackling their first roofing project or DIYers looking for a budget-friendly pneumatic option, the WEN 61783 offers solid performance and practical features that prioritize ease of use over complexity.
| Specification | Detail |
|---|---|
| Brand | WEN |
| Model | 61783 |
| Nail Gauge | 11-Gauge |
| Nail Length Range | 3/4 inch to 1-3/4 inch |
| Magazine Capacity | 120 Nails |
| Operating Pressure | 70-120 PSI |
| Weight | 5.95 Pounds |
| Dimensions | 5.5 x 17.5 x 16.3 inches |
| Color | Black |
| Included Accessories | Blow-molded carrying case, pneumatic oil, hex wrenches |
| Category | Pneumatic Roofing Nailer |
Setup: Connect the nailer to your air compressor using a standard pneumatic hose. Adjust the air pressure to between 70 and 120 PSI according to the manufacturer's recommendations. Apply a small amount of pneumatic oil to the tool before first use and periodically during operation.
Loading Nails: Open the quick-release magazine and insert a coil of 11-gauge roofing nails. Close the magazine securely. The tool holds up to 120 nails, so you can work longer between reloads.
Adjusting Depth and Spacing: Use the adjustable depth control to set how deep nails penetrate into your shingles. Adjust the shingle guide to maintain consistent spacing between nails. Test your settings on scrap material first to ensure proper nail seating.
Operating: Position the nailer against the shingle or roof surface and squeeze the trigger. The tool fires one nail per trigger pull. Keep steady pressure and maintain control to ensure straight nail placement.
Clearing Jams: If a nail jams, release the air pressure, open the quick-release magazine, and remove any bent or stuck nails. Reload and resume work.
Personal Protective Equipment: Always wear safety glasses to protect against debris. Consider hearing protection when using pneumatic tools for extended periods. Wear work gloves for better grip and hand protection.
Air Compressor Safety: Ensure your air compressor is properly maintained and operates within the recommended 70-120 PSI range for this nailer. Check hose connections for leaks before use. Never exceed maximum operating pressure.
Tool Handling: Never point the nailer at yourself or others. Keep your fingers away from the trigger and nail exit when not actively driving nails. Do not use the tool while standing on a ladder unless you have a secure, stable position with both hands free to operate safely.
Maintenance: Regularly apply pneumatic oil to keep the tool functioning properly. Check the quick-release magazine for damage before each use. Store the nailer in the included carrying case when not in use to protect against damage and accidental discharge.
Roof Work: When working at heights, use appropriate fall protection equipment. Ensure your roof surface is stable and dry. Never rush your work or sacrifice safety for speed.
Optimize Air Pressure: Start at 70 PSI and gradually increase pressure while observing nail penetration on test shingles. Find the sweet spot where nails seat flush without oversinking or undersinking. This saves energy and produces cleaner results.
Maintain Consistent Rhythm: Develop a steady pace when driving nails. Consistency in pressure, angle, and trigger pull helps you achieve uniform nail spacing and appearance across your entire roof.
Prevent Magazine Jams: Use quality roofing nails from reputable manufacturers. Bent, damaged, or undersized nails are the primary cause of jams. Inspect your nail coils before loading.
Keep Your Tool Dry: Moisture in your air lines can damage the nailer and cause performance issues. Use an air filter and moisture trap on your compressor, especially if working in humid conditions.
Practice on Scrap Material: Before tackling your actual roof, practice on scrap plywood or sheathing. This helps you dial in the depth control and shingle guide settings specific to your shingle thickness and material.
Store Properly: Always drain air pressure before storing the tool. Keep it in a dry location in the provided carrying case to prevent rust and damage to internal components.

Pros
- Upgraded engine delivers improved drive quality and consistent nail penetration on shingles
- Carbide nose inserts extend tool life by resisting wear from repeated contact with roofing materials
- Tool-free depth adjustment makes it easy to dial in proper nail setting without extra equipment
- Dual door magazine design speeds up reloading and reduces downtime on the job
- Ergonomic grip handle minimizes hand strain during full-day roofing projects
Cons
- No user reviews available to validate real-world durability and long-term reliability claims
- Requires an air compressor and hose setup, adding to overall equipment investment for homeowners
The Bostitch 15-Degree Coil Roofing Nailer is engineered specifically for the demands of residential and commercial roofing work. The upgraded engine and improved feed system work together to deliver consistent drive quality, ensuring that nails penetrate shingles cleanly and securely without bounce-back or inconsistent seating. This reliability is essential when you're installing hundreds of shingles and need uniform results across the entire roof.
Durability is built into the design through carbide nose inserts that resist wear from the constant friction of roofing materials. The oversized, tool-free depth adjustment allows you to fine-tune nail setting on the fly, adapting to different shingle thicknesses or substrate conditions without stopping work. The dual door magazine is a practical feature that speeds up reloading and reduces the frustration of jams, while the redesigned grip handle keeps hand fatigue at bay during extended roofing sessions.
This nailer is best suited for contractors and experienced DIYers who understand pneumatic tool operation and have access to a quality air compressor system. If you're planning a full roof replacement or tackling multiple roofing projects, the Bostitch 15-Degree delivers the performance and durability needed to get the job done right.
| Specification | Details |
|---|---|
| Brand | Bostitch |
| Model Type | 15-Degree Coil Roofing Pneumatic Nailer |
| Color | Multi |
| Dimensions | 12 x 11 x 5 inches |
| Weight | 0.000625 Pounds |
| Product Category | Tools & Home Improvement |
| Magazine Type | Dual Door Coil |
| Nose Material | Carbide Inserts |
| Depth Adjustment | Tool-Free Oversized |
Setup: Connect the nailer to your air compressor using a quality pneumatic hose. Adjust the air pressure according to Bostitch's guidelines for your specific nail size and material. Ensure the depth adjustment is set appropriately before beginning work.
Loading: Open the dual door magazine and load coil nails as directed. The flexible door design allows you to load from either side, making it convenient to reload without repositioning the tool.
Operation: Position the nailer nose flush against the shingle or substrate. Squeeze the trigger smoothly to drive the nail. Use the oversized depth adjustment knob between shots to fine-tune nail seating depth as needed for different materials or shingle types.
Maintenance: Drain the air compressor tank regularly to remove moisture. Periodically oil the tool according to manufacturer instructions to keep the engine running smoothly and extend service life.
Personal Protection: Always wear safety glasses to protect against flying debris or nail ricochet. Use hearing protection if working for extended periods, as pneumatic nailers can be loud.
Compressor Safety: Verify your air compressor is in good working condition and properly grounded. Use a regulator to maintain stable air pressure and prevent over-pressurization, which can damage the nailer or cause unsafe operation.
Work Area: Keep bystanders away from the work area. Be aware of what's behind and below the surface you're nailing to avoid unintended fastening of hidden objects or people.
Trigger Control: Keep your finger off the trigger until you're ready to fire. Never point the nailer at yourself or others, even when not actively working. Treat it with the same respect as any power tool.
Pressure Tuning: Spend time dialing in the correct air pressure for your specific nail type and substrate. Too much pressure can cause nails to sink too deep or damage shingles; too little can result in incomplete seating. Start low and increase gradually until you get consistent, clean penetration.
Depth Adjustment Mastery: Use the tool-free depth adjustment between different shingle types or when moving from new to old materials. Small adjustments prevent costly rework and ensure a professional-looking roof with uniform nail placement.
Magazine Management: Load the dual door magazine fully before starting a section of roof. This minimizes interruptions and keeps you in a steady rhythm, improving both speed and consistency.
Maintenance Routine: Oil the nailer regularly and drain your compressor tank daily to prevent moisture from corroding internal components. A well-maintained nailer will last for years and perform reliably on every project.
Buying Guide: How to Choose the Right Roofing Nailer
Shopping for a roofing nailer is not as straightforward as grabbing any nail gun off the shelf. Roofing nails are short, wide-headed fasteners designed specifically to hold shingles, underlayment, and felt paper flat against the deck. A framing nailer or finish nailer simply will not seat the nail head correctly or maintain the holding strength required under wind load. Below are the key factors our editorial team weighed when evaluating every model in this roundup, along with practical guidance on what each spec means for real jobsite performance.
Power Source: Pneumatic vs. Cordless
The vast majority of professional roofing nailers are pneumatic, meaning they run on compressed air. Pneumatic models like the AeroPro CN45N, Metabo HPT NV45AB2, and Bostitch RN46 deliver consistent driving power with virtually no slowdown over a full day of work. They are lighter than battery-powered alternatives because there is no heavy battery pack attached to the tool body, which matters significantly when you are kneeling on a pitched roof for hours at a stretch. A well-balanced pneumatic tool also reduces fatigue compared to a heavier cordless equivalent when driving hundreds of nails per hour.
Cordless roofing nailers, such as the DeWalt 20V MAX Brushless model in this roundup, are rapidly catching up in driving performance. They eliminate the need to drag an air hose up a ladder, which improves mobility considerably on complex roof lines with multiple hips, valleys, and dormers. The trade-off is added weight from the battery and a higher upfront cost. For small repair jobs or locations where running a hose is impractical, cordless is worth the premium. For production roofing, most professionals still reach for a pneumatic tool first. If you already own compatible cordless power tools, pairing a cordless nailer with your existing battery platform is a sensible way to reduce total kit cost.
Nail Compatibility and Magazine Capacity
Roofing nailers use coil-style magazines that hold anywhere from 100 to 120 nails per load, dramatically reducing downtime compared to a stick-feed nailer. Most models in this guide accept 15-degree coil nails ranging from 3/4 inch to 1-3/4 inch in length. The Metabo HPT NV45AB2 accepts a slightly wider range of 7/8 inch to 1-3/4 inch nails, which is worth noting if you work with thicker decking materials or composite underlayment products.
Always verify that the nails you buy match both the wire gauge and coil angle specified in your nailer’s manual. Using the wrong coil angle or gauge is the single most common cause of jams and misfires on otherwise well-built tools. Most major brands sell nails designed specifically for their tools, but generic coils that meet the published specifications work fine in practice. The DOTOOL CN45C and toolant Roofing Nailer both accommodate standard 120-nail coil loads, which is the practical maximum you will find in this category and translates to roughly three reloads per square of shingles under standard four-nail fastening schedules.
Depth-of-Drive Adjustment
Driving a roofing nail too deep cuts through the shingle’s surface and weakens the hold. Driving it too shallow leaves a bump that lifts adjacent shingles and creates a direct leak path at the nail zone. A tool-less depth-of-drive adjustment lets you dial in the perfect countersink on the fly without reaching for a screwdriver, which is especially useful when switching between shingle brands or thicknesses mid-job. This feature appears on premium models like the Metabo HPT NV45AB2 and is well worth prioritizing, particularly if you work across different materials during the same project. Budget-tier models like the WEN 61783 offer depth adjustment as well, though the mechanism may require slightly more effort to operate precisely.
Firing Modes: Sequential vs. Bump
Sequential firing requires you to press the contact tip against the work surface before pulling the trigger, delivering one nail at a time with maximum placement precision. Bump firing, also called contact firing, lets you hold the trigger and bump the nose against successive nail points to fire rapidly across a shingle row. Professional roofers almost universally use bump mode for production speed, driving several nails per second across long runs. The Metabo HPT NV45AB2 is rated at up to three nails per second in bump mode, which is among the fastest in this category. If you are a homeowner doing occasional repairs, sequential mode is safer and more forgiving while you develop a feel for the tool’s rhythm. Most models in this roundup offer both modes, selectable via a simple switch on the trigger assembly.
Weight and Ergonomics
Roofing is physically demanding work, and a nailer that feels manageable in the store can feel punishing after six hours on a steep pitch. Pneumatic coil nailers in this roundup weigh roughly five to eight pounds depending on housing material and magazine design. Aluminum-bodied tools are notably lighter than magnesium-cast alternatives, though magnesium provides better vibration damping over long sessions, which reduces hand fatigue on high-volume days. Look for a well-balanced grip, rubber overmold on the handle, and a narrow nose profile that improves sightlines when working tight valleys, hips, and rake edges.
Rubber skid pads on the bottom of the tool body are a small but safety-critical detail. On a hot summer roof, smooth plastic slides on warm shingles and puts you at real risk of dropping an expensive tool down a slope. Brands like Metabo HPT build rubberized contact points into the base of their roofing nailers specifically to address this hazard. After your roofing project wraps, a well-organized tool storage system keeps your nailer protected and ready for the next season.
Tar and Debris Resistance
Hot asphalt shingles release tar that coats the nose of a roofing nailer and eventually causes jams or misfires. Some manufacturers coat the nose piece in tar-resistant materials or design the contact area so that tar adhesion is minimized through surface geometry rather than coatings alone. The AeroPro CN45N, which earns its reputation on production crews, is frequently cited for a drive mechanism that resists buildup better than most budget competitors. If you work primarily in warm climates or during summer months, this is a feature worth researching before committing to a model. Routine cleaning of the nose and driver blade after each job extends the service life of any nailer significantly, regardless of how well it is engineered to resist contamination.
Operating Pressure Range
Most roofing nailers operate within a 70 to 120 PSI range, which falls comfortably within the output of a standard portable air compressor. The toolant Roofing Nailer and the Bostitch RN46 both specify this same operating window, making them compatible with the widest variety of compressors you are likely to already own. Confirm your compressor’s rated output before buying, and size the hose diameter appropriately to avoid pressure drop over long runs. A pancake or hot dog compressor with a six-gallon tank is usually enough for one roofing nailer on a standard residential project. If you are running two nailers simultaneously or feeding a hose run exceeding 50 feet, stepping up to a larger tank maintains consistent pressure without the compressor cycling constantly and disrupting your rhythm.
Warranty and Brand Support
A roofing nailer takes serious abuse over its working life: dropped from ladders, left in direct sun, run through thousands of nails per day in all weather. Backing from a manufacturer who stands behind their product is not a luxury, it is a practical requirement for professional use. Metabo HPT offers a five-year warranty on their NV45AB2, one of the strongest coverage periods in this category. Bostitch and DeWalt both maintain service networks that make parts and repairs accessible across North America, which matters when you need a tool back in service fast. Budget-tier options from WEN and DOTOOL offer shorter coverage windows but can be a smart choice for homeowners who need the tool for a single project rather than sustained daily professional use. When you factor in the total cost of ownership including repair access, the mid-range and premium models often deliver better long-term value than their upfront prices suggest.
Budget Considerations
The roofing nailers in this roundup span a wide price range, from budget-friendly pneumatic options aimed at homeowners all the way to premium professional-grade tools designed for daily production use. The WEN 61783 and DOTOOL CN45C represent capable entry-level picks that handle residential shingle work without the premium price tag. Mid-range options from Bostitch and toolant deliver stronger build quality and better accessory ecosystems for contractors who need consistent performance across an entire season. At the top end, the Metabo HPT NV45AB2 and DeWalt 20V MAX Brushless model command higher prices but justify them through feature depth, durability, and warranty coverage. Match your budget to how often you will realistically use the tool: a professional roofer who bills dozens of squares per week should invest in a high-end model, while a homeowner replacing a section of storm-damaged shingles may find a budget pick more than sufficient for the task.
While you are evaluating your overall tool budget, consider that a reliable set of cordless drills and a sharp collection of jigsaws for cutting trim and fascia often come into play on the same roofing project, especially when replacing damaged soffit boards or trimming underlayment around penetrations.
Why Trust HomeThru
HomeThru is an independent editorial platform with no affiliation to any manufacturer or retailer. We do not sell tools, process orders, or handle warranty claims. Our recommendations are built through independent research: we analyze product specifications in depth, compare user feedback across verified purchase sources, study published technical data from manufacturers, and weigh the real-world priorities of both professional contractors and DIY homeowners. For this roofing nailers guide, our team evaluated models from Bostitch, AeroPro, Metabo HPT, WEN, DeWalt, DOTOOL, and toolant, assessing each across nail compatibility, depth adjustment, magazine capacity, weight, firing mode options, operating pressure, and manufacturer warranty.
We apply the same rigorous independent methodology to every category we cover, from reciprocating saws for demolition work to random orbital sanders for finish surfaces. Our goal is always the same: give you the information you need to make a confident, well-informed purchase without wading through promotional copy or sales pressure. HomeThru does not sell products, manage orders, or provide warranty support on any item covered in our guides.
Final Thoughts
Choosing the right roofing nailer comes down to matching the tool’s capabilities to your actual workload. Professionals who nail shingles every day need the reliability, speed, and durability of a well-built pneumatic model with strong warranty backing. Homeowners handling the occasional repair can get excellent results from a capable budget pick or a cordless option that removes the compressor from the equation entirely. Here are our top picks by use case, based on the products evaluated in this roundup.
- Best Overall: Metabo HPT NV45AB2 Roofing Nailer delivers an outstanding combination of production speed, tool-less depth adjustment, high nail capacity, and a five-year warranty that backs up its premium positioning with genuine long-term value.
- Best for Professional Production Crews: AeroPro CN45N Pneumatic Roofing Nailer earns its place on high-volume crews with a robust drive mechanism, strong tar resistance, and a build quality engineered for sustained heavy use across full roofing seasons.
- Best Cordless Option: DeWalt 20V MAX Brushless Cordless Roofing Nailer is the top pick for anyone who wants full roof mobility without managing an air hose, backed by DeWalt’s extensive service network and a widely compatible battery platform.
- Best Budget Pick: WEN 61783 Pneumatic Coil Roofing Nailer covers all the fundamentals at an accessible price point, making it a smart choice for homeowners who need a dependable nailer for a one-time or occasional shingle project.
- Best Mid-Range Value: DOTOOL CN45C Roofing Nail Gun punches above its price with a 120-nail coil capacity and solid build quality, offering a meaningful step up from the entry level without reaching premium territory.
Whichever model you choose, use the nail coil specification listed in your tool’s manual and clean the nose and driver blade after every session. A well-maintained roofing nailer will serve you reliably for years of seasonal and production work. For safely marking and measuring the deck before you start nailing, a dependable tape measure built for jobsite use should always be within reach. If your project extends beyond the roof itself, impact drivers worth buying for DIY and professional projects handle fastening tasks on fascia, trim, and gutter hardware with far less effort than a standard drill. And once the job is done, a thorough shop vac makes short work of debris cleanup on the deck and around the perimeter.
Frequently Asked Questions
Do I Need a Special Nailer for Roofing, or Can I Use a Framing Nailer?
Roofing nailers are specifically designed for the short, wide-headed nails used to fasten shingles and underlayment. Framing nailers drive longer, narrower nails at angles that can damage shingles or fail to seat the head correctly against the shingle surface. Using the wrong nailer risks improper fastening, shingle blow-off in high winds, and voided manufacturer warranties on the shingle product itself. A dedicated roofing nailer is the correct tool for the job, full stop. For other cutting and shaping tasks during the same project, a sharp set of jigsaws handles fascia and trim work cleanly.
What Size Air Compressor Do I Need to Run a Roofing Nailer?
Most roofing nailers operate between 70 and 120 PSI. A standard six-gallon pancake compressor handles one roofing nailer comfortably on residential shingle work. If you plan to run two nailers at once or use a long hose run exceeding 50 feet, step up to a larger tank in the 15 to 30 gallon range to maintain consistent pressure throughout the day. Always match the hose diameter to the compressor’s CFM output to avoid pressure drop on longer runs.
How Do I Prevent My Roofing Nailer From Jamming?
The most common jam causes are bent nails in the coil, incorrect nail specifications for the tool, and tar buildup on the nose and driver blade. Always use nails that match the gauge and coil angle listed in your nailer’s manual. Clean the nose piece and driver blade with a rag or brush after each use, especially in warm weather when hot asphalt releases more tar than usual. Most models include a quick-clear jam-release mechanism on the nose that lets you clear a stuck nail without reaching for tools. Keeping a mechanic tool set on the job site ensures you can handle any minor adjustments or maintenance on the spot.
Is a Cordless Roofing Nailer Worth the Extra Cost?
For homeowners and light-duty use, a cordless model like the DeWalt 20V MAX simplifies setup considerably by eliminating the compressor and hose entirely. The freedom of movement is a real advantage on complex roof geometries with multiple ridges and valleys. For full-time professional roofers driving thousands of nails daily, a pneumatic model typically offers better sustained performance and lower cost per nail driven over the tool’s working lifetime. Consider how often you will actually use the tool and whether you already own a compatible battery platform before committing to the higher price.
How Many Nails Per Shingle Does a Standard Roofing Job Require?
Most asphalt shingle manufacturers specify four nails per shingle under standard wind conditions, with six nails recommended in high-wind zones or along the roof’s perimeter. A single square covering 100 square feet requires roughly 320 nails at the four-nail rate, meaning a 120-nail magazine coil means reloading approximately three times per square. This is exactly why high-capacity magazines and fast-reloading designs are so valued in professional roofing work. Always follow the shingle manufacturer’s fastening schedule to preserve the product warranty. Once your roofing project wraps up, upgrading your home’s exterior security with top-rated security cameras and reinforcing entry points with smart lock upgrades are worthwhile next steps that many homeowners tackle at the same time.




Write Your Review
No reviews yet. Be the first to share your experience!