

Whether you are retiling a bathroom floor, laying a kitchen backsplash, or finishing a large-format porcelain installation, having the right tile cutter separates a clean, professional result from a pile of cracked waste. The market ranges from compact nippers designed for mosaic work all the way to 71-inch manual cutters built for oversized stone slabs. Our editorial team at HomeThru independently researched, analyzed, and compared dozens of models to surface the most capable options across every budget and project type. The 11 tile cutters below represent the best balance of cutting precision, build quality, ease of use, and overall value available right now.
Manual scoring cutters remain the go-to for most residential tile work because they are quiet, require no water setup, and deliver repeatable straight cuts quickly. If your project involves natural stone or complex curves, a high-quality tile saw may complement your cutter nicely. For the vast majority of ceramic and porcelain jobs, however, the manual models in this roundup will handle everything you need. Read on for our full analysis and buying guidance.
Top Tile Cutters We Recommend

Pros
- Two specialized nippers in one set cover both hard glass tiles and softer ceramics and stone
- Excellent leverage and sharp carbon steel jaws make clean cuts with minimal chipping or breakage
- Soft-grip handles and spring-return design significantly reduce hand fatigue during repetitive cutting
- Safety lock prevents accidental closure and injury when tools are stored or not actively used
- Drop-forged, heat-treated steel construction delivers years of reliable performance for serious DIYers
Cons
- Requires glass thickness of at least 1/16 inch to function properly, limiting use on very thin materials
- No reviews currently available to verify real-world performance and durability claims from actual users
The Goldblatt 2-Piece Glass Tile Nippers Set addresses a common DIY challenge: cutting precise shapes in tile and glass without expensive equipment or professional help. This set includes two specialized tools designed for different materials, which is smart thinking for homeowners who work with multiple tile types. The glass tile nipper (G2007) features a wheeled design optimized for hard, brittle materials, while the ceramic tile nipper (G2008) handles softer tiles, marble, and stone. Both tools are constructed from drop-forged carbon steel that's been heat-treated for strength and sandblasted for a durable finish.
What sets this nipper set apart is the attention to ergonomics and user comfort. The soft-grip handles are designed with high leverage to maximize cutting force while minimizing the strength required from your hands and wrists. The spring-return action keeps the jaws flexible and responsive, and the included safety lock prevents accidental closure during storage. For tile work that involves fitting pieces around pipes, cabinets, corners, and irregular edges, these features make a genuine difference in both speed and accuracy. The scissor-like cutting action allows for quick, controlled cuts without the crushing force of some budget alternatives.
The practical thickness range of 1/16 inch to 3/8 inch covers most residential tile applications, from delicate glass mosaic work to thicker ceramic and stone tiles. Whether you're repairing a broken tile, creating a custom mosaic, or installing decorative trim, this set provides the precision and control needed for professional-looking results. The anti-rust oil coating on the carbon steel ensures long-term durability if stored in a normal home environment.
| Specification | Details |
|---|---|
| Brand | Goldblatt |
| Model Numbers | G2007 (Glass) and G2008 (Ceramic) |
| Quantity | 2-piece set |
| Tool Length | 8 inches |
| Material | Drop-forged carbon steel, heat-treated |
| Minimum Cutting Thickness | 1/16 inch (1.5mm) |
| Maximum Cutting Thickness | 3/8 inch (9.5mm) |
| Handle Type | Ergonomic soft-grip, non-slip |
| Key Features | Spring-return action, safety lock, scissor-like jaw action |
| Suitable Materials | Glass tile, ceramic, marble, stone, mirror, stained glass, terrazzo, agate, metal |
| Finish | Sandblasted, polished, anti-rust oil coating |
Basic Cutting Technique
Position the tile or glass between the jaws of the appropriate nipper (glass nipper for hard materials, ceramic nipper for softer tiles). Align the cutting edge with your desired cut line. Apply steady, even pressure by squeezing the handles together in a smooth motion. The scissor-like action will score and separate the material cleanly.
Best Practices
- Always wear safety glasses to protect against small tile fragments that may fly during cutting
- Work on a flat, stable surface with good lighting to see your cut line clearly
- Make small, controlled cuts rather than forcing the tool through thick material in one squeeze
- For curved or intricate cuts, make multiple small cuts to gradually shape the piece rather than attempting one large cut
- Use the glass nipper (G2007) for hard, brittle materials like glass and stone
- Use the ceramic nipper (G2008) for softer tiles, marble, and decorative materials
- Engage the safety lock when tools are not in active use to prevent accidental closure
Personal Protection
- Always wear safety glasses or a face shield when cutting tile or glass to protect against sharp fragments
- Wear work gloves to protect your hands from sharp edges on cut tiles and broken glass pieces
- Ensure adequate lighting in your work area to maintain control and visibility of your cuts
Tool Safety
- Engage the safety lock on both nippers when not actively cutting to prevent accidental hand injuries
- Keep your fingers clear of the jaws when squeezing the handles, especially during the final cutting motion
- Do not attempt to cut material thinner than 1/16 inch, as the tool may not grip properly and could cause slipping
- Do not force the tool through material thicker than 3/8 inch, as this can damage the jaws or cause the tool to slip
- Inspect the jaws regularly for damage or dullness; sharp jaws are safer and more effective than dull ones
Storage
- Store nippers in a dry location to preserve the anti-rust oil coating on the carbon steel
- Keep the safety locks engaged during storage to prevent accidental closure and to protect the jaws
- Store away from moisture and humidity to extend tool life
Cutting Techniques
- For glass tiles, use a light touch and let the tool do the work; excessive force can cause uneven breaks
- Score the material first with a light squeeze, then apply full pressure on the second squeeze for cleaner breaks
- For curved cuts, mark your line with a grease pencil and make multiple small cuts to gradually shape the piece
- When fitting tiles around pipes or obstacles, make test cuts on scrap material first to ensure accuracy
Material-Specific Advice
- Glass tiles cut more cleanly when the glass is at room temperature; cold glass can be more brittle and prone to unexpected breaks
- For marble and soft stone, the ceramic nipper works best; use controlled pressure to avoid crushing delicate material
- Stained glass and decorative tiles benefit from the glass nipper's wheeled design, which distributes pressure more evenly
- Mosaic work is easier if you plan your cuts before starting; lay out pieces dry to minimize waste
Maintenance
- Keep the jaws clean and free of tile dust, which can accumulate and affect cutting performance
- Wipe down the tools after use to maintain the anti-rust oil coating
- Periodically check the spring-return mechanism to ensure smooth operation

Pros
- Smooth ball-bearing slide reduces hand fatigue during repetitive cuts
- Titanium-coated cutting wheel stays sharp longer than standard wheels
- Extendable side arms accommodate tiles larger than the base platform
- Cuts both ceramic and porcelain without requiring tool changes
- Sturdy yellow steel frame designed for years of jobsite use
Cons
- Manual operation requires physical strength and technique to achieve consistent, clean cuts
- Limited to straight and diagonal cuts; does not handle curved or complex shapes
The QEP 10630 is a workhorse manual tile cutter built for professionals and dedicated DIYers who need to process large-format tiles regularly. The 24-inch cutting capacity covers most modern tile applications, and the ball-bearing slide mechanism makes scoring feel effortless compared to older, friction-based designs. The titanium-coated tungsten-carbide wheel is a standout feature, offering both durability and the smooth scoring action that leads to clean breaks.
What sets this cutter apart is its thoughtful design for handling oversized materials. The side arm extensions provide crucial support when working with tiles that exceed standard dimensions, preventing wobble and ensuring accurate cuts. Whether you're working with ceramic subway tiles or large-format porcelain slabs, the QEP 10630 adapts to the material without requiring adjustments or different equipment.
The trade-off is that this is a manual tool requiring physical effort and proper technique. You'll need adequate workspace and a steady hand to achieve consistent results. It's not designed for curved cuts or intricate shapes, but for straightforward rip cuts and diagonal scoring on large tiles, it performs reliably and delivers the precision expected at this price point.
| Specification | Details |
|---|---|
| Brand | QEP |
| Model | 10630 |
| Maximum Straight Cut | 24 inches |
| Maximum Diagonal Cut | 16 inches |
| Cutting Wheel | 7/8 inch titanium-coated tungsten-carbide |
| Slide Mechanism | Ball-bearing slide |
| Compatible Materials | Ceramic and porcelain tile |
| Side Arm Extensions | Yes |
| Power Source | Manual (no electricity required) |
| Color | Yellow |
Setup and Safety: Place the cutter on a flat, stable work surface. Ensure the cutting wheel spins freely and the slide moves smoothly. Wear safety glasses to protect against tile dust and fragments. Keep hands clear of the cutting wheel at all times.
Measuring and Positioning: Measure your tile carefully and mark the cut line with a pencil or marker. Place the tile on the base platform with the cut line aligned under the cutting wheel. Use the side arms if the tile is large or unwieldy.
Scoring the Tile: Apply steady, even pressure as you pull the cutting wheel toward you in one smooth motion. The goal is to score the tile surface without breaking it yet. A single, confident pass is better than multiple passes. For thicker porcelain, you may need slightly more pressure.
Breaking the Tile: Once scored, use the breaking mechanism (typically a lever or foot pedal depending on the model) to snap the tile cleanly along the score line. Support both sides of the tile to prevent uneven breaking.
Maintain the Cutting Wheel: Keep the wheel clean and free of tile dust. A clogged wheel reduces cutting efficiency and increases the risk of uneven scores. Wipe it down between cuts for best results.
Master Your Technique: Consistent, moderate pressure beats aggressive force. Let the titanium-coated wheel do the work. A good score requires only one smooth pass; multiple passes wear the wheel faster and may cause chipping.
Support Large Tiles Properly: Always extend the side arms when working with tiles near or exceeding 20 inches. This prevents rocking and ensures your score line stays true. Proper support also reduces hand strain.
Score in Good Light: Position your work so the cut line is clearly visible. Good lighting helps you maintain alignment and produce straighter cuts. Mark your line with a dark pencil for visibility.
Practice on Scrap Tile: Before cutting expensive material, familiarize yourself with the tool's feel and the pressure required for your specific tile thickness and material. Every tile type behaves slightly differently.
Who Should Buy This: The QEP 10630 is ideal for contractors, professional installers, and serious DIYers who frequently work with large-format tiles. If you're planning a major tile project (kitchen backsplash, bathroom walls, or floor) and want to avoid renting equipment, this is a solid investment.
When to Consider Alternatives: If your project involves mostly small tiles (under 12 inches), a smaller, lighter cutter may be sufficient. If you need to cut curved shapes, intricate patterns, or very thick stone, a wet saw would be more appropriate. For occasional, one-time projects, renting may be more economical.
What You Get: This is a manual tool with no electricity or water requirements. It's portable, reliable, and requires minimal maintenance. You're investing in durability and precision for straight cuts on large tiles.
Durability Expectations: The yellow steel frame and titanium-coated wheel are built to withstand years of jobsite use. With basic maintenance (keeping the wheel clean and the slide lubricated), this tool should serve you for many projects.

Pros
- Exceptional cutting capacity handles large-format tiles that standard cutters cannot manage
- Three-blade design provides flexibility to optimize cuts for different tile types and thicknesses
- Dual handles significantly reduce cutting effort, making it accessible for users of varying strength levels
- Precision engineering with adjustable roller track ensures repeatable, accurate cuts with minimal waste
- Includes helpful accessories like suction cups and pliers for a complete cutting solution
Cons
- Suction cups work only on smooth tiles and will not grip rough or textured surfaces, limiting versatility
- Requires careful setup and roller adjustment out of the box to achieve optimal performance and accuracy
The YANGYANGDA 71-inch manual tile cutter stands out for its oversized cutting capacity, handling tiles twice as long as conventional models. The 3-blade rotating system is engineered to adapt to different tile materials, whether you're working with ceramic, porcelain, or stone. This flexibility, combined with the ability to cut tiles up to 4.7 inches thick, makes it a practical choice for homeowners and DIYers undertaking ambitious renovation projects that involve large-format tiles.
What sets this cutter apart is its engineering for stability and precision. The wear-resistant roller system and adjustable precision track are designed to eliminate wobble during scoring, which directly translates to cleaner breaks and higher success rates. The dual auxiliary handles are a thoughtful addition that meaningfully reduces the physical effort required to operate the cutter, allowing you to work longer without fatigue. For projects involving dozens of cuts, this ergonomic design makes a real difference.
Setup and maintenance do require attention to detail. The roller track needs proper adjustment to function optimally, and the included suction cups work best on smooth tile surfaces. Understanding these limitations upfront and preparing your workspace accordingly will help you get the most from this tool. For DIYers committed to mastering large-format tile cutting without investing in expensive power equipment, this cutter delivers solid value and professional-grade results.
| Specification | Detail |
|---|---|
| Cutting Length Capacity | Up to 71 inches (1.8 m) |
| Tile Thickness Range | 4 to 12 mm (0.16 to 0.47 inches) |
| Maximum Thickness | 4.7 inches |
| Blade System | 3-Head Rotating Blade Design |
| Material Compatibility | Ceramic, Porcelain, Stone Tiles |
| Roller System | Multiple Wear-Resistant Rollers |
| Track Type | Precision Bite Track with Adjustment Screws |
| Handles | Dual Auxiliary Handles |
| Included Accessories | Suction Cups, Tile Pliers |
| Brand | YANGYANGDA |
Preparation: Place your tile on a flat, sturdy work surface to ensure even cutting force. Before your first cut, verify that the rollers slide smoothly along the track without wobbling. Adjust the tightness of the track by turning the adjustment screws around the rollers until the fit is snug and stable.
Scoring: Position the tile securely on the cutter bed. Use the dual handles to guide the 3-blade system across the tile surface in a smooth, controlled motion. The goal is to score a clean line that will serve as your break point. Apply consistent, even pressure throughout the stroke.
Breaking: After scoring, position the tile so the scored line aligns with the break mechanism. Use steady, controlled pressure on both handles to cleanly separate the tile along the scored line. For thick tiles, take your time and let the tool do the work rather than forcing the break.
Suction Cup Use: The included suction cups work best on smooth, non-porous tile surfaces. They will not adhere to rough, textured, or uneven surfaces. Use them to safely position and stabilize tiles during cutting when the surface allows.
Optimize Roller Performance: Spend time getting the roller track adjustment right before starting your project. A properly adjusted track is the foundation of clean, accurate cuts. Check alignment periodically, especially if you're cutting multiple tiles in one session.
Tile Material Matters: Different tile materials may require slightly different cutting techniques. Porcelain tiles are harder and may need a slower, more deliberate scoring stroke. Ceramic tiles typically respond well to standard cutting speed. Experiment with scrap pieces if you're new to a particular tile type.
Work Surface Setup: Ensure your work table is completely flat and stable. Any unevenness will transfer to your tile and can cause uneven breaks or chipping. A dedicated cutting station will improve both safety and results.
Blade Maintenance: Keep the 3-blade system clean of tile dust and debris. Periodically wipe down the blades and track to prevent buildup that could affect cutting precision. This simple maintenance extends tool life and ensures consistent performance.
Who Should Buy This Cutter? This tool is ideal for homeowners and DIYers planning large-format tile projects, such as modern kitchen backsplashes, bathroom renovations, or feature walls with oversized tiles. If your project involves tiles longer than 48 inches, this cutter is a practical alternative to renting or purchasing power equipment.
When to Choose This Over Other Options: Manual tile cutters offer precision without electricity, noise, or dust generation. This 71-inch model excels when you need that control and quiet operation for extended cutting sessions. If you're cutting dozens of tiles of varying sizes and thicknesses, the 3-blade system's flexibility is a real advantage.
Setup and Learning Curve: Expect to spend 15-20 minutes setting up and calibrating the roller track before your first cut. This upfront investment in proper setup pays dividends in cutting accuracy. Once calibrated, the tool is straightforward to operate, though mastery improves with practice on scrap tiles.
Space and Storage: At 71 inches long, this cutter requires a dedicated work surface or storage space. Measure your workshop or garage before purchasing to ensure you have adequate room for both operation and storage.

Pros
- Extends cutting capacity to 71 inches, making it practical for modern large-format tile trends
- Three-blade system provides flexibility across different tile materials and thicknesses
- Dual handles and precision rollers reduce user fatigue and improve cutting accuracy
- Heavy-duty construction delivers stable performance without wobbling or binding
Cons
- Suction cup guides only work on smooth, flat tile surfaces and are not effective on textured or uneven tiles
- Requires a flat, sturdy work surface to maintain even cutting pressure, limiting portability on job sites
The DYBEDA 71-inch manual tile cutter stands out for its ability to handle large-format tiles that standard cutters simply cannot accommodate. With a cutting capacity reaching 71 inches and thickness range from 0.16 to 0.47 inches, this tool opens up design possibilities for modern installations featuring oversized ceramic, porcelain, and stone tiles. The three-blade scoring system is thoughtfully designed to adapt to different tile materials, allowing users to select the appropriate blade for cleaner cuts and better results across varying tile types.
Ergonomics and stability are key strengths of this cutter. The dual auxiliary handles reduce the physical effort required during long cutting sessions, which is especially valuable on larger projects. The heavy-duty wear-resistant rollers and precision bite track work together to eliminate wobbling and ensure consistent scoring every time. These design elements translate to more accurate cuts and less user fatigue, making the tool practical for both professional installers and serious DIYers.
Practical considerations matter when choosing a tile cutter. This model performs best when placed on a flat, sturdy workbench or floor to maintain even cutting pressure throughout the stroke. The built-in suction cup guides work reliably on smooth, flat tile surfaces but are not suitable for textured or uneven tiles. Understanding these operational requirements helps users get the best performance and longest tool life from their investment.
| Specification | Detail |
|---|---|
| Cutting Length Capacity | Up to 71 inches (1.8 meters) |
| Tile Thickness Range | 0.16 to 0.47 inches (4 to 12 mm) |
| Scoring System | Three-blade rotary design with interchangeable blades |
| Roller System | Heavy-duty wear-resistant rollers with precision bite track |
| Handles | Dual ergonomic auxiliary handles |
| Securing Features | Built-in suction cups and tile clamp |
| Compatible Materials | Ceramic, porcelain, and stone tiles |
| Best Surface | Flat, sturdy workbench or floor |
| Brand | DYBEDA |
Setup and Preparation
Place the tile cutter on a flat, sturdy workbench or floor to ensure even cutting pressure and stable operation. Clean the work surface to remove dust and debris that could interfere with the cutter's performance.
Positioning the Tile
Lay your tile flat on the cutter bed, aligning it with the guide rails. Use the built-in suction cups on smooth, flat tile surfaces to secure the material. For textured or uneven tiles, rely on the tile clamp to hold the piece firmly in place.
Scoring and Breaking
Select the appropriate blade from the three-blade system based on your tile material. Apply steady, even pressure as you push the scoring wheel across the tile surface in one smooth motion. Do not make multiple passes over the same line. Once scored, use the cutter's breaking mechanism to snap the tile cleanly along the scored line.
Maintenance
After each use, wipe down the rollers and blade system to remove tile dust and debris. Check the suction cups periodically to ensure they maintain proper grip on smooth surfaces. Keep the precision bite track clean for consistent performance on future projects.
Before You Start
Inspect the cutter for any damage or loose parts before each use. Ensure all handles are secure and the tile clamp operates smoothly. Keep the work area well-lit so you can see the scoring line clearly.
During Operation
Always use both hands when operating the cutter, gripping the dual auxiliary handles firmly. Keep your fingers and hands away from the scoring wheel and blade area. Never force the cutter through a tile; let the blade do the work with steady, even pressure. Wear safety glasses to protect your eyes from tile dust and small chips.
After Cutting
Allow the cutter to come to a complete stop before removing the tile. Handle cut tiles carefully, as edges may be sharp. Clean up tile dust promptly using a damp cloth or vacuum to prevent slip hazards and keep your work area safe for the next project.
Work Surface Stability
Ensure your workbench or floor is level and sturdy. An unstable work surface compromises cutting accuracy and increases the risk of the tile or cutter shifting unexpectedly. For large projects, consider securing the cutter to a dedicated work station.
Blade Selection Strategy
The three interchangeable blades are your key to clean cuts across different tile types. Ceramic tiles typically work best with one blade, while porcelain and stone may require different options. Keep all three blades sharp and rotate them regularly to extend their lifespan and maintain cutting quality.
Scoring Technique
A single, confident scoring pass is superior to multiple light passes. Apply steady, even pressure throughout the entire stroke. The goal is to create a consistent score line that guides a clean break. Rushing or hesitating mid-stroke often results in uneven breaks and wasted material.
Suction Cup Optimization
Suction cups work best on smooth, glazed tile surfaces. Before relying on them, test their grip on a scrap piece. For textured or matte-finish tiles, the tile clamp is your better choice. Keep suction cups clean and free of dust for optimal adhesion.
Large Format Tile Handling
When working with tiles approaching the 71-inch capacity, have a helper available to support the tile as it extends beyond the cutter bed. This prevents the tile from tipping or shifting during the scoring process. Proper support also allows you to focus on maintaining consistent pressure and a straight line.
Project Planning
Measure and mark all cut lines before beginning. Group similar cuts together to minimize blade changes and maximize efficiency. For complex layouts, consider making a cardboard template first to verify measurements and reduce the risk of costly mistakes on expensive large-format tiles.
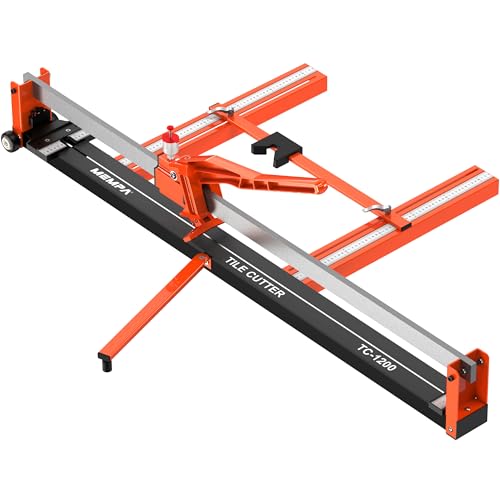
Pros
- Tungsten carbide wheel delivers consistently clean, chip-free cuts that reduce waste and rework
- Sealed rail system with maintenance oil extends tool lifespan and keeps performance smooth over time
- Precision single-rail design provides superior control and straighter cuts compared to dual-rail systems
- Auto-return handle reduces operator fatigue and speeds up repetitive cutting tasks
- Heavy-duty steel frame with integrated support arms handles large-format tiles securely and accurately
Cons
- No customer reviews available yet, so real-world durability and long-term performance feedback is limited
- Requires manual operation and physical effort to snap tiles, which may be tiring for extended projects or users with limited hand strength
The Mempa 48-inch manual tile cutter is engineered for homeowners and DIYers who need reliable, accurate cuts on ceramic and porcelain tiles without the cost and complexity of powered equipment. The tungsten carbide wheel is the standout feature here, delivering clean, chip-free scoring that minimizes waste and reduces the need for touch-up work. Combined with the sealed rail roller system, the cutter maintains smooth operation over time while the included oil bottle ensures you can keep the rails performing at their best.
What sets this model apart is its precision single-rail design, which provides better control and straighter scoring compared to traditional dual-rail systems. The 15x45mm solid rail and reinforced steel construction deliver exceptional rigidity, meaning your cuts stay accurate cut after cut. The auto-return handle is a practical feature that speeds up workflow by automatically resetting after each score, reducing fatigue during larger projects. The integrated support arms are invaluable when working with large-format tiles, keeping materials stable and preventing shifting that could compromise cut quality.
The cutter handles tiles from 5 to 16mm thick and supports both 0-degree straight cuts and 45-degree angle cuts on a non-slip steel base, making it versatile enough for most residential tiling applications. If you're tackling a bathroom renovation, kitchen backsplash, or floor installation and want a manual cutter that delivers professional results without breaking the bank, this Mempa model is worth serious consideration.
| Specification | Detail |
|---|---|
| Brand | Mempa |
| Model | 48 Inch Manual Tile Cutter |
| Cutting Width | 48 inches |
| Tile Thickness Range | 5-16 mm |
| Cutting Angles Supported | 0 degrees and 45 degrees |
| Wheel Type | Tungsten carbide |
| Rail System | Precision single-rail (sealed, dust-resistant) |
| Rail Dimensions | 15x45 mm solid rail |
| Base Material | Reinforced steel |
| Base Type | Non-slip steel base |
| Handle Type | Auto-return handle |
| Included Accessories | Oil bottle for rail maintenance |
| Support Features | Integrated support arms for large-format tiles |
| Suitable Materials | Ceramic and porcelain tiles |
| Operation | Manual (no electricity required) |
Step-by-Step Operation
- Prepare Your Workspace: Place the tile cutter on a stable, level work surface. Ensure the non-slip steel base is clean and free of debris.
- Measure and Mark: Measure your tile and mark the cut line clearly with a pencil or tile marker.
- Position the Tile: Place the tile on the cutter bed, aligning your cut line with the scoring wheel. Use the integrated support arms to stabilize large-format tiles and prevent shifting.
- Adjust the Angle: Select your cutting angle (0 degrees for straight cuts, 45 degrees for beveled cuts) using the cutter's angle adjustment mechanism.
- Score the Tile: Apply firm, even pressure as you pull the handle toward you to score the tile. The tungsten carbide wheel will create a clean scoring line. One smooth pass is usually sufficient.
- Snap the Tile: After scoring, use the breaking mechanism to snap the tile cleanly along the scored line. The auto-return handle will reset automatically for your next cut.
- Maintenance: After use, apply a small amount of oil (included) to the sealed rail to maintain smooth operation and extend tool life.
Safe Operation Guidelines
- Wear Eye Protection: Always wear safety glasses when cutting tiles. Tile dust and small fragments can become airborne during scoring and snapping.
- Use Hand Protection: Wear work gloves to protect your hands from sharp tile edges and the tungsten carbide wheel.
- Secure Your Workspace: Ensure the tile cutter is positioned on a stable, level work surface. Never operate on an unstable or uneven base.
- Keep Hands Clear: Keep your hands and fingers away from the scoring wheel and breaking mechanism during operation.
- Inspect Before Use: Check the cutter for any visible damage, loose parts, or dull wheels before each use. A dull wheel can cause the tile to crack unpredictably.
- Avoid Overextension: Do not force the cutter to handle tiles thicker than 16mm or materials it is not designed for.
- Use Support Arms: Always use the integrated support arms when working with large-format tiles to prevent shifting and loss of control.
- Maintain the Tool: Keep the sealed rail clean and properly lubricated with the included oil to prevent rust and ensure safe, smooth operation.
Expert Advice for Best Results
- One Smooth Pass: Score the tile with one smooth, confident stroke rather than multiple passes. Multiple passes can cause the wheel to drift and result in uneven scoring lines.
- Let the Wheel Do the Work: Apply firm, steady pressure but do not force the handle. The tungsten carbide wheel is designed to score efficiently with proper technique.
- Mark Both Sides for Angled Cuts: When making 45-degree cuts, mark your cut line on both the top and bottom of the tile to ensure alignment and accuracy.
- Maintain Rail Lubrication: Regularly apply the included oil to the sealed rail, especially if you notice any resistance or grinding sounds. A well-lubricated rail ensures cleaner, more accurate cuts.
- Clean After Each Session: Wipe down the cutter bed and rail with a dry cloth after use to remove tile dust and prevent buildup that can affect performance.
- Break Tiles Immediately: Snap tiles as soon as the scoring line is complete while the score is still fresh. Waiting too long can cause uneven breaks.
- Use Support Arms on All Large Tiles: Even if a tile seems stable, use the integrated support arms. They prevent subtle shifting that can compromise cut quality.

Pros
- Exceptional capacity for large-format tiles eliminates the need for multiple tools or workarounds
- Interchangeable three-blade system adapts to different tile materials and reduces replacement costs
- Precision track system and wear-resistant rollers deliver clean, straight cuts with minimal chipping
- Dual handles and suction cup system make solo operation easier and safer
- Heavy-duty construction built to withstand professional-level use and repeated projects
Cons
- Suction cups only work on smooth, flat tile surfaces and won't grip textured or uneven tiles effectively
- Requires a sturdy, flat workbench or floor for proper operation, limiting portability on job sites
The DYBEDA 71" manual tile cutter addresses a real gap in the market for homeowners and contractors working with modern large-format tiles. Standard tile cutters typically max out around 48 inches, forcing professionals to improvise or invest in multiple tools. This cutter's extended 71-inch capacity handles oversized ceramic, porcelain, and stone tiles in a single, controlled motion, making it a practical solution for contemporary kitchen backsplashes, bathroom walls, and feature installations.
The three-blade scoring wheel system is a thoughtful upgrade that sets this tool apart. Rather than a single fixed blade, the interchangeable design lets you match the blade to your tile material, whether you're working with delicate ceramics or harder porcelain. The heavy-duty wear-resistant rollers and precision bite track work together to minimize wobbling and deliver consistent, clean scores that snap cleanly along your cut line. The dual auxiliary handles aren't just a comfort feature; they meaningfully reduce the physical effort required on large tiles, which matters during day-long projects.
Setup and operation require attention to detail. The suction cup guides work well on smooth, flat tile surfaces but won't grip textured or uneven materials. You'll need a sturdy, level workbench or floor to maintain even cutting pressure throughout the stroke. For DIYers tackling occasional projects, this is manageable; for professionals running multiple jobs, it's essential to account for setup time and workspace requirements. Customer support is available if you run into questions, which is reassuring for a specialized tool.
| Specification | Detail |
|---|---|
| Maximum Cutting Length | 71 inches (1.8 meters) |
| Tile Thickness Range | 0.16 to 0.47 inches (4 to 12 millimeters) |
| Blade System | Three-head scoring wheel system with interchangeable blades |
| Compatible Materials | Ceramic, porcelain, and stone tiles |
| Roller System | Heavy-duty wear-resistant rollers with precision bite track |
| Auxiliary Handles | Dual ergonomic handles for improved control |
| Positioning Aids | Built-in suction cups and tile clamp |
| Brand | DYBEDA |
| Category | Manual Tile Cutting Tool |
Setup and Preparation
Place your tile cutter on a flat, sturdy workbench or floor to ensure even cutting pressure throughout the operation. Position your tile on the cutter's track, using the built-in suction cups and tile clamp to secure it firmly. The suction cups work best on smooth, flat tile surfaces; if your tile has texture or an uneven finish, rely on the clamp for stability.
Scoring and Breaking
Select the appropriate blade from the three-blade system based on your tile material. Draw the scoring wheel across the tile surface in one smooth, controlled motion, applying consistent downward pressure. You should hear a crisp scoring sound as the blade marks the surface. Once scored, use the cutter's breaking mechanism to snap the tile cleanly along the scored line.
Best Practices
Work slowly and deliberately; rushing increases the risk of uneven cuts or blade damage. The dual auxiliary handles are designed to reduce strain; use them to maintain control and even pressure. For thick tiles near the 0.47-inch limit, take extra care to score deeply enough for a clean break. Clean the blade and rollers periodically to maintain precision and prevent tile dust buildup.
Personal Protection
Wear safety glasses to protect your eyes from tile shards and dust particles. Consider wearing work gloves to protect your hands from sharp tile edges, especially when handling broken pieces. A dust mask is recommended if you're cutting multiple tiles in succession, as tile dust can irritate airways.
Workspace Safety
Ensure your work surface is stable and level before beginning. Never operate the cutter on a wobbly or uneven workbench, as this compromises cut accuracy and increases accident risk. Keep your hands clear of the blade path during scoring, and never force the cutter through a tile; if resistance is high, check that the blade is sharp and properly selected for your material.
Tool Maintenance
Inspect the blade regularly for damage or dullness; a worn blade requires more pressure and increases breakage risk. Keep the roller track clean and free of debris to maintain smooth operation. Store the cutter in a dry location, and handle it carefully to avoid dropping, which can damage the precision track system.
Maximizing Cut Quality
For the cleanest breaks, score the tile in one smooth stroke without lifting the wheel or changing pressure. A hesitant, multiple-pass approach often results in uneven breaks or chipping. On thicker tiles, a slightly deeper score improves snap consistency. Let the tool do the work; excessive force doesn't improve results and can damage the blade.
Material-Specific Techniques
Ceramic tiles typically score and break cleanly with moderate pressure. Porcelain tiles are harder and may require the specialized blade and slightly more deliberate scoring. Stone tiles vary widely; assess your specific material and adjust blade selection accordingly. The three-blade system exists precisely to handle these differences.
Workflow Efficiency
Batch similar cuts together to minimize blade changes and maintain momentum. Measure twice and mark clearly before scoring; the cost of a wasted tile far exceeds the time spent in careful preparation. For large projects, organize tiles by size and material to streamline the cutting sequence.

Pros
- Produces smooth cuts with minimal chipping on ceramic, porcelain, and granite
- Works for both wet and dry cutting, eliminating the need for multiple blades
- Reduced vibration makes cuts more controlled and safer for the operator
- Extended blade life saves money on frequent replacements
- Versatile compatibility works with most standard angle grinders and tile saws
Cons
- No customer reviews available yet, so real-world durability claims are unverified
- Limited to straight cuts only; cannot be used for curved cuts or side grinding
The ZORUNNA 4.5-inch diamond blade stands out for its ultra-thin design, which balances cutting speed with precision. The X-teeth turbo mesh rim is engineered to handle both wet and dry cutting applications, making it flexible enough for various tile materials including ceramic, porcelain, and granite. For homeowners and DIYers working on kitchen backsplashes, bathroom tile, or outdoor paving projects, this dual-functionality eliminates the frustration of switching between specialized blades.
Safety and control are central to this blade's design. The thicker core construction significantly reduces vibration and wobbling during operation, which translates to steadier cuts and less operator fatigue. The spark-free operation and absence of burn marks on materials are particularly valuable when working with delicate or finished tiles where surface damage can be costly. At a maximum of 13,200 RPM, this blade operates within safe parameters for standard angle grinders.
The high-performance diamond matrix is built for longevity, meaning fewer blade changes during extended projects and better long-term value. The two-pack format provides a practical backup, ensuring you won't run out mid-project. However, because this product has no verified customer reviews yet, durability claims should be evaluated through your own use, and the straight-cut-only limitation means curved or decorative cuts require different tools.
| Specification | Detail |
|---|---|
| Brand | ZORUNNA |
| Blade Diameter | 4.5 inches |
| Arbor Size | 7/8 inch |
| Quantity | 2 blades |
| Rim Type | X-teeth turbo mesh |
| Core Design | Thicker core for reduced vibration |
| Cutting Modes | Wet and dry |
| Maximum RPM | 13,200 |
| Blade Thickness | Ultra-thin design |
| Compatible Tools | Angle grinders, tile saws, wet saws |
| Materials | Ceramic, porcelain, granite, marble, vitrified tile |
Setup and Safety First
Always wear complete personal protective equipment: eye protection, face shield, dust mask or respirator, gloves, protective clothing, and safety shoes. Ensure the blade guard is installed and secure before operation. Check that your angle grinder or tile saw is in good working condition and that the blade is properly mounted with the 7/8-inch arbor fitting snugly.
Making Cuts
Start the tool gently and allow it to reach full speed before contacting the material. For tile cutting, guide the blade smoothly through the material using steady, even pressure. Avoid forcing the blade, as this can cause binding or damage. Let the blade do the work; excessive pressure reduces cut quality and blade life. For wet cutting, maintain a consistent water supply to cool the blade and reduce dust.
Maintenance and Limitations
After each use, allow the blade to cool completely before storage. This product is designed for straight cuts only; do not attempt curved cuts, side grinding, twisting, or prying motions. Never exceed 13,200 RPM. Clean debris from the blade regularly and inspect for damage before each use. Replace the blade if you notice uneven wear, chipping, or wobbling.
Personal Protective Equipment (Required)
Do not operate this blade without full PPE: safety glasses or goggles, face shield, dust mask or respirator, work gloves, long sleeves, and closed-toe safety shoes. Tile dust and ceramic particles can cause serious eye and respiratory damage. A dust mask is essential for dry cutting; a respirator is recommended for extended use or enclosed spaces.
Machine Safety
Always ensure the blade guard is installed and locked in place. Never remove or disable the guard. Secure your workpiece firmly before cutting to prevent kickback or slipping. Keep hands and body parts at least 12 inches away from the blade during operation. Do not reach over or under the blade while it is running. Start the tool before contacting the material and allow it to reach full speed gradually.
Operational Boundaries
This blade is designed for straight cuts only. Do not attempt side grinding, curved cuts, twisting, or prying motions, as these can cause blade breakage or dangerous kickback. Maintain RPM below 13,200 as specified. Never force the blade through material; excessive pressure causes overheating and premature failure. For wet cutting, ensure water supply is consistent and the blade remains cool. Inspect the blade before each use and replace immediately if you see cracks, chips, or uneven wear.
Is This Blade Right for You?
This ZORUNNA blade is ideal if you're a homeowner or DIYer planning tile projects like kitchen backsplashes, bathroom walls, countertops, or outdoor paving. The two-pack format is perfect for larger jobs where you might wear out one blade or want a backup. If your projects involve mostly straight cuts in ceramic, porcelain, or granite, this blade delivers the precision and durability you need. However, if you frequently need curved cuts or decorative shapes, you'll need additional blade types or a different cutting method.
Compatibility Check
Confirm your angle grinder or tile saw has a 7/8-inch arbor to ensure proper fit. Most standard angle grinders use this size, but verify before purchasing. The blade works with both wet and dry cutting setups, so you have flexibility in your cutting method. If you primarily work with masonry or stone, the extended blade life and reduced vibration make this a practical investment compared to cheaper alternatives that wear out quickly.
What to Expect
Expect clean, chip-free cuts when you maintain steady pressure and proper technique. The ultra-thin design means faster cutting speed compared to thicker blades, which can reduce project time. Wet cutting will produce cleaner results and extend blade life further. Because this product has no verified customer reviews yet, consider starting with a single use on scrap material to evaluate performance before committing to larger projects. The two-pack provides good value and ensures you won't be caught without a blade mid-project.

Pros
- Robust construction with anti-slip rubber pads prevents tile movement and ensures clean, accurate cuts
- Extended handle and high-leverage design make cutting easier and reduce hand strain on larger projects
- Chrome-plated rails glide smoothly and withstand repeated use without binding
- Compact footprint makes storage and transport convenient for homeowners with limited shop space
- No water or electricity needed, making it ideal for renters, small repairs, and outdoor work
Cons
- Limited to manual operation, so cutting thick or hard porcelain tiles requires significant hand strength and effort
- Diagonal cutting capacity of 14 inches may be restrictive for larger decorative or specialty tile applications
The QEP 10220Q is a workhorse manual tile cutter built for homeowners and DIYers tackling ceramic and porcelain tile projects. Its 20-inch cutting capacity covers the vast majority of standard wall and floor tiles you'll encounter in residential work. The design emphasizes stability and control: heavy-duty rubber pads grip tiles firmly to prevent slippage during scoring, while dual chrome-plated steel rails ensure smooth, straight cuts every time. The rubber-padded aluminum breaker bar is thoughtfully designed to snap tiles cleanly without chipping or marring edges, a common frustration with cheaper models.
Ergonomics matter when you're cutting tiles for hours, and QEP recognized this with an extended handle and high-leverage design that reduces hand fatigue significantly. The bumpers on the rails protect both the tool and your work surface, extending the cutter's lifespan and keeping your tiles pristine. This cutter requires no electricity or water, making it genuinely portable and perfect for on-site work, renovations in homes without power access, or quick repairs where setting up a wet saw isn't practical.
The trade-off is straightforward: manual operation demands more physical effort than motorized alternatives, especially when cutting thicker porcelain or harder materials. The 14-inch diagonal cutting limit may also constrain projects involving larger decorative tiles. For standard residential tile work, however, this QEP cutter delivers reliability, ease of use, and excellent value without the complexity or cost of a wet saw.
| Specification | Details |
|---|---|
| Model Number | 10220Q |
| Brand | QEP |
| Maximum Straight Cut Length | 20 inches |
| Maximum Diagonal Cut | 14 inches |
| Maximum Tile Thickness | 1/2 inch |
| Cutting Wheel Size | 1/2 inch diameter |
| Rail Material | Chrome-plated steel (dual rails) |
| Base Material | Heavy-duty rubber pads |
| Breaker Bar Material | Rubber-padded aluminum alloy |
| Handle Type | Extended high-leverage design |
| Power Source | Manual (no electricity required) |
| Tile Types Supported | Ceramic and porcelain |
Setup and Measurement: Place your tile on the cutter with the cutting line aligned under the cutting wheel. Use a ruler or measuring tape to mark your cut line clearly on the tile. Position the tile so the rubber pads grip it firmly without rocking.
Scoring the Tile: Pull the handle toward you with steady, even pressure to score the tile surface. You should hear a consistent scratching sound as the wheel creates a groove. One smooth pass is typically sufficient; don't press too hard or make multiple passes, as this wastes energy and can dull the wheel.
Breaking the Tile: After scoring, align the tile so the scored line is centered over the breaker bar. Push down on the handle firmly and evenly to snap the tile along the score line. For thicker tiles, you may need to apply more pressure. The rubber padding on the breaker bar prevents chipping and marring.
Maintenance Tips: Wipe the cutting wheel regularly to remove tile dust and debris. Keep the rails clean and dry to ensure smooth operation. Store the cutter in a dry location to prevent rust on the chrome rails.
Hand and Finger Protection: Keep your fingers clear of the cutting wheel at all times. Never reach under the wheel or place hands near the breaking edge. Wear work gloves if you have sensitive skin or are working with rough tile edges.
Eye Protection: Wear safety glasses to protect your eyes from tile dust and small chips that may fly during the breaking process. Tile dust can be sharp and irritating.
Stable Work Surface: Always place the cutter on a flat, stable work surface at waist height. A wobbly setup increases the risk of slips and makes accurate cuts impossible. Ensure the rubber pads are clean and grippy before each use.
Tile Handling: Support the tile with both hands as you position it, and keep the tile pressed firmly against the rubber pads during scoring. After breaking, be aware that freshly broken tile edges are extremely sharp. Handle broken pieces carefully and consider wearing gloves.
Dust Control: Work in a well-ventilated area or outdoors when possible. If working indoors, consider using a dust mask, as tile dust can contain silica particles that are harmful if inhaled in large quantities.
Is This the Right Cutter for You? The QEP 10220Q works best for homeowners and DIYers handling standard ceramic and porcelain tile projects. If your project involves mostly straight cuts on tiles under 20 inches, this manual cutter is ideal. It's perfect for bathroom renovations, kitchen backsplashes, and floor tile work where you have time to cut tiles one at a time.
When to Consider Alternatives: If you're cutting dozens of tiles, a wet saw will save time and physical effort. If your tiles are thicker than 1/2 inch or you need to cut many diagonal or curved lines, a wet saw or angle grinder setup is more practical. For very large tiles (over 20 inches), you'll need a larger cutter or wet saw.
Budget Considerations: This cutter costs significantly less than a wet saw, making it the smart choice for occasional DIYers or renters. If you're a professional or tackling large projects regularly, the investment in a wet saw pays off in speed and reduced fatigue.
Space and Portability: The compact design is a major advantage if you have limited storage space or work on multiple job sites. You can throw it in a truck or car without taking up much room, and it works anywhere without needing a power outlet or water source.
Durability and Warranty: QEP is an established brand in tile tools. Before purchasing, verify the warranty coverage and check if replacement wheels are readily available and affordable, as the cutting wheel will eventually dull with use.

Pros
- Aluminum construction balances strength with portability
- Straightforward manual operation requires no power source or water
- Generates minimal dust and noise compared to power tools
- Extended 26-inch capacity handles larger tile formats
- Precision scoring wheel delivers consistent, clean cuts
Cons
- Manual operation requires physical effort and technique to achieve clean breaks consistently
- Limited to straight cuts only - cannot make angled or curved cuts
The Sigma 6053820 is a manual tile cutter engineered for homeowners and professionals who need a reliable, electricity-free solution for straight tile cuts. With a 26-inch cutting capacity, it handles both standard and larger-format ceramic and porcelain tiles commonly found in kitchen backsplashes, bathrooms, and flooring projects. The aluminum frame provides a solid work platform while remaining light enough to transport between job sites.
The precision scoring mechanism is the core of this cutter's performance. A hardened wheel scores the tile surface with consistent pressure, and the pull-down lever applies downward force to cleanly snap the tile along the scored line. This design minimizes chipping and delivers the straight cuts that tile installation demands. The tool works best on tiles without excessive glaze thickness and performs well on standard ceramic and porcelain materials.
For DIYers and contractors alike, this cutter offers practical advantages: no dust collection system needed, no water runoff to manage, and silent operation that won't disturb neighbors or jobsite schedules. It's most effective for projects requiring numerous straight cuts, though it does demand proper technique and a steady hand to maximize cut quality. The manual nature means physical effort is involved, making it less suitable for high-volume production work.
| Specification | Details |
|---|---|
| Brand | Sigma |
| Model Number | 6053820 (2B3) |
| Type | Manual Pull Tile Cutter |
| Maximum Cutting Length | 26 inches (66 cm) |
| Maximum Cutting Width | 26 inches (66 cm) |
| Frame Material | Aluminum |
| Cutting Mechanism | Precision Scoring Wheel with Pull-Down Lever |
| Power Required | None - Manual Operation |
| Suitable for | Ceramic and Porcelain Tiles |
| Cut Type | Straight Cuts Only |
Setup: Place the tile cutter on a flat, stable work surface. Ensure the cutting bed is clean and free of debris that could affect tile placement or scoring accuracy.
Measuring and Positioning: Measure your tile and mark the cut line with a pencil or marker. Align the tile with the guide rails, positioning your cut line directly under the scoring wheel. Most Sigma cutters include guides to help with alignment.
Scoring: Pull the handle down smoothly and steadily to score the tile. The wheel should create a visible line across the tile surface. Apply consistent, moderate pressure - excessive force is unnecessary and can damage the wheel.
Breaking: Once scored, pull the handle down again with a firm, controlled motion to snap the tile along the scored line. The break should be clean if the score was deep and straight.
Maintenance: Wipe the cutting bed clean after each use. Keep the scoring wheel clean and check it periodically for wear or damage, as a dull wheel compromises cut quality.
Hand Placement: Always keep hands clear of the scoring wheel and the breaking lever path. Position your hands to guide the tile, not directly in line with the cutting mechanism. Wear work gloves if you prefer additional protection from sharp tile edges.
Tile Stability: Secure the tile firmly against the guide rails before scoring. A shifting tile can cause uneven cuts and increase the risk of the tile slipping during the breaking motion.
Personal Protective Equipment: Wear safety glasses to protect your eyes from small tile fragments that may chip or fly during the breaking process. A dust mask is optional but recommended if you're working indoors for extended periods.
Work Surface: Use the cutter on a sturdy, level work table or bench. An unstable surface can affect cutting accuracy and create safety hazards. Keep the work area clear of clutter and trip hazards.
Tile Edges: Freshly cut tile edges are sharp. Handle cut tiles carefully, and consider wearing gloves when moving or installing them. Allow cut tiles to cool slightly before handling if they've been scored and broken in quick succession.
Scoring Pressure: A single, smooth scoring pass is better than multiple passes. Let the wheel do the work - excessive pressure doesn't improve the cut and wears the wheel faster. Aim for a visible, consistent line across the tile.
Tile Type Matters: This cutter performs best on standard ceramic and porcelain tiles. Glazed tiles cut more cleanly than unglazed varieties. Very thick tiles or stone materials may be challenging and may require a wet saw instead.
Clean Cuts on Glazed Tiles: For glazed tiles, score the glaze side lightly first, then apply full pressure on the second pass. This technique reduces chipping on the finished surface.
Wet vs. Dry Scoring: Some professionals lightly dampen the tile surface before scoring to reduce dust and improve the wheel's grip. Experiment to find what works best for your tile type.
Practice Makes Perfect: If you're new to manual tile cutting, practice on scrap tiles first. Getting the feel for proper pressure and lever motion takes a few cuts, and scrap tiles are cheaper than mistakes on your actual project.

Pros
- Tungsten carbide wheel scores and breaks tiles cleanly without chipping or cracking
- Dual rails with ball bearings provide smooth operation and repeatable accuracy
- Non-slip base and anti-displacement design keep the cutter stable on any work surface
- Handles tiles from 1 inch to 17 inches wide, making it versatile for most residential projects
- No water or electricity needed, so it's portable and ideal for bathrooms, kitchens, and outdoor work
Cons
- No reviews available yet, so real-world durability and long-term performance feedback is limited
- Maximum cutting thickness of 0.5 inches may not accommodate thicker specialty or stone tiles
The VEVOR 17-inch manual tile cutter is built for homeowners and DIYers who want clean, precise cuts without the complexity of wet saws or the mess of water spray. The tungsten carbide wheel is engineered to score tiles efficiently, and the dual rail system with ball bearing design ensures your cuts stay straight and accurate, whether you're working on a small bathroom backsplash or a larger kitchen floor project. The heavy-duty aluminum base and non-slip rubber feet keep the cutter planted firmly on your work surface, even when you're applying steady downward pressure to break the tile.
What sets this cutter apart is its practical design for real-world use. The built-in scale and angle rulers let you measure and position tiles before cutting, reducing waste and saving time. The anti-displacement pressure rod holds tiles in place during scoring and breaking, so you don't have to worry about the tile shifting mid-cut. It handles wall tiles, polished tiles, and glazed tiles up to 17 inches long and 0.5 inches thick, making it compatible with most standard residential tile sizes and materials you'll encounter in bathroom and kitchen renovations.
As a manual tool, this cutter requires no electricity or water hookup, which makes it ideal for working in tight spaces, outdoors, or anywhere you need portability and simplicity. The trade-off is that it's designed for tiles within its thickness range and works best with consistent, controlled hand pressure. For homeowners tackling tile projects of moderate scope, this is a reliable, low-maintenance option that delivers results without the learning curve or setup time of larger machinery.
| Specification | Detail |
|---|---|
| Brand | VEVOR |
| Model Type | Manual Tile Cutter |
| Maximum Cutting Length | 17 inches (430 mm) |
| Maximum Cutting Thickness | 0.5 inches (12 mm) |
| Minimum Cutting Width | 1 inch (25 mm) |
| Cutting Wheel Material | Tungsten Carbide |
| Rail System | Double Rails with Ball Bearings |
| Base Material | Heavy-Duty Aluminum |
| Base Features | Non-Slip Rubber Feet |
| Compatible Tile Types | Wall Tiles, Polished Tiles, Glazed Tiles |
| Measurement Tools | Built-In Scale and Angle Rulers |
| Power Source | Manual (No Electricity Required) |
| Water Requirement | None |
Step 1: Prepare Your Tile Clean the tile surface and measure your cut line using the built-in scale and angle rulers. Mark your cut line lightly with a pencil if needed.
Step 2: Position the Tile Place the tile on the cutter with the marked line aligned under the tungsten carbide wheel. Use the anti-displacement pressure rod to secure the tile in place. Make sure the tile is centered and stable before proceeding.
Step 3: Score the Tile Apply steady, even pressure as you push the scoring head across the tile. The tungsten carbide wheel will score a clean line along your cut. You should hear a consistent scratching sound as the wheel marks the tile surface.
Step 4: Break the Tile Once you've scored the full length of the tile, apply firm downward pressure on the pressure rod to snap the tile along the score line. The break should be clean and straight if your score was consistent.
Step 5: Clean Up Remove the broken tile pieces and wipe down the cutter to remove any tile dust. Check the cutting wheel for debris and clean as needed to maintain smooth operation.
Wear Protective Gear Always wear safety glasses to protect your eyes from tile fragments and dust. Consider wearing work gloves to protect your hands from sharp tile edges during and after cutting.
Secure the Cutter Make sure the cutter is placed on a flat, stable work surface before use. The non-slip base helps prevent movement, but double-check that the cutter won't shift during operation. Keep your work area clear of clutter.
Handle Broken Tiles Carefully Tile edges are sharp after breaking. Handle broken pieces with care, and dispose of them in a designated container. Sweep up dust and small fragments immediately to prevent slips and cuts.
Use Proper Hand Position Keep your hands clear of the cutting wheel and pressure rod. Apply pressure smoothly and steadily rather than jerking or forcing the cutter. Never place your hands or fingers under the pressure rod or near the wheel while the cutter is in use.
Maintain the Cutter Periodically inspect the tungsten carbide wheel for wear or damage. If the wheel becomes dull or chipped, it should be replaced to ensure clean cuts and safe operation. Keep the rails and base clean and free of tile debris.
Who Should Buy This? The VEVOR 17-inch manual tile cutter is ideal for homeowners and DIYers planning bathroom, kitchen, or entryway tile projects. It's especially useful if you want to avoid the mess and complexity of wet saws or if you're working in spaces where water and electricity aren't convenient. It's also a great choice for small to medium-sized projects where you need portability and simplicity.
What Projects Is It Best For? This cutter excels at cutting standard wall tiles, polished tiles, and glazed tiles for backsplashes, shower walls, bathroom floors, and kitchen walls. If your project involves tiles larger than 17 inches or thicker than 0.5 inches, or if you're working with stone or porcelain tiles that exceed the thickness range, you may want to consider a larger wet saw instead.
Key Considerations Before Buying Measure your tiles to confirm they fall within the 1-inch to 17-inch width range and 0.5-inch thickness limit. Think about your work space and whether you have room for a stationary cutter. Consider the volume of cuts you need to make: manual cutters work best for moderate quantities of cuts. If you're doing extensive tiling, a wet saw might be faster and more efficient.
Value for Money This cutter offers solid value for DIYers who need precision without the investment in a large wet saw. The tungsten carbide wheel and dual rail system are built to last, and the manual design means no ongoing electricity or water costs. For occasional to moderate tile work, this is a practical, affordable choice.

Pros
- Laser guide and aluminum rulers significantly improve accuracy for consistent, professional-quality cuts
- All-steel construction and 27-ball-bearing sliding head provide years of reliable, shake-free performance
- Includes bonus spare cutter wheel, saving money on replacement parts down the road
- Ergonomic design with anti-skid handle and lifting mechanism makes extended work sessions more comfortable
Cons
- Not suitable for mosaic tiles or uneven surfaces, limiting versatility for certain decorative tile projects
- Manual operation requires physical effort and technique to achieve consistent results, unlike powered alternatives
The VEVOR 48-inch manual tile cutter is purpose-built for homeowners and DIYers who need reliable, accurate cuts without the expense and complexity of powered equipment. The all-steel frame construction with solid rails provides the stability necessary for clean cuts, while the upgraded sliding head featuring 27 ball bearings ensures smooth, consistent operation without the vibration that can compromise precision. The built-in oil reservoir keeps the mechanism lubricated, extending the tool's working life and maintaining performance over hundreds of cuts.
What sets this cutter apart is the laser infrared positioning system combined with three aluminum rulers, which together eliminate much of the guesswork from tile layout and cutting. This is particularly valuable when working on larger projects where accumulated measurement errors can lead to significant waste. The super-hard alloy cutter wheel handles standard ceramic and porcelain tiles between 6-15mm thick, and VEVOR includes a spare wheel so you won't be sidelined if the primary wheel dulls during a project.
The ergonomic design reflects practical thinking about real-world use. The anti-skid rubber handle reduces hand fatigue during extended cutting sessions, and the lifting mechanism helps you reposition the handle smoothly with the moving roller. This cutter excels for standard floor and wall tiles on projects ranging from bathroom renovations to kitchen backsplashes, though it's not designed for specialty tiles with uneven surfaces like some decorative mosaics.
| Specification | Detail |
|---|---|
| Brand | VEVOR |
| Type | Manual Tile Cutter (Score and Snap) |
| Frame Material | All-Steel |
| Maximum Cutting Width | 1200mm (48 inches) |
| Maximum Cutting Thickness | 6-15mm |
| Cutter Wheel | Super-hard Alloy (1 included + 1 spare) |
| Sliding Head | 27 Ball Bearings with Built-in Oil Reservoir |
| Positioning System | Laser Infrared Guide |
| Rulers | Three Aluminum Rulers for Multiple Sizes |
| Handle | Ergonomic Anti-Skid Rubber with Lifting Mechanism |
| Suitable For | Smooth Standard Ceramic and Porcelain Tiles |
| Not Recommended For | Mosaic Tiles with Uneven Surfaces |
Setup and Measurement: Place the tile cutter on a stable, level work surface. Use the laser guide and aluminum rulers to mark your cut line on the tile. Align the tile with the desired ruler based on your cutting width. Ensure the tile sits flat against the base rails.
Scoring the Tile: Position the cutter wheel at the starting edge of your cut line. Apply steady downward pressure as you pull the sliding head toward you in one smooth motion. The cutter wheel should score a clean line across the tile surface. Do not make multiple passes over the same line.
Snapping the Tile: Once scored, position the tile so the scored line aligns with the snap bar beneath the sliding head. Apply downward pressure on both sides of the tile to snap it cleanly along the scored line. For thicker tiles, you may need to apply firm, even pressure.
Maintenance: After each use, wipe down the frame and rails to remove tile dust. Check the oil reservoir periodically and refill as needed to keep the ball bearings lubricated. Replace the cutter wheel when it becomes dull or damaged using the included spare.
Consistent Pressure: The key to clean cuts is maintaining steady, even pressure throughout the scoring stroke. Rushing or applying uneven force can result in incomplete breaks or chipped edges. Let the sharp cutter wheel do the work rather than forcing it.
Tile Positioning: Always ensure tiles are seated flat and square against the base rails before cutting. Even slight tilts can cause the cutter wheel to skip or the snap to be uneven. Use the laser guide to verify alignment before each cut.
Cutter Wheel Care: A sharp wheel is essential for clean cuts. Keep track of how many tiles you've cut and replace the wheel proactively rather than waiting until it fails mid-project. Dull wheels produce rough edges and require more pressure, increasing the risk of breakage.
Dust Management: Keep a damp cloth nearby to wipe tile dust from the rails and sliding head periodically during work. Dust buildup can interfere with smooth operation and affect the accuracy of your cuts.
Practice Cuts: Before cutting expensive tiles, practice on scrap pieces to develop a feel for the proper pressure and speed. This is especially important if you're new to manual tile cutting.
Is This the Right Tool for You? This manual tile cutter is ideal if you're tackling a tiling project with 50-500 tiles and want a tool that requires no electricity, produces no dust clouds, and offers excellent precision at a reasonable price point. It's perfect for bathrooms, kitchens, entryways, and other moderate-scale projects.
When to Choose This Over Other Options: Choose this cutter if you need accuracy and reliability without the expense of powered wet saws or the learning curve of angle grinders. It's quieter than power tools, creates less mess, and is safer for beginners with proper technique. However, if you're cutting hundreds of tiles, a powered wet saw may save significant time and effort.
Tile Compatibility: This cutter works best with standard ceramic floor tiles, porcelain tiles, and similar smooth-surfaced materials. It is not designed for glass tiles, natural stone, or decorative mosaic tiles with irregular surfaces. Always verify your tile type before purchasing.
Space and Storage: At 48 inches wide, this tool requires adequate workspace. Measure your work area and ensure you have at least 5-6 feet of clear space on either side of the cutter for tile handling. It can be stored vertically in a garage or workshop to save space.
Skill Level: Manual tile cutters have a moderate learning curve. Beginners can achieve good results within a few practice cuts, but mastery develops with experience. If you're new to tile work, allocate time for practice before starting your main project.
Buying Guide: How to Choose the Right Tile Cutter
Choosing among the best tile cutters comes down to matching the tool to your specific tile material, project scale, and skill level. The sections below walk through every major factor our team evaluated so you can make a confident, well-informed purchase decision.
Tile Material and Hardness
Ceramic tile is the most forgiving material to cut and works with virtually any manual scorer or snap cutter. Porcelain is considerably denser and requires a cutter with a high-quality tungsten carbide scoring wheel and enough rail leverage to snap cleanly. Natural stone such as marble and granite demands even more force and is generally better suited to a wet saw with diamond blades. If you plan to cut glass mosaic tiles or irregular shapes, tile nippers like the Goldblatt 2-piece set (ASIN B09G6LMYL4) are purpose-built for that task and rated highly by over 1,500 buyers. Always confirm that the cutter you choose lists your tile material as a compatible type before purchasing.
Cutting Capacity and Rail Length
Rail length determines the maximum straight cut you can make. A 17-inch cutter like the VEVOR model (ASIN B0FLP1STCC) is sufficient for standard 12-by-12-inch tiles and wall tile work. Mid-range cutters in the 24-inch to 48-inch class, such as the QEP 10630 and the 48-inch all-steel model (ASIN B08B86381H), handle the 18-by-18-inch and 24-by-24-inch formats that are common in modern floor installations. Large-format tiles 24 inches and above, including the 24-by-48 slabs increasingly popular in open-plan renovations, require the 71-inch class cutters represented in this list by B0FLDC6W69 and B0FMDZZYYM. Always buy at least four to six inches more rail than your largest tile to allow for diagonal cuts.
Scoring Wheel Quality
The scoring wheel is the single most important component on any manual tile cutter. Tungsten carbide wheels outlast steel alternatives by a significant margin and maintain the consistent edge depth needed for clean snaps on porcelain. Look for replaceable wheels so the cutter stays useful long after the original wears out. The 48-inch model with a dust-sealed roller (ASIN B0GS8PXFK1) earns a strong early rating partly because its sealed bearing system protects wheel alignment during dusty jobsite use. Multi-head scoring systems, found on the 71-inch cutters in this roundup, distribute pressure more evenly across wide tiles and reduce chipping along the score line.
Cut Angle Options
Most manual tile cutters make straight 90-degree rip cuts as their primary function. Diagonal or 45-degree cuts are essential for corner borders, decorative patterns, and fitting tiles around obstacles. Some models include an adjustable fence or protractor guide that allows angles anywhere from 22.5 to 60 degrees. If you are planning trim work around doorframes or installing herringbone patterns, confirm that the cutter supports angle cuts before buying. The 48-inch model with 0-degree and 45-degree cut support (ASIN B0GS8PXFK1) is a good example of a mid-range tool that covers both standard needs without requiring a separate miter setup. For intricate curved cuts, pair your cutter with a set of oscillating multi tools to refine edges after scoring.
Build Quality and Frame Material
Entry-level tile cutters often use aluminum alloy frames that are light but can flex under pressure, leading to inconsistent snaps on thick porcelain. Professional-grade cutters feature all-steel frames, reinforced guide rails, and anti-vibration pads that keep the tile stable during the scoring stroke. The 48-inch all-steel frame cutter (ASIN B08B86381H) is a standout in the mid-price range for its rigid construction, while the Sigma 2B3 pull cutter (ASIN B00DG4NRSE) represents premium Italian engineering used by professional tilers worldwide. Heavy steel adds weight, so consider how much you will move the tool around a jobsite before prioritizing frame mass over portability.
Push vs. Pull Action
Push-action cutters are more common and generally easier for beginners to learn because the scoring stroke moves away from the body. Pull-action designs, exemplified by the Sigma 2B3 (ASIN B00DG4NRSE), draw the handle toward the user. Many professional tilers prefer pull action because it allows them to apply body weight more naturally and maintain a consistent scoring depth. Neither design is objectively superior; the right choice depends on your comfort and the type of tile you cut most often. If you already own a push-action model and want to diversify your renovation toolkit, browse precision cutting saws and other complementary tools that reward proper technique.
Laser Guides and Alignment Aids
Laser guide lines are not strictly necessary for experienced tilers who can read a pencil mark reliably, but they are genuinely helpful for beginners and for cutting dark or patterned tiles where pencil lines are hard to see. The 48-inch cutter (ASIN B08B86381H) includes a built-in laser guide that projects a cut line onto the tile surface, reducing misalignment on first attempts. Suction cup systems on the large-format 71-inch models prevent tile shift during scoring, which is critical when handling a 47-inch porcelain slab that could crack from the slightest movement mid-stroke.
Diamond Blades as an Accessory Option
For projects that require a curved or notched cut that no manual scorer can produce, a 4.5-inch diamond blade (ASIN B0D4TJK9NT) mounted on a standard angle grinder fills the gap efficiently. At a budget-friendly price point, the two-pack reviewed here carries a strong rating from over 1,100 buyers and handles porcelain, ceramic, granite, and marble. Diamond blades are not a replacement for a dedicated cutter on straight cuts, but they are invaluable for plumbing cutouts and irregular shapes. Combine them with demolition and detail saws when you are doing a full bathroom gut-and-retile job.
Ease of Use and Safety Features
Non-slip rubber feet, ergonomic handles with soft-grip coating, and anti-displacement pressure rods all contribute to safer, more controlled cuts. The VEVOR 17-inch cutter (ASIN B0FLP1STCC) packs an impressive array of ergonomic features into a beginner-friendly package, making it one of the more thoughtfully designed entry-level options in this roundup. Auto-return handles found on the 48-inch rail cutter (ASIN B0GS8PXFK1) reduce operator fatigue during repetitive cuts on large flooring projects. Wearing eye protection is non-negotiable when snapping tile; tile shards travel fast and in unpredictable directions regardless of how careful you are.
Budget Considerations
Tile cutters in this roundup span from budget-friendly nippers and entry-level scorers all the way to professional-grade pull cutters at a premium price. For an occasional DIY project covering a single bathroom, an entry-level or mid-range cutter delivers more than enough performance. Contractors and serious renovators who cut tile daily will recoup the investment in a professional model through speed, accuracy, and reduced tile waste. Keep in mind that cheap tiles and an expensive cutter is a much better combination than expensive tiles and a cheap cutter. Before finalizing your purchase, it is worth comparing your tile cutter shortlist against your project scope the same way you would weigh up power planers or finish nailers: buy to the top of what your workload justifies.
Why Trust HomeThru
HomeThru is an independent editorial platform with no financial ties to any manufacturer or retailer. Our team of researchers and renovation specialists spends hundreds of hours each month analyzing product specifications, verified buyer reviews, and real-world performance data to deliver honest, unbiased recommendations. We do not sell products, process orders, or handle warranty claims. Every pick in this guide was selected through a systematic evaluation process that weighed cutting capacity, build quality, scoring wheel durability, safety features, and long-term value. We also cross-referenced our findings with community feedback from professional tilers and experienced DIYers to ensure our recommendations hold up in diverse real-world conditions.
Our commitment extends beyond tile cutters. Whether you are planning a full renovation or assembling a comprehensive tool kit, you will find similarly rigorous guides covering concrete mixers, caulk guns, and pneumatic flooring nailers across our Building and Renovation section. We update our roundups regularly to reflect new product releases and pricing shifts so the information you rely on stays current.
Final Thoughts
The best tile cutters for your project depend entirely on your tile type, the scale of your work, and how often you plan to cut. After careful evaluation of every model in this roundup, here are our standout picks by category:
- Best Overall: Sigma 6053820 Pull Tile Cutter 2B3 26 Inches earns the top spot for its professional pull-action design, premium Italian construction, and exceptional performance on porcelain and natural stone that justifies its premium price for serious tilers.
- Best for Large-Format Tiles: 71-Inch Large Format Manual Tile Cutter with 3-Head Scoring Wheel System is purpose-built for oversized porcelain and stone slabs up to 4.7 inches thick, with integrated suction cups that prevent costly tile shift during the scoring stroke.
- Best Mid-Range Pick: QEP 10630 24-Inch Professional Tile Cutter strikes a strong balance between cutting capacity and everyday affordability, handling the tile sizes most homeowners encounter during bathroom and kitchen renovations.
- Best Budget Pick: VEVOR 17-Inch Manual Tile Cutter delivers double-rail precision, a tungsten carbide wheel, and beginner-friendly ergonomics at an entry-level price that makes it an outstanding value for first-time tile projects.
- Best for Specialty Cuts: Goldblatt 2-Piece Glass Tile Nippers Set gives mosaic artists and glass tile installers the controlled nibbling action needed for curves and irregular shapes that no rail cutter can achieve.
Whichever model you choose, pair it with proper safety glasses, a stable work surface, and a consistent scoring technique. A well-chosen tile cutter pays for itself in reduced waste and cleaner results from the very first cut. If your project also involves structural or finish carpentry, our guides to framing nailers, brad nailers, and stud finders will help you build a complete renovation toolkit around your new cutter.
Frequently Asked Questions
Can a manual tile cutter handle porcelain tiles?
Yes, but not every manual cutter is up to the task. Porcelain is dense and unforgiving, so you need a cutter with a high-quality tungsten carbide scoring wheel, a rigid all-steel or reinforced frame, and enough rail length to apply even breaking pressure across the full tile width. Budget models with softer wheels often chip the glazed surface rather than snapping cleanly. Confirm that the manufacturer specifically lists porcelain as a compatible material before buying, and always score in a single smooth stroke.
What size tile cutter do I need for a standard bathroom floor?
Most bathroom floors use 12-by-12-inch or 12-by-24-inch tiles, which means a 24-inch cutter covers the vast majority of cuts comfortably, including diagonal cuts on 12-by-12 tiles. If you plan to use larger 18-by-36-inch or 24-by-24-inch formats, step up to a 36-inch or 48-inch model. Always add a few extra inches of rail length beyond your largest tile to accommodate the angle cuts you will inevitably need along walls and around fixtures. A dedicated tile saw is worth considering alongside your manual cutter for curved cuts around pipes and toilets.
How do I get clean cuts without chipping the tile edge?
Chipping almost always comes from one of three mistakes: an inconsistent scoring stroke, insufficient scoring pressure, or scoring the same line twice. Score the tile in a single confident stroke from one edge to the other, applying firm and even downward pressure throughout. Never go back over the score line. Make sure the scoring wheel is sharp and in good condition. On very hard porcelain, slightly increasing wheel pressure helps. After snapping, a rubbing stone or diamond hand pad smooths any minor burrs along the cut edge quickly.
If your renovation also involves cutting lumber or trim around the tiled areas, a reliable setup with miter saws and pry bars will round out your workspace efficiently.
Is a pull-action tile cutter better than a push-action model?
Pull-action cutters, popularized by Sigma and a few other European manufacturers, let you use your body weight more naturally and often produce more consistent scoring depth on thick tiles. Push-action models are generally more intuitive for beginners and are the dominant design in the North American market. Neither is universally superior. Professional tilers often develop strong preferences based on years of muscle memory with one design. If you are new to tile work, start with a push-action model and consider a pull-action upgrade once you understand what scoring consistency feels like in practice.
When should I use diamond blades on an angle grinder instead of a manual cutter?
Manual tile cutters excel at straight rip cuts and predictable diagonal cuts on square or rectangular tiles. Angle grinders fitted with thin diamond blades shine when you need a curved notch for a pipe, an L-shaped cutout for an outlet box, or a complex shape that no straight-rail cutter can produce. Diamond blade work is dusty and loud, so always use respiratory protection and work outdoors or in a well-ventilated area. Think of the two tools as complementary rather than competing: use the manual cutter for the bulk of your cuts and the angle grinder for the exceptions.





Write Your Review
No reviews yet. Be the first to share your experience!