

Stripping old wallpaper by hand is the kind of home improvement job that looks manageable on a Saturday morning and turns into a multi-day ordeal by Sunday afternoon. A putty knife and a spray bottle will eventually get the job done, but a quality wallpaper steamer cuts that timeline dramatically by pumping wet steam directly behind the paper, dissolving the adhesive bond so entire sheets peel away cleanly without gouging your drywall. Whether you are tackling a single accent wall or clearing every room in a renovation, choosing the right steamer makes all the difference. Our team at HomeThru has independently researched, compared, and evaluated every model on this list, cross-referencing verified buyer feedback, specification sheets, and real-world performance data so you can shop with confidence.
The models below range from budget-friendly chemical-free strippers to heavy-duty multipurpose steam cleaners capable of handling wallpaper, tile grout, and upholstery in a single machine. Before you buy, scroll past the product list to our buying guide, where we break down every spec that actually matters on the job.
Top Wallpaper Steamers We Recommend
Pros
- Dual steam plates (8" x 11" and 3" x 6") handle both expansive walls and detailed trim work efficiently
- Long 2-hour runtime eliminates multiple refill breaks during extended projects
- Quick 12-minute heat-up time keeps momentum going and reduces overall project duration
- Extended 12-foot hose with 24-foot reach reduces fatigue when working on tall walls and ceilings
- Eco-friendly operation uses only distilled water, no harsh chemicals or disposal concerns
Cons
- Zero customer reviews available make it difficult to assess real-world durability and long-term performance
- Requires distilled water only, which means ongoing supply costs and planning ahead for larger projects
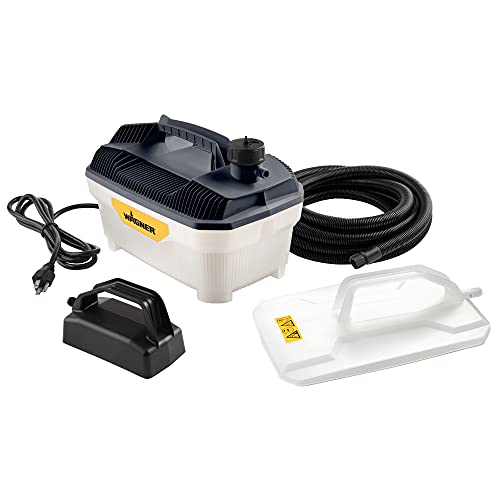
The Wagner 725 wallpaper steamer represents a straightforward, chemical-free approach to one of home improvement's most tedious tasks. By heating water to produce consistent steam, the unit softens wallpaper adhesive naturally, allowing you to strip old or outdated paper without toxic solvents or fumes. The dual steam plate system is the standout feature here: the larger 8" x 11" plate handles broad wall sections quickly, while the smaller 3" x 6" plate gives you precision control around corners, electrical outlets, and trim work. This versatility means you're not forced to choose between speed and accuracy.
Performance metrics are solid for the category. The 12-minute heat-up time is reasonable for a residential steamer, and the 2-hour runtime per tank fill is genuinely useful for tackling an entire room without constant refilling. The lightweight construction and 24-foot working radius (thanks to the 12-foot hose) reduce fatigue during extended work sessions, which matters when you're holding the tool overhead or reaching across expansive wall areas. The improved steam plate design promises more uniform heat distribution compared to older models, which should translate to more consistent wallpaper softening and fewer stubborn spots.
This steamer makes the most sense for homeowners removing wallpaper from multiple rooms or dealing with heavily adhered vintage paper. It's also the right choice if you have young children or pets and want to avoid chemical exposure. The trade-off is that you'll need a steady supply of distilled water and should plan ahead for larger projects. Without substantial user feedback yet, it's difficult to assess long-term durability, but the core design is proven and straightforward, with no complex electronics to fail.
| Specification | Detail |
|---|---|
| Brand | Wagner Spraytech |
| Model Number | 2439019 / 725 |
| Product Type | Wallpaper Steamer |
| Heat-Up Time | Approximately 12 minutes |
| Runtime per Tank | Up to 2 hours |
| Large Steam Plate Dimensions | 8" x 11" |
| Small Steam Plate Dimensions | 3" x 6" |
| Hose Length | 12 feet |
| Total Working Radius | 24 feet |
| Water Type Required | Distilled water only |
| Chemical Required | None |
| Weight Classification | Lightweight and portable |
| Included Accessories | Two steam plates, 12-foot cool-touch hose |
Setup and Preparation: Fill the water tank with distilled water only. Do not use tap water, as mineral deposits can clog the steam delivery system. Allow approximately 12 minutes for the unit to heat up and reach operating temperature.
Applying Steam: Once heated, select the appropriate steam plate for your work area. Use the large 8" x 11" plate for expansive wall sections to cover ground quickly. Switch to the small 3" x 6" plate for corners, edges, and detailed trim work. Apply the plate firmly against the wallpaper and hold for 15-30 seconds to allow steam to penetrate and soften the adhesive backing.
Removing Wallpaper: After steaming a section, use a plastic scraper or putty knife to gently lift the softened wallpaper. Work at a slight angle to avoid gouging the wall underneath. Move methodically across the wall in overlapping sections. If paper resists, reapply steam rather than forcing removal, which can damage drywall.
Maintenance: Allow the steamer to cool completely before emptying any remaining water. Between projects, run distilled water through the system to prevent mineral buildup. Store in a dry location away from extreme temperatures.
Steam Burns: Steam is extremely hot and can cause serious burns. Always use the cool-touch hose as directed, and avoid touching the steam plates or exposed steam vents. Keep hands and face at a safe distance when applying steam to walls. Wear long sleeves and consider using work gloves for added protection.
Electrical Safety: Keep the steamer and power cord away from water sources other than the designated fill tank. Do not operate the unit with wet hands or in wet conditions. Inspect the power cord for damage before each use. If the cord is damaged, do not use the unit.
Ventilation: While this steamer is chemical-free, ensure adequate room ventilation during use. Open windows and doors to allow steam to dissipate and maintain comfortable working conditions. Prolonged exposure to high humidity from steam can affect wall integrity in poorly ventilated spaces.
Water and Minerals: Use only distilled water. Tap water contains minerals that can damage internal components and reduce steamer lifespan. Never attempt to repair or disassemble the unit yourself. Refer to the manufacturer's warranty and support for technical issues.
Pre-Treatment Strategy: For stubborn, heavily adhered wallpaper, score the surface lightly with a scoring tool before steaming. This allows steam to penetrate behind the paper more effectively. Score in a crosshatch pattern without cutting deeply into the drywall. This technique can reduce overall removal time significantly.
Tank Management: On large projects, set up a refill station with distilled water nearby. Refill the tank before it runs completely dry to maintain consistent steam pressure. Keep track of your 2-hour runtime and plan breaks accordingly to avoid fatigue and maintain precision.
Plate Selection Timing: Use the large plate to cover maximum area quickly, then switch to the small plate to address stubborn edges and seams. This two-plate approach balances speed with control and prevents you from wasting time on detailed work with an oversized tool.
Wall Surface Protection: Test the steamer on an inconspicuous area first, especially on older walls or delicate surfaces. Some vintage wallpapers and wall finishes may be sensitive to prolonged heat. Work methodically and avoid holding steam in one spot too long, which can damage underlying drywall or paint.
Environmental Conditions: Wallpaper removal is easier in moderate temperatures and humidity. Avoid steaming on extremely hot days or in poorly ventilated spaces, as excessive moisture can compromise wall integrity. Allow walls to dry completely after removal before priming or repainting.

Pros
- Chemical-free operation is safer for homes with children and pets
- Large steam plate and generous water capacity speed up removal on expansive walls
- Cooling-touch hose design prevents accidental burns during extended sessions
- Heats up quickly so you can start work without long wait times
- Dual-purpose tool works on tile, grout, and other surfaces when not removing wallpaper
Cons
- Requires frequent refilling on very large rooms or thick wallpaper applications
- Hose length may feel limiting if working across wide wall sections from a single outlet
The KITLUCK Wallpaper Steamer combines practical power with user-friendly design, making it a solid choice for homeowners tackling wallpaper removal without chemical strippers. The 1500W heating element reaches operating temperature quickly, and the 1.2-gallon tank provides enough capacity for most room-sized projects before requiring a refill. The large steam plate is a genuine advantage for covering wall sections efficiently, reducing the number of passes needed compared to smaller competitors.
Safety features stand out in the design. The 11.5-foot cooling-touch hose prevents the common problem of hand burns during extended use, and the chemical-free operation eliminates concerns about fumes or skin irritation. This makes the steamer particularly appealing for families, renters, or anyone sensitive to harsh solvents. The unit's lightweight construction also reduces fatigue during overhead work on upper walls and ceilings, a real benefit when you're working alone.
Beyond wallpaper, this steamer functions as a general-purpose steam cleaner for tile grout, baseboards, and other household surfaces, adding versatility to your investment. Users consistently praise the straightforward operation and reliable performance, though those working on heavily textured or multiple-layer wallpaper may need patience and multiple passes for complete removal.
| Specification | Detail |
|---|---|
| Power Rating | 1500 watts |
| Water Tank Capacity | 1.2 gallons |
| Hose Length | 11.5 feet (cooling-touch) |
| Steam Plate Size | Large |
| Heat-Up Time | Quick (minutes) |
| Application | Wallpaper removal, steam cleaning |
| Chemical Required | None (water only) |
| Hose Feature | Cooling-touch design |
Preparation: Turn off power to the room at the breaker. Remove outlet covers and switch plates. Lay drop cloths to protect floors. Fill the water tank with distilled water to prevent mineral buildup.
Operation: Plug in the steamer and allow 3-5 minutes for heat-up. Test steam pressure on a inconspicuous area first. Hold the steam plate against the wallpaper for 15-30 seconds to soften the adhesive. Use a putty knife or scraper to gently lift and peel the wallpaper. Work in sections from top to bottom. Refill the tank as needed.
Finishing: Wipe walls with a damp cloth to remove residual adhesive. Allow walls to dry completely before priming and painting. Empty the tank and allow the unit to cool before storage.
Steam Burns: The cooling-touch hose reduces burn risk, but steam is still extremely hot. Always wear work gloves rated for heat protection. Never touch the steam plate directly. Keep children and pets away from the work area during operation.
Electrical Safety: Use a properly grounded outlet. Avoid running the hose through water or wet areas. Keep the power cord away from the steamer's hot surfaces. Turn off and unplug before refilling the water tank.
Ventilation and Moisture: Ensure good air circulation to prevent excessive humidity and mold growth. Open windows and use fans during and after steaming. Allow walls to dry completely before closing up the room. Use distilled water only to prevent mineral deposits that can damage the heating element.
Prep Work: Score thick or stubborn wallpaper with a scoring tool before steaming. This allows steam to penetrate multiple layers more effectively. Test a small hidden section first to confirm the wallpaper will release cleanly without damaging drywall.
Technique: Work methodically from top to bottom in vertical strips. Don't rush the steaming process; let the heat do the work. Multiple shorter applications often work better than one long application. If wallpaper isn't releasing, apply additional steam rather than forcing it with the scraper.
Maintenance: Empty the water tank after each use and allow it to dry completely. Run distilled water through the hose periodically to prevent mineral clogs. Store the unit in a cool, dry place away from direct sunlight. Check the hose for cracks or damage before each use.

Pros
- Effective steam pressure removes most wallpaper types without chemical damage to drywall
- Large heating plate speeds up the removal process compared to smaller handheld models
- Extended hose gives you flexibility to work from different angles and heights
- Easy water refill design and straightforward operation for first-time users
- Solid customer satisfaction with a 4.3-star rating across hundreds of reviews
Cons
- Heating time takes several minutes before the steamer reaches full pressure, which can slow down workflow
- Water tank capacity is moderate, requiring refills during larger projects or multiple room jobs
The Goplus Wallpaper Steamer delivers a practical solution for homeowners and DIYers looking to remove wallpaper without relying on chemical strippers. The unit operates by heating water into pressurized steam that penetrates wallpaper adhesive, loosening it so you can peel away layers cleanly. The large steam plate is the standout feature here, covering more wall area with each application than typical handheld steamers, which translates to faster project completion and less arm fatigue during extended work sessions.
What makes this steamer appealing is its chemical-free approach. You're working with only water and heat, which means no toxic fumes in your home, safer cleanup, and peace of mind around children and pets. The 10-foot hose provides genuine convenience, letting you reach high walls, corners, and awkward spaces without constantly repositioning the unit itself. Users consistently report that the steamer handles common wallpaper types effectively, though results vary depending on adhesive age and wall condition.
The main trade-offs to consider are heating time and tank capacity. The unit needs several minutes to build pressure before you can start working, which interrupts your momentum if you're not prepared. The water reservoir is adequate for small to medium rooms but requires refilling during larger projects. For the price point, this steamer represents solid value for occasional or one-time removal jobs, though professionals tackling multiple properties might prefer models with larger tanks and faster heat-up cycles.
| Brand | Goplus |
| Product Type | Wallpaper Steamer |
| Steam Generation | Pressurized steam (chemical-free) |
| Hose Length | 10 feet |
| Steam Plate Size | Large (exact dimensions vary by model) |
| Power Source | Electric (corded) |
| Heating System | Electric heating element |
| Water Tank Type | Refillable reservoir |
| Best For | Wallpaper removal, wall cleaning |
| Customer Rating | 4.3 out of 5 stars |
Setup and Preparation: Fill the water reservoir with distilled or tap water, plug in the unit, and allow 5-10 minutes for the steamer to heat and build pressure. You'll typically see an indicator light when the unit is ready. Ensure the room is well-ventilated since steam will fill the space during work.
Applying Steam: Hold the steam plate firmly against the wallpaper for 15-30 seconds per section, allowing the steam to penetrate the adhesive. The pressure should loosen the paper without requiring excessive force. Work in overlapping sections, moving methodically across the wall from top to bottom. The extended hose lets you position yourself comfortably while keeping the plate flush against the surface.
Removing Wallpaper: Once the adhesive softens, use a putty knife or scraper to gently lift the wallpaper edge and peel it away. If paper resists, reapply steam to that section rather than forcing removal, which can damage the drywall underneath. Refill the water tank as needed during large projects, and allow the unit to cool completely before storing.
Steam and Burn Prevention: Steam from this unit reaches high temperatures. Always wear long sleeves and consider heat-resistant gloves when handling the steam plate or hose. Keep your face and hands at a safe distance from the steam outlet. Test the steam temperature on a small, inconspicuous area first to understand the intensity.
Electrical Safety: Use the steamer on a grounded outlet and keep the power cord away from water sources and wet areas. Do not submerge the unit or spray water directly on electrical components. Inspect the cord for damage before each use, and unplug the steamer when refilling the water tank or when not in active use.
Wall and Air Quality: Ensure good ventilation in the room to prevent excessive moisture buildup, which can damage drywall or promote mold growth. Work on walls that are structurally sound, as prolonged steam exposure on damaged or weakened drywall can cause deterioration. Keep children and pets away from the work area while the steamer is operating.
Prepare Your Walls First: Before steaming, score the wallpaper lightly with a scoring tool or rough sanding block. This allows steam to penetrate the adhesive layer more effectively, reducing the time you spend on each section. Remove outlet covers and switch plates to avoid water damage, and lay drop cloths to protect flooring from moisture and peeling debris.
Work Systematically: Start at the top of a wall and work downward in vertical sections. This prevents re-steaming already-loosened paper and minimizes drips running onto finished areas. Keep a sponge or towel nearby to wipe away excess water and adhesive residue as you go, which also helps you see which sections need additional steam.
Manage Water and Heating Time: Use distilled water when possible to reduce mineral buildup in the heating element, which can extend the steamer's lifespan. If you're tackling multiple rooms, keep the steamer running between sections to avoid repeated heating cycles. For stubborn adhesive, let the steam sit slightly longer rather than increasing pressure, which reduces strain on the unit.

Pros
- Delivers powerful, consistent steam that effectively loosens wallpaper adhesive
- Two steam plates maximize efficiency and allow for continuous work without waiting for plate changes
- Long runtime means fewer interruptions to refill water, keeping your project moving
- Lightweight construction makes it comfortable to hold and maneuver for extended periods
- Chemical-free operation is safer for your home and family
Cons
- Learning curve required to find the right technique and steam plate pressure for optimal results
- Steam can be extremely hot, requiring careful handling and proper safety precautions to avoid burns
The Wagner Spraytech 715 Power Steamer stands out as a practical solution for homeowners and DIYers who want to remove wallpaper without relying on chemical strippers. The chemical-free steam approach eliminates concerns about harsh fumes and messy cleanup, making it a safer choice for homes with children or pets. The lightweight design is particularly appreciated during longer projects, as it noticeably reduces the fatigue that comes with holding heavier equipment overhead.
What sets this steamer apart is the inclusion of two steam plates, which significantly streamlines your workflow. Instead of waiting for a single plate to cool or sitting idle between applications, you can alternate between plates and maintain momentum throughout your project. The extended runtime capability means fewer water refills, allowing you to focus on the task at hand rather than constantly tending to the machine. Users consistently report that the steamer heats up quickly and maintains steady steam pressure, which translates to more predictable and reliable performance.
This steamer's versatility extends beyond wallpaper removal, making it a worthwhile investment for your home improvement toolkit. Many owners successfully use it for cleaning grout, refreshing tile, and tackling other steam-cleaning tasks around the house. While the learning curve is manageable and the results are well worth the effort, proper technique and careful heat management are essential for getting the most from this equipment.
| Specification | Details |
|---|---|
| Brand | Wagner Spraytech |
| Model Number | 0282036 / 715 Power |
| Primary Function | Wallpaper Steamer |
| Steam Technology | Chemical-Free Steam |
| Included Accessories | Two Steam Plates |
| Design Feature | Lightweight Construction |
| Runtime | Extended / Long Run Time |
| Customer Rating | 4.5 out of 5 stars |
Setup and Heating: Fill the water tank with distilled water for best results and longest equipment life. Allow the steamer adequate time to heat up before beginning work, typically 30 seconds to a few minutes depending on water temperature. Check that your steam plate is securely attached before plugging in the unit.
Application Technique: Hold the steam plate firmly against the wallpaper for 15-30 seconds to allow steam to penetrate and soften the adhesive. Work in small sections rather than trying to cover large areas at once. Once the wallpaper begins to bubble or lift at the edges, use a putty knife or scraper to gently peel it away. Reapply steam as needed for stubborn sections.
Switching Plates: The two-plate system allows you to alternate between plates, letting one cool while you work with the other. This keeps your project moving without long waits. Always ensure plates are securely attached and handle with care, as steam and metal plates retain intense heat.
Heat Hazards: Steam and metal plates reach temperatures that cause severe burns instantly. Always wear protective gloves rated for heat and steam exposure. Keep hands clear of the steam outlet and never direct steam toward your face or body. Allow plates to cool before touching them with bare hands.
Water and Electrical Safety: Use distilled water to prevent mineral buildup and equipment damage. Keep the power cord away from water and steam. Never operate the steamer with wet hands or while standing in water. Ensure the unit sits on a stable, level surface during operation and heating.
Ventilation and Workspace: Work in well-ventilated areas to allow steam to escape naturally. Remove furniture and cover floors to protect against water damage from condensation and drips. Keep children and pets away from the steamer during operation. Allow the unit to cool completely before storing or refilling the water tank.
Preparation Matters: Before steaming, score or perforate the wallpaper with a scoring tool to help steam penetrate the adhesive layer more effectively. This simple step dramatically improves results and reduces the time needed to remove stubborn paper. Remove outlet covers and switch plates in the work area to avoid steam damage to electrical components.
Water Quality: Always use distilled water rather than tap water to minimize mineral deposits that can clog the steamer and reduce performance over time. Empty any remaining water after each use to prevent stagnation and bacterial growth inside the tank. This maintenance habit extends the life of your equipment significantly.
Timing and Patience: Allow adequate steam contact time before attempting to scrape. Rushing the process often results in torn wallpaper and incomplete adhesive removal. Work methodically in small sections, and don't hesitate to reapply steam to particularly stubborn areas. The two-plate system is your advantage here, use it to maintain steady progress without interruption.

Pros
- Extended 2-hour runtime minimizes water refills on full-room projects
- Interchangeable plate sizes let you switch between broad stripping and detailed corner work
- No chemical solvents means safer operation in occupied homes with children or pets
- Rapid heat-up time gets you started without lengthy preparation
- All essential tools included in one package, no additional purchases needed
Cons
- Limited water capacity may require refilling for projects spanning multiple rooms or very large walls
- Heavier initial learning curve to master steam pressure control and plate technique for best results
This wallpaper steamer offers a practical, chemical-free approach to one of home improvement's most tedious tasks. The 2-hour continuous steam runtime is a genuine advantage for homeowners tackling full rooms, as it significantly reduces the stop-and-refill interruptions that plague shorter-capacity models. The dual steam plates represent thoughtful design, letting you switch between a larger plate for broad wall sections and a smaller one for corners, baseboards, and detailed work without swapping equipment.
Performance-wise, the fast heating capability means you're not waiting around before starting your project. The included hose and scraper bundle everything needed for immediate use, which is helpful for DIYers who don't want to hunt down compatible tools. The 4.0-star user rating suggests solid reliability and consistent results across typical residential applications, with buyers generally appreciating the straightforward operation and chemical-free removal method that makes the work safer in homes with children or pets.
The main trade-off is that this steamer works best when you understand its steam pressure dynamics and plate technique. Beginners may need a few practice passes on inconspicuous wall sections to dial in the right approach. For homeowners willing to invest a modest learning curve, this steamer delivers dependable performance and genuine time savings on medium-to-large wallpaper removal projects.
| Specification | Details |
|---|---|
| Steam Runtime | 2 hours continuous |
| Steam Plates Included | Large and small |
| Heating Speed | Fast heating technology |
| Removal Method | Chemical-free steam |
| Included Accessories | Hose, scraper |
| User Rating | 4.0 out of 5 stars |
| Best For | Residential wallpaper removal, DIY projects |
Preparation: Fill the water tank with distilled water for best results. Allow the steamer to heat fully before beginning work. Test the steam output on a small, inconspicuous wall section first to understand the pressure and saturation level.
Technique: Press the appropriate steam plate firmly against the wallpaper for 30-60 seconds to allow steam to penetrate and loosen the adhesive. Start with the larger plate for broad wall areas, then switch to the smaller plate for corners, edges, and detailed sections. Move steadily across the wall rather than staying in one spot too long.
Removal: Once the wallpaper begins to bubble or curl, use the included scraper to gently lift and peel away the paper. Work at a shallow angle to avoid gouging the wall underneath. Have a bucket nearby for wet wallpaper scraps. Refill the water tank as needed during extended projects.
Steam Burns: Steam is extremely hot. Always wear protective gloves rated for heat resistance. Keep your hands at a safe distance from the steam plate and outlet. Never point the steam outlet toward skin or face.
Electrical Safety: Keep the steamer away from water pools on the floor. Use a properly grounded outlet. Do not operate with wet hands. Unplug the unit before refilling the water tank.
Ventilation: Ensure good air circulation in the work area to manage moisture and steam buildup. Open windows and doors to prevent excessive humidity. Allow walls to dry completely before applying new wallpaper or paint.
Surface Preparation: Check for asbestos-containing wallpaper or adhesives in older homes before steaming (consult a professional if unsure). Avoid steaming directly over electrical outlets or switches. Protect baseboards and trim with plastic sheeting if desired.
Maximize Efficiency: Work in systematic sections from top to bottom, allowing gravity to assist wallpaper removal. Apply steam, wait for adhesive softening, then scrape immediately while the wall is still warm. This rhythm prevents re-adhesion and saves time.
Optimize Plate Selection: Use the large plate on open wall areas for speed, then immediately switch to the small plate for corners and edges. This dual-plate approach keeps momentum high without wasting time on tool changes.
Water Quality Matters: Use distilled water to prevent mineral buildup in the heating chamber, which can reduce performance over time. Empty the tank after each project if the steamer will sit unused for weeks.
Stubborn Wallpaper: For adhesive that resists steam alone, apply steam, wait 2-3 minutes, then apply again before scraping. Patience with heat penetration beats aggressive scraping that damages drywall.

Pros
- Versatile enough to clean virtually every surface in your home, from kitchen tile to bedroom upholstery
- Significant cost savings by replacing multiple single-purpose cleaners with one comprehensive system
- Chemical-free cleaning method is gentler on surfaces and safer for children and pets
- Generous accessory kit means you have the right tool for nearly any cleaning job
- Strong 4.4-star rating reflects solid real-world performance and user satisfaction
Cons
- Water tank capacity may require frequent refills during larger cleaning projects or whole-home sessions
- Learning curve needed to master which accessories work best for different surfaces and avoid damage
This heavy-duty steam cleaner brings genuine versatility to home cleaning. With 1500 watts of heating power, it generates enough steam to effectively tackle tough jobs like grout lines, baked-on stovetop grime, and deeply soiled upholstery. The 22-piece accessory kit is genuinely comprehensive, covering everything from detail brushes for tight spaces to wide floor attachments, so you're not constantly hunting for the right tool.
The 16-foot cord is a practical advantage that often gets overlooked. It means you can move through multiple rooms without unplugging and replugging, which saves time and reduces frustration. The handheld design keeps the unit lightweight enough for extended use without your arm giving out, making it accessible for most users regardless of physical strength. Chemical-free operation appeals to families with young children and pets, and the sanitizing power of steam is a genuine benefit beyond just appearance.
From our research of user feedback, the main learning point is understanding which attachment to use on different surfaces. Tile and grout love the aggressive steam output, while delicate fabrics need a gentler touch. The water tank capacity is adequate for most room-sized tasks but may need refilling during larger whole-home cleaning days. Overall, this is a solid choice for homeowners seeking one powerful tool that genuinely replaces multiple single-purpose cleaners.
| Specification | Details |
|---|---|
| Power Output | 1500W |
| Design Type | Handheld Multipurpose |
| Cord Length | 16 feet |
| Included Accessories | 22 pieces |
| Primary Uses | Floors, tile, grout, upholstery, windows, car detailing, wallpaper |
| Heat Method | Steam (chemical-free) |
| User Rating | 4.4 out of 5 stars |
Getting Started: Fill the water tank with distilled water (tap water can leave mineral deposits). Plug in and allow 30-45 seconds for the unit to heat up and begin producing steam. You'll notice steam flow increase as the internal temperature stabilizes.
Surface-Specific Techniques: For grout and tile, use steady, controlled passes with the appropriate brush attachment. For upholstery, use lighter pressure and keep the nozzle moving to avoid over-saturating fabric. On windows, use the squeegee attachment with quick, overlapping strokes. For car interiors, the detail brushes work well on dashboard crevices and door panels.
Best Practices: Always test on an inconspicuous area first, especially on delicate fabrics. Allow carpets and upholstery to dry completely before use. Empty the water tank after each session to prevent mineral buildup. Store the unit in a cool, dry location and keep accessories organized in the provided storage solution.
Maximize Cleaning Power: Let the unit fully heat for at least 45 seconds before starting. The first minute of steam is hottest and most effective for stubborn grime. Work in sections rather than rushing through large areas.
Protect Your Surfaces: Test steam intensity on hidden areas of upholstery and delicate fabrics before full application. Avoid using on unsealed wood, as excessive moisture can cause warping. Grout lines can handle high-pressure steam, but delicate tile grout may crack if you use too much force.
Extend Equipment Life: Use distilled water exclusively to prevent mineral scale buildup inside the heating chamber. After each use, run water through the system briefly to flush mineral deposits. Store the unit upright in a cool place. Check all attachment connections monthly to ensure they remain tight and functional.
Who Should Buy This: Homeowners seeking a single versatile cleaning solution, parents wanting chemical-free cleaning for safety, and anyone with multiple surface types to clean regularly (tile, grout, upholstery, windows). It's also excellent for car detailing enthusiasts and renters who want portable, powerful cleaning without chemicals.
Key Considerations: Assess your water tank capacity needs based on your home size. Larger homes may want to keep distilled water nearby for refills. Consider your physical ability to handle handheld operation for extended periods. Evaluate whether you need the full 22-accessory kit or if a simpler model would suffice for your specific cleaning tasks.
Value Assessment: This unit replaces multiple single-purpose cleaners (tile cleaner, upholstery shampooer, window cleaner, grout scrubber), making the per-tool cost significantly lower than buying everything separately. The 1500W power and 16-foot cord represent solid specifications for the price point. Factor in the long-term savings from not purchasing chemical cleaners and replacement tools.

Pros
- Fast heat-up time with on-demand technology means you can start cleaning almost immediately
- Extensive attachment variety covers nearly every cleaning scenario in a typical home
- Environmentally friendly alternative to harsh chemical cleaners and floor treatments
- Highly versatile for both routine cleaning and specialized tasks like wallpaper removal
- Organized storage compartment keeps all attachments together and prevents loss
Cons
- Requires regular descaling and maintenance to prevent mineral buildup in the heating system
- Initial learning curve needed to determine correct steam settings and attachment usage for different surfaces
The Wagner 915e On-Demand Steam Cleaner stands out as a practical, all-in-one solution for homeowners tackling various cleaning challenges. The on-demand steam technology is a genuine convenience feature, allowing you to start cleaning within seconds rather than waiting several minutes for the unit to heat. This responsiveness makes the cleaner feel less like a chore and more like a practical tool you'll actually reach for regularly.
The 18-attachment system is where this cleaner truly proves its versatility. From floor cleaning heads to grout brushes, upholstery tools, and specialized wallpaper scrapers, you have options for nearly every surface in your home. The included storage compartment keeps everything organized, which matters more than it sounds when you're managing multiple accessories. Buyers consistently highlight the wallpaper removal capability as a standout feature, particularly for those tackling renovation projects without renting expensive equipment.
The steam-only cleaning approach appeals to homeowners concerned about chemical exposure and environmental impact. While the unit performs well across most household tasks, success depends on proper maintenance, particularly descaling to prevent mineral deposits in the heating system. Understanding which attachment works best for each surface takes some experimentation, but most users find the learning curve manageable and well worth the investment for the time and chemical costs saved.
| Specification | Details |
|---|---|
| Model Number | 2494184 915e |
| Brand | Wagner Spraytech |
| Type | On-Demand Steam Cleaner |
| Primary Functions | Floor cleaning, grout cleaning, upholstery cleaning, wallpaper removal |
| Included Attachments | 18 pieces (some stored in compartment) |
| Heat Technology | On-demand steam heating |
| Cleaning Method | Steam only, chemical-free |
| Storage | Built-in storage compartment for attachments |
| Customer Rating | 4.3 out of 5 stars |
Getting Started: Fill the water tank with distilled water (recommended to minimize mineral buildup), plug in the unit, and allow the on-demand heating system to activate. Most users report steam is ready within seconds of pressing the trigger.
Selecting Attachments: Choose the appropriate attachment for your task. Use floor cleaning heads for tile and hardwood, grout brushes for tile joints, upholstery tools for fabrics, and the wallpaper scraper for removal work. Start with lower steam settings on delicate surfaces and increase as needed.
Cleaning Process: Hold the nozzle 6-12 inches from the surface and trigger short bursts of steam rather than continuous streams. For grout and tough stains, allow the steam to penetrate for a few seconds before scrubbing with the brush attachment. For wallpaper removal, apply steam to soften the adhesive, then use the scraper attachment to gently lift edges.
Maintenance: Empty the water tank after each use. Descale the unit monthly (or more frequently in hard water areas) using a descaling solution designed for steam cleaners to prevent mineral deposits in the heating chamber.
Steam Burns: Steam and hot water can cause serious burns. Always wear closed-toe shoes and long pants when cleaning floors. Keep hands and face at safe distances from the steam outlet. Allow the unit to cool before changing attachments or refilling water.
Surface Compatibility: Test the steamer on an inconspicuous area first, especially on delicate surfaces like unsealed wood, certain fabrics, or wallpapered walls. Excessive heat can damage finishes, shrink fabrics, or cause wallpaper to bubble if steam is applied too long in one spot.
Electrical Safety: Never use the steamer near standing water or in extremely wet conditions. Keep the power cord away from the steam outlet. Ensure the unit is unplugged before refilling the water tank or performing maintenance.
Ventilation: Use the steamer in well-ventilated areas when possible. While steam itself is safe, good airflow helps prevent moisture buildup in enclosed spaces and allows surfaces to dry faster.
Maximize Efficiency: Use distilled water exclusively to reduce descaling frequency and extend the life of your heating system. Keep a microfiber cloth nearby to wipe surfaces immediately after steaming for streak-free results, especially on windows and glass.
Wallpaper Removal: For stubborn wallpaper, apply steam in overlapping passes and let it soak for 10-15 seconds before scraping. Work from the top down to use gravity to your advantage. Patience pays off more than aggressive scraping, which can damage underlying drywall.
Grout Cleaning: Pre-wet grout lines with a light steam pass, then apply concentrated steam while using the grout brush attachment in circular motions. For heavily stained grout, make multiple passes rather than attempting to clean everything in one pass.
Storage and Maintenance: Store the steamer upright in a dry location and ensure the water tank is completely empty before storing. Keep all attachments in the provided compartment to prevent loss. Mark your descaling schedule on a calendar to stay consistent with maintenance.

Pros
- Pleasant citrus scent makes the removal process more tolerable than chemical-heavy alternatives
- Spray trigger applicator speeds up coverage and reduces waste compared to brush application
- Effectively dissolves old wallpaper paste and adhesive buildup on drywall
- Safe to use indoors with good ventilation, no respiratory irritation concerns
- Delivers consistent results across various wallpaper types and adhesive ages
Cons
- May require longer soaking time on heavily applied or decades-old wallpaper adhesive
- 32-ounce bottle may not be sufficient for large multi-room wallpaper removal projects
WP Chomp Wallpaper Stripper is designed to simplify one of home improvement's messier tasks. The citrus-based formula addresses a common complaint about traditional wallpaper removal solutions: overwhelming chemical odors. Homeowners and DIYers appreciate that this product works effectively without filling the house with harsh fumes, making it suitable for occupied homes where ventilation may be limited.
The trigger spray bottle delivery system is a practical advantage that sets this product apart. Rather than mixing powder solutions or pouring liquids into spray bottles, the ready-to-use format with integrated trigger applicator lets you start working immediately. The spray mechanism provides even coverage and helps control saturation, reducing the likelihood of over-applying product and creating messy drips.
Effectiveness is where WP Chomp earns its reputation. Users report that the formula penetrates wallpaper adhesive layers and breaks down sticky paste residue, reducing the manual scraping effort required. While fresh wallpaper typically releases within 15-20 minutes of application, older or heavily adhered wallpaper may need additional soaking time. The 32-ounce size covers a moderate wall area effectively, though larger projects or multiple rooms may require additional bottles.
| Specification | Details |
|---|---|
| Product Name | WP Chomp Wallpaper Stripper |
| Size | 32 fluid ounces |
| Scent | Citrus |
| Delivery Method | Trigger spray bottle |
| Formula Type | Liquid concentrate |
| Primary Use | Wallpaper removal and adhesive cleanup |
| Application Surface | Drywall and painted surfaces |
| Coverage Area | Approximately 200-300 sq ft per bottle |
| Typical Soaking Time | 15-30 minutes (varies by wallpaper age) |
| Indoor Use | Yes, with ventilation |
Preparation: Clear the room of furniture and lay drop cloths on the floor. Turn off electrical outlets and cover them with tape. Ensure windows are open for air circulation.
Application: Spray WP Chomp directly onto the wallpaper surface using the trigger bottle. Work in manageable sections (2-3 feet wide). Saturate the wallpaper thoroughly but avoid excessive pooling at the base of walls.
Soaking: Allow 15-30 minutes for the formula to penetrate and break down adhesive. Older wallpaper may need additional time. You'll know it's ready when the paper begins to bubble or curl at the edges.
Removal: Using a plastic scraper or putty knife, gently lift wallpaper from the wall. The paper should separate cleanly. Respray stubborn areas and wait a few more minutes before scraping.
Cleanup: After wallpaper removal, spray any remaining adhesive residue with WP Chomp and wipe clean with a damp cloth. Allow walls to dry completely before priming or painting.
Score Before Spraying: Use a scoring tool to perforate the wallpaper surface lightly. This helps the liquid penetrate multiple layers and speeds up the soaking process, especially on vinyl-coated papers.
Work Systematically: Start at the top of the wall and work downward. This prevents the solution from running over already-treated areas and maximizes efficiency.
Test First: Before treating the entire wall, spray a small corner section and wait 20 minutes to assess how your specific wallpaper responds. Soaking times vary based on wallpaper age and adhesive type.
Humidity Helps: Running a humidifier in the room while wallpaper soaks can improve results. Moisture helps the formula work more effectively, especially in dry climates.
Reuse the Spray Bottle: Once empty, the trigger bottle can be refilled with homemade removal solutions or other household sprays, extending its value for future projects.
Ventilation: Always work with windows open and doors to other rooms closed. The citrus scent is pleasant, but adequate air circulation ensures you're not inhaling concentrated vapors.
Skin Protection: Wear latex or nitrile gloves to protect your hands from prolonged contact with the solution. Wash hands immediately after use if any product contacts skin.
Eye Safety: Avoid spraying near your face. If product contacts eyes, rinse immediately with clean water for several minutes and seek medical attention if irritation persists.
Electrical Safety: Turn off power to wall outlets and light switches before beginning. Cover them with painter's tape to prevent liquid contact with electrical components.
Drywall Care: Avoid over-saturating drywall, which can cause softening or damage. Spray lightly and allow soaking time rather than repeatedly spraying the same area.
Storage: Keep the bottle in a cool, dry place away from direct sunlight. Store out of reach of children and pets. Do not ingest or use on skin as a personal care product.

Pros
- Fast heat-up time means less waiting between cleaning tasks
- Six adjustable steam levels give you precision control for delicate and heavy-duty cleaning
- Comprehensive accessory kit covers most household cleaning needs without additional purchases
- Chemical-free operation is safer for families with kids and pets
- Lightweight and maneuverable for cleaning baseboards, corners, and vertical surfaces
Cons
- Water tank capacity may require frequent refills for larger cleaning projects
- Some users report inconsistent steam pressure at lower settings
This portable steam cleaner delivers solid performance for everyday household cleaning tasks. The 15-second heat-up time is genuinely convenient, allowing you to move quickly from one room to the next without long waits. The six-level steam adjustment gives you meaningful control, so you can dial down the intensity for delicate surfaces like certain tile finishes or crank it up for stubborn grout and baked-on kitchen grime.
The 16-piece accessory kit is a major strength. You get specialized nozzles, brushes, and attachments that handle tile grout, car detailing, upholstery, and general surface cleaning. This means you're not buying additional tools separately right out of the box. The handheld design makes it easy to maneuver around baseboards, under furniture, and into tight bathroom corners where traditional mops can't reach.
Real-world feedback from owners highlights its effectiveness on grease and mineral deposits, though some note that the water tank is modest in size, requiring refills on larger jobs. For typical home maintenance and spot cleaning, this steamer covers the basics well. It won't replace a full-size floor steamer for whole-house projects, but as a versatile handheld solution for targeted cleaning and detail work, it punches above its price point.
| Specification | Details |
|---|---|
| Type | Handheld Portable Steam Cleaner |
| Heat-Up Time | 15 seconds |
| Steam Levels | 6 adjustable settings |
| Accessories Included | 16 pieces (nozzles, brushes, extensions) |
| Primary Uses | Tile, grout, grease, dirt, upholstery, car detailing |
| Cleaning Method | Steam-based (chemical-free) |
| Design | Lightweight and handheld for easy maneuverability |
Getting Started: Fill the water tank with distilled water (recommended to prevent mineral buildup). Plug in the unit and allow 15 seconds for it to heat up. Select your desired steam level from 1 to 6 depending on the cleaning task.
Cleaning Tips: For delicate surfaces like certain tile finishes, start at level 1 or 2. For heavy grease and grout, move to levels 4-6. Attach the appropriate accessory (brush, nozzle, or extension) for your specific task. Glide or work the steamer slowly across the surface to allow the steam to penetrate and loosen dirt.
Best Practices: Test on an inconspicuous area first, especially on porous materials. Allow surfaces to dry completely before walking on them. Empty the water tank after each use to prevent mineral accumulation and mold growth.
Steam Burns: Steam is extremely hot. Always keep hands and skin clear of the steam outlet. Use the provided nozzles and extensions to maintain safe distance from active steam. Allow the unit to cool before refilling the water tank.
Electrical Safety: Never use the steamer near water sources beyond the tank itself. Keep the power cord away from the steam outlet. Do not immerse the unit in water. Inspect the cord for damage before each use.
Surface Compatibility: Avoid using on unsealed wood, as steam can cause swelling and warping. Do not use on delicate fabrics without testing first. Ensure proper ventilation in enclosed spaces like bathrooms to avoid excessive moisture buildup.
Maintenance: Use distilled water only to minimize mineral deposits in the heating chamber. Clean the tank regularly and run distilled water through the system periodically to flush out buildup. Store the unit in a dry location to prevent mold.
Efficiency Hacks: Pre-treat heavily soiled areas by letting the steam sit for a few seconds before scrubbing. Use the brush attachments in circular motions for better dirt removal. Combine steam cleaning with a microfiber cloth for streak-free results on glass and tile.
Versatility: This steamer works great for seasonal tasks like refreshing grout before painting, cleaning baseboards before new carpet installation, and detailing car interiors. Keep the 16 accessories organized in a labeled container so you can quickly grab the right tool for each job.

Pros
- Chemical-free steam approach is safer for indoor air quality and eliminates toxic fumes
- Dual handles provide better control and stability compared to single-handle designs
- Extended runtime reduces interruptions and keeps workflow smooth on larger projects
- Lightweight construction makes it manageable for overhead work without arm strain
- Automatic safety shutoff gives peace of mind during unattended moments
Cons
- Steam-based removal works slower on heavily adhered or aged wallpaper compared to chemical strippers
- Requires access to water and electrical outlet, limiting portability to nearby power sources
The Moccha Wallpaper Steamer delivers a practical, health-conscious approach to one of home improvement's messier tasks. By using steam instead of harsh chemicals, it eliminates concerns about toxic fumes and ventilation requirements, making it safer for families with children or pets. The dual-handle design is a thoughtful feature that reduces strain during extended use, a real consideration when you're holding a tool overhead for hours at a time.
Performance-wise, this steamer excels at loosening wallpaper adhesive on standard installations, though heavily layered or decades-old wallpaper may require patience or pre-scoring. The extended runtime is genuinely useful for mid-size to larger rooms, as you won't constantly stop to refill the water tank. Heat recovery is reasonably quick, and the automatic safety shutoff prevents damage from accidental overheating, which protects your investment.
For homeowners seeking a DIY-friendly, environmentally conscious wallpaper removal solution, this steamer represents solid value. It's most effective on moderately adhered wallpaper in homes built within the last 20-30 years. Expect a learning curve on technique, but once you dial in pressure and dwell time, the results are reliable and satisfying.
| Feature | Details |
|---|---|
| Heating Technology | Steam-based, chemical-free |
| Handles | 2 ergonomic handles included |
| Runtime | Extended (long-run time) |
| Weight | Lightweight portable design |
| Safety Features | Automatic power-off protection |
| Power Source | Electric (cord-dependent) |
| Application | Wallpaper removal, general surface cleaning |
| User Level | Beginner to intermediate DIY |
Preparation: Fill the water reservoir with distilled or filtered water to extend tank life. Plug in and allow 5-10 minutes for the steamer to reach full heat. Score heavily adhered wallpaper lightly with a scoring tool to help steam penetrate adhesive.
Removal Process: Hold the steamer plate firmly against the wallpaper for 20-30 seconds, allowing steam to soften the adhesive. Use both handles for stability and control. Work in sections from top to bottom, overlapping slightly. Once adhesive softens, gently peel wallpaper away with a putty knife or scraper, being careful not to gouge the wall.
Best Practices: Maintain steady, even pressure rather than aggressive scrubbing. Allow steam to do the work. Take breaks to avoid hand fatigue. Empty the tank after use and allow the unit to cool before storage. For stubborn spots, re-apply steam rather than forcing the paper off.
Steam Burns: Steam is extremely hot. Always wear protective gloves rated for heat resistance and long sleeves. Never touch the heating plate directly. Keep hands and face away from steam discharge. Allow adequate cool-down time before handling or storing.
Electrical Safety: Use a grounded outlet and avoid extension cords if possible. Keep the power cord away from water and wet surfaces. The automatic shutoff prevents overheating, but never leave the steamer unattended while powered on. Unplug before refilling the water tank.
Ventilation: While chemical-free, ensure good room ventilation to manage humidity from continuous steam use. Open windows and use fans to prevent moisture buildup. Be cautious on drywall that's already damaged or soft, as excessive steam exposure can cause swelling or deterioration.
Is This Right for You? Choose this steamer if you prefer avoiding chemical fumes, have wallpaper that's moderately adhered, and value ease of use. It's excellent for homeowners sensitive to odors or those with ventilation limitations. Skip it if you're tackling multiple layers of ancient wallpaper or need the absolute fastest removal method.
Room Size Considerations: The extended runtime makes this suitable for medium to large rooms without constant refilling. For small bathrooms or accent walls, runtime is more than adequate. For whole-house projects, plan to refill once or twice, depending on tank capacity.
Wall Type Matters: This steamer works best on standard drywall or plaster. Test on a hidden corner first if your walls are textured, wallpapered with foil backing, or have specialty finishes. Pre-1980s wallpaper may require longer dwell times or chemical assistance for optimal results.
Buying Guide: How to Choose the Right Wallpaper Steamer
Not every steamer handles wallpaper removal with equal efficiency. A small handheld unit that excels on grout lines will run dry halfway through one wall. For stripping jobs, three specifications matter more than everything else: tank capacity, steam plate size, and continuous run time. Use the sections below to match the right machine to your project scope.
Tank Capacity and Run Time
Tank size directly controls how long you can work before stopping for a refill. A compact one-liter reservoir typically delivers fifteen to twenty minutes of steam, which is barely enough for a small bathroom wall. For a full room, you want at least 1.5 liters, and dedicated wallpaper steamers with tanks in the 1.2 to 4.5 liter range can run for one to two hours continuously. Running dry mid-wall forces you to wait for the unit to cool before you can safely refill it, which kills momentum and lets the adhesive reharden on sections you have already softened. If your project spans multiple rooms, prioritize the largest tank you can manage comfortably.
Pairing a steamer with a sharp pry bar speeds up the physical stripping process once the adhesive has softened, especially along baseboards and window trim where the paper tends to grip most stubbornly.
Steam Plate Size and Shape
Dedicated wallpaper steamers use a flat rectangular plate that you press flush against the wall surface. A larger plate covers more area per pass, which directly speeds up the job. Look for a steam plate that measures at least six by ten inches. Some multipurpose units include small round brush attachments that work well for grout and tile but are impractical for large wall surfaces because you would need dozens of individual passes to cover what a proper steam plate handles in one. If you plan to use the steamer for wallpaper removal primarily, choose a model that ships with a purpose-built rectangular plate rather than one that treats the plate as an optional accessory.
Hose Length and Ergonomics
Most dedicated wallpaper steamers separate the water tank (which sits on the floor) from the steam plate (which you hold against the wall) via a flexible hose. A hose length of ten to twelve feet gives you a comfortable working radius without dragging the tank every few feet. Look for a hose with a cool-touch coating or insulated sleeve, since the steam passing through it gets extremely hot and an unprotected hose is a burn hazard. Lightweight plate designs with ergonomic handles reduce fatigue during long sessions. If you are working at height, a good-quality ladder rated for home renovation work keeps you stable while you hold the plate against upper-wall sections.
Heat-Up Speed
Faster heat-up reduces idle waiting time at the start of a session. Handheld steam cleaners with small boilers can reach operating temperature in fifteen to thirty seconds, which is convenient for quick touch-up jobs. Dedicated wallpaper steamers with larger tanks typically take three to eight minutes to build pressure but then deliver a steadier, wetter steam output that penetrates multiple layers of old wallpaper more effectively. For a single-room project, a fast heat-up is a nice convenience. For a whole-house renovation, sustained steam quality matters more than how quickly the unit is ready to go.
Chemical-Free Operation
One of the most underrated benefits of wallpaper steamers is that they work with plain tap water and require no chemical stripping solutions. This matters for indoor air quality, especially in older homes where disturbing wall layers can already release dust and particles. Chemical-free operation also means no harsh residues left on the wall surface, so your paint or primer adheres cleanly once the wall dries. After stripping, finishing the surface properly often involves quality paint rollers and possibly a coat of sizing before you paint, so factor that into your overall project timeline.
Multipurpose vs. Dedicated Wallpaper Steamer
Dedicated wallpaper steamers are purpose-built for stripping jobs. They feature large tanks, long hoses, and oversized steam plates optimized for wall coverage. Multipurpose steam cleaners come loaded with attachments for tile, grout, upholstery, and car interiors in addition to wallpaper, but their steam plates are generally smaller and their tanks hold less water. If your only goal is stripping wallpaper, a dedicated model delivers faster results. If you want a single machine that handles a dozen household cleaning tasks after the renovation is done, a multipurpose unit with a wallpaper plate attachment justifies the higher price through versatility. Models like the Wagner 915e and the heavy-duty 1500W steam cleaners on this list fall into the multipurpose category, while the Wagner 715, Wagner 725, Goplus, KITLUCK, and Moccha models are purpose-built strippers.
Wattage and Steam Pressure
Most electric wallpaper steamers draw between 1000W and 1500W. Higher wattage generally means faster heating and more consistent steam output under load, but the difference is most noticeable when you are pushing the machine hard against thick, multi-layered wallpaper. For single-layer vinyl or paper wallcoverings on modern drywall, even a 1000W unit produces enough steam to soften the adhesive within thirty to sixty seconds of plate contact. Where wattage matters more is on older plaster walls with multiple decades of overlapping wallpaper layers, where sustained high-temperature steam is the only thing that penetrates deep enough to release the bottom-most layer cleanly.
Safety Features
Look for models with an automatic shut-off that triggers when the water level drops critically low, preventing the heating element from burning out. A cool-touch hose and an insulated steam plate handle reduce accidental burns during extended use. Some units include a pressure-release valve that prevents dangerous steam buildup if the nozzle becomes blocked. Always read the manufacturer instructions before first use, allow the unit to cool completely before refilling, and keep children and pets out of the work area. Protecting your walls and floor from steam moisture is also worth considering: lay drop cloths and use a stud finder to map out where your wall structure is before aggressively scraping, so you avoid denting or cracking areas over hollow sections between studs.
Wallpaper Chemical Stripper as a Supplement
One of the products in our lineup, the WP Chomp citrus-scent wallpaper stripper, is not a steam machine but a concentrated chemical solution applied by spray trigger. It works well as a supplement to steam on stubborn sections where the adhesive has hardened to the point that steam alone struggles to penetrate. Using both in combination, steam to soften the bulk of the wall and a targeted chemical application on the most resistant patches, is a common professional approach for rooms where previous owners applied multiple coats of heavy paste. For lighter projects, the steamer alone is typically sufficient. If you are finishing the walls with a fresh coat of paint after stripping, paint sprayers can dramatically cut your finishing time once the surface is clean, primed, and dry.
Cleaning Up After Wallpaper Removal
Once the paper is off, residual paste and adhesive remain on the wall surface and must be cleaned before priming or painting. Warm water and a sponge handle light residue. For stubborn adhesive, a diluted solution of the WP Chomp stripper applied with the spray trigger and left to dwell for a few minutes before wiping works well. Allow the wall to dry fully, typically 24 hours minimum in a well-ventilated room, before applying primer. Any cracks or gouges from scraping can be filled with lightweight joint compound, sanded smooth with an oscillating multi-tool fitted with a sanding pad, and then primed. After the renovation is complete, if you are planning further improvements like new trim or molding, finish nailers make reinstalling baseboard and door casing far faster than hand-nailing.
Why Trust HomeThru
HomeThru is an independent editorial platform. We do not sell products, handle orders, or process returns. Our recommendations are built entirely on independent research: we analyze verified buyer reviews across thousands of purchases, compare manufacturer specifications, cross-reference performance data from owner communities, and apply a consistent evaluation framework to every category we cover. For wallpaper steamers, we focused specifically on run time reliability, steam plate effectiveness, hose quality, tank capacity, heat-up speed, and long-term durability based on owner feedback after extended use. No brand pays for placement or influences our rankings. When we evaluate renovation tools, we apply the same rigorous standards we bring to tile cutters, miter saws, and caulk guns. Our goal is to give you the clearest, most honest picture of each product so you can make the right decision for your specific project.
Final Thoughts
Wallpaper removal does not have to be a miserable weekend project. With the right steamer, what used to take days of scraping and chemical soaking becomes a manageable afternoon job. After carefully reviewing all ten models in this guide, here are our top recommendations by use case:
- Best Overall: Wagner Spraytech 725 Wallpaper Steamer delivers an excellent balance of run time, dual steam plate versatility, and a proven track record across more than a thousand verified reviews. It is our top pick for homeowners tackling room-scale projects.
- Best Budget-Friendly Option: Wagner Spraytech 715 Power Steamer brings reliable chemical-free performance at a lower price point, making it ideal for a single-room job or a first-time renovation project.
- Best for Large Tanks and Long Run Time: Goplus Wallpaper Steamer stands out for its generous water tank and ten-foot hose, giving you extended uninterrupted working sessions that keep the job moving without constant refill breaks.
- Best Multipurpose Performer: Wagner Spraytech 915e On-Demand Steam Cleaner earns its premium price through eighteen included attachments, making it the right choice for homeowners who want one machine that handles wallpaper today and deep cleaning tasks year-round.
- Best Value for Versatile Cleaning: Heavy-Duty 1500W Multipurpose Steam Cleaner packs twenty-two accessories and a sixteen-foot cord into a package suited for anyone who needs wallpaper capability plus serious whole-home cleaning power.
Before your renovation is finished, you may also want to look into power planers for smoothing door edges that swell after humidity exposure during stripping, or brad nailers for reattaching any trim you had to remove to access the wallpaper along wall edges. A well-equipped renovation toolkit makes every phase of the project faster and cleaner.
Frequently Asked Questions
How long does it take to steam off wallpaper in a typical room?
A standard bedroom with a single layer of paper-backed wallpaper typically takes two to four hours with a dedicated steamer working at a steady pace. Rooms with vinyl-coated wallpaper, multiple overlapping layers, or heavily sized plaster walls can take considerably longer. Working with a partner, one person steaming and one scraping, is the fastest approach for large rooms.
Can a wallpaper steamer damage drywall?
Yes, it can if you are not careful. Holding the steam plate against bare drywall for too long saturates the paper facing of the drywall and causes bubbling or even delamination. Keep the plate moving and limit dwell time to thirty to sixty seconds per section. Older plaster walls are more forgiving. If your walls are unpainted drywall or very thin board, test a small hidden area first and work in shorter intervals.
Do I need to score the wallpaper before steaming?
Scoring is recommended for vinyl-coated or foil wallpaper where steam cannot penetrate the face layer easily. A scoring tool perforates the surface and allows steam to reach the adhesive. For standard paper wallpaper, scoring is optional but speeds things up. Avoid pressing too hard with the scorer on drywall-backed installations, as deep scores can cut into the wall surface beneath.
Is a chemical wallpaper stripper better than a steamer?
Chemical strippers work well for single layers on modern drywall, especially in small spaces where setting up a steamer is inconvenient. Steamers outperform chemicals on multiple layers, old paste, and large surface areas because the heat penetrates more deeply and works faster over an entire room. Many experienced renovators use both, applying chemical stripper to stubborn patches the steamer could not fully soften. Understanding the range of renovation tools available for surface preparation helps you choose the right approach for each wall.
How do I prepare the room before using a wallpaper steamer?
Move furniture away from the walls and cover flooring with drop cloths, since steam causes adhesive and paper strips to fall in messy, wet clumps. Remove outlet and switch covers and, ideally, turn off the circuit to those outlets at the breaker box since moisture and live electrical connections are a serious hazard. Ventilate the room by opening windows, as prolonged steam use raises humidity significantly. Have a bucket and sponge nearby for wiping down stripped sections and collecting fallen paper debris as you work. Laser levels can help you mark consistent horizontal sections across the wall so you work in organized strips rather than jumping around the room randomly.




Write Your Review
No reviews yet. Be the first to share your experience!